We had out frost scare last week, then it got nice and warm again. It’s that period ever fall when we get a break, then it’s like God’s testing us to see if we’ll make good use of the time He gave us. Tonight it’s not a frost scare, but a full blown FREEZE warning. The high today was 45 degrees and it’s already down to 36 degrees at 9:00 P.M. But we had plenty of warning. Our good old NOAA (by the way, I misspelled it last time!) weather radio kept us informed of a really cold front headed our way and we’ve had two days to get ready.
 There won’t be any “cover plants”; it’ll be too cold for that to do any good. We had the same thing happen last year. We didn’t think it would get so cold and it did; plants froze black under all the tarps we spent hours spreading out.
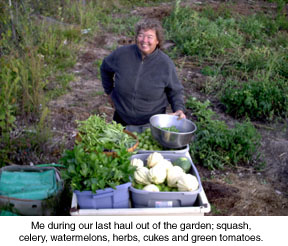
This time we knew it would freeze hard and we’ve spent two full days picking everything in the garden that would not live through a freeze; tomtoes, peppers, squash, melons, herbs and the potatoes and onions we’d dug to see how they looked.
I was getting this feeling of panic this afternoon. David, of course, was in school and I had a whole lot of stuff to get in before dark. But then lo! Our friend, Jim, called to see if he could get a few wheelbarrows full of sand for his septic pipe repair. I told him sure thing and kept on picking. He came over, bearing a chile plant in a pot for me, then went to dig sand into his pickup.
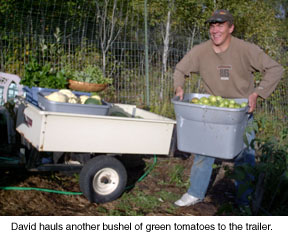
Awhile later, he walke down and asked if he could help; he and Jeri had finished picking their garden that morning. Because I was not insane, I graciously and very gratefully accepted his offer. Together, we picked two bushels of green tomatoes to add to the two bushels I had already picked and hauled in yesterday.
 And David voluntarily skipped football practice to help me finish up the garden. We picked, picked and picked. He hauled bins and buckets full of produce up to the house and we stashed it in the new greenhouse. It’s now pretty much weathertight, except for a few minor cracks and will keep the harvest cool but unfrozen until we can sort and use it where we need to.
I picked the green tomatoes into several different plastic totes, according to their size and ripeness. When I do this, each box ripens in the house at about the same time, avoiding rotten tomatoes in the middle of a box. I actually lose very few this way and end up canning a whole lot of tomato products after it freezes, all at once, rather than a little at a time.
Because we can’t stand to have beautiful plants killed by the freeze, David and I dug up three nice bell pepper plants to join those already in our greenhouse, and the chile that Jim brought over this afternoon. Then, at dark, we dug up a Chilly Chile (non-hot chile) from the flower bed in the yard. Sigh. I really hate to lose all my nice annuals and other frost sensitive plants.
But that’s how it is when you live with nature; you soon find out that nature isn’t always gentle and kind; it has no mercy or feelings. When stuff happens, it happens and you’d better learn to deal with it. Our here in the backwoods, cute little animals are born and you also find a chick drowned in the drinking water or a baby goat layed on by it’s own mother. Those little seeds you’ve nurtured all spring, the plants they become all summer will also die when the freeze comes. It’s all part of homesteading and it makes each and every success so much more gratifying and wonderous.
I’ve posted readers’ questions and answers below:
Mirro pressure canner
My father gave me his 12 quart mirro pressure canner and cooker model m-0512 I would like to can green beans there are no instructions with it and I cant find a manual on line, I don’t know
the first thing about a pressure cooker.
Pam Duncan
Waterford, Michigan
You’re not so far in the dark as you think, Pam. Just buy a Ball Blue Book canning manual at you local grocery or hardware store (Wal Mart even has them!) and follow the directions in there. It’s simple and quick to learn to can green beans. They are nearly impossible to mess up. That’s why most beginners start with them.
Basically you’re going to add a couple of inches of water to the canner to produce the steam that processes the food. Put in the wire or aluminum rack or plate to keep the jars off the bottom of the canner. Then you heat the canner up a bit, add your jars of food, put the lid on it and tighten it down securely with the petcock or steam valve open. Turn on the heat and wait until the steam ejects forcefully for a few minutes.
Shut down the petcock or steam valve to let it build up pressure to 10 pounds. Process the beans or 25 minutes for pints or 30 minutes for quarts. Turn off the heat and let the dial return to zero. Carefully open the steam valve to let any remaining steam blow off then open the lid away from you so your face doesn’t get burned by the steam in the kettle.
Remove the jars to a folded dry towel on a counter or table to cool. That’s it.
This is an abreviated instruction, but will give you a good idea. Again, buy or borrow a book and read the directions and you’ll feel more confident. Good canning!
—————–
Pam, it just dawned on me that the Mirro Model 0512 has a weight instead of a gauge. With the weight, there are three holes, one for 5, 10 and 15 pounds pressure. You’ll use the 10 pound one unless you live at an altitude above 2,000 feet.
With the weight, you exhaust the canner, then put the weight on the steam valve. Begin timing when the weight jiggles 2-3 times per minute. If it jiggles more, turn down the heat a bit; less, turn it up a bit until it gets right. Then hold it there by gentle heat adjustments. — Jackie
Using plums
We live in east central Minnesota – about 1/2 way between Duluth and the twin cities, just 20 miles west of the Wisconsin border. We started keeping bees this year (the first time in the 8 years my husband has owned the land-I’m a 3 year newbie) on our acreage and have found that we have a great deal more fruit trees than we had imagined. Along with a pear tree (that no one this far north can believe has survived) we are blessed with several different wild plum trees. There were a couple that matured red/orange that were pretty good fresh, just very tart at the skin. But there are several trees that are a more yellow variety that give the impression of taking a full tablespoon of alum into your mouth. They are so astringent to be impossible to eat. I have not attempted to process them in any way as of yet. We have, as well, one tree that has a green fruit that is as hard as an apple but a little smaller than a crabapple (which have been wonderfully plentiful this year as well). Could you direct me on how I could find ways to use the plums (besides the obvious bear decoy away from the honey) and identify the green fruit? There must be 60+ pounds of the astringent plums waiting to be processed. If I can find no use for them between now and frost I’ll remove the trees in hopes that the others will expand into their old space.
Kara Nelson
Askov, Minnesota
For your astringent plums, try making a batch of jelly from them when they get so ripe they are starting to fall off. They will be softer to the squeeze than when they are unripe. Then taste your jelly right away by putting a dab in a saucer when you fill your jars. If this tastes fine, you’re in business. If not, don’t make any more!
I don’t know what your little green fruit is. Cut one open. If it has “apple seeds” it is of the apple family. My guess would be that it’s an apple gone “wild” or reverted back to it’s ancestors. This is not necessarily a bad thing; you can graft a number of good tame varieties onto it and make your own 5-in-one apple gree with Minnesota hardy varieties on a root stock that is already proven hardy.
Besides jelly, I make plum jam, plum leather and a plum dipping sauce that’s basically jam with a little almond extract and hot pepper mixed in with it to give it zing. Wild plums dry well, but you need to squeeze the skin off when you rehydrate them because it is so tart. — Jackie
Bread and butter pickles
Bread & Butter Pickles – I just read through your recipe, do they need to go through a waterbath after the jars have been filled? How do I store – refrigerator or on a shelf?
Sandy LaBranche
Exton, Pennsylvania
I do not waterbath my bread and butter pickles and have never had a seal fail or a jar go bad. Without the extra boiling temperature, the pickels stay very crisp. With the waterbathing, they can get a little soft; not bad, but just a little more soft.
I work very fast and make sure I get my pickels packed quickly so that the jars seal. To be extra certain of a safe seal, you can waterbath process the jars for 10 minutes. — Jackie


