By Robert Van Putten
There comes a time when all homesteaders start thinking of livestock, and 14 years ago, we were no exception. But before we could get any livestock, we needed a barn. Because we like to be as self-reliant as possible and don’t have a lot of coin, we decided to build our own.
There were many things we took into consideration when designing our barn. We wanted to house several milk goats and a couple of horses as well as have a place to milk the goats and store saddles, tack, and tools. During the winter, we often get snowed in for many months, which meant we needed to design our barn with room to store a six-month supply of feed. Our barn needed to withstand tremendous snow loads and have doors that could be used without shoveling tons of snow out of the way. We’re off grid with no electric lighting, so the barn would need plenty of windows for natural light. Our homestead has no flat ground, so a compact barn (with less bulldozer work required) would save us money. I wanted a barn layout that would minimize the amount of work associated with the daily chores that go along with keeping animals. It needed to be as easy as possible to build because I’m a sloppy, impatient, amateur carpenter. And perhaps above all else, it needed to be cheap.
Barn layout & design
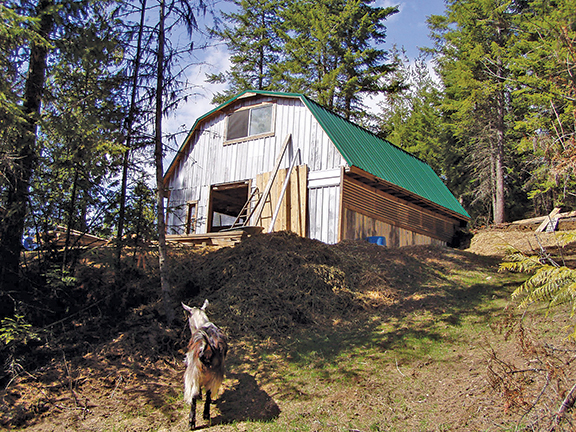
What we came up with was a rustic-looking barn. The bottom half is 22 feet wide and 24 feet long. The top part is 24’x24′, giving a one-foot overhang on the sides.
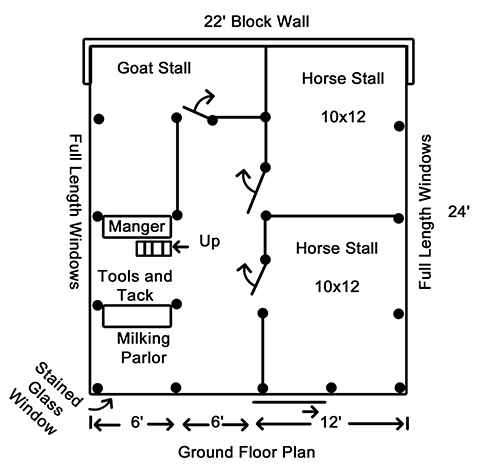
On the ground floor, I divided one long side into two 10’x12′ horse stalls.
A six-foot-wide aisle runs from the front of the building to the 12’x12′ L-shaped goat stall in the back. To the left of the entrance is a 6’x6′ bay for milking goats. On the next left is a 6’x6′ bay for tools, tack, saddle racks, a ladder to the hayloft, and a hay manger open to the goat stall in the back.
It was my wife’s idea to build the barn up against a bank. This reduced the amount of flat ground we needed to bulldoze and it allows us to walk right into the second story hayloft. It’s very nice to be able to back a pickup right up to the hayloft door and just throw the hay in. This turns one of our biggest disadvantages — hilly terrain — into an advantage. A hatch in the hayloft floor lets us drop hay right into the manger.
The design of the back wall was the biggest design problem. I didn’t want to pour a huge concrete wall because of the difficulty and cost involved. After tossing around many ideas, we decided to use dry-stacked blocks that we would fill with concrete by hand, one coffee can at a time.
The rest of the lower barn is an ordinary pole barn, supported by logs I cut from my property. For light, it has full-length clear plastic panels on the side walls up high enough not to be damaged by animals and is protected from snow by the overhanging roof. The panels work great and admit a good deal of light.
Below the windows, I sided the barn with rough cut 1-inch boards, tar paper, and salvaged metal roofing. I topped the barn with homemade gambrel trusses, which form the second story hayloft.
Building the barn
I started on the project in the winter of 2004, felling trees, peeling the bark off them where they lay, then leaving them propped up on their stumps until I needed them.
During the summer of 2005, I gradually scrounged building material from all over town, and came away with a big pile of plywood scraps and miscellaneous lengths of 2x4s, 2x6s, and 2x8s. I even scrounged up a bucket of old hinges and plenty of roofing metal.
We had been saving our coin for an excavator and hired one at the beginning of the fall. He carved us a new flat spot where a hill formerly was, as well as dug us a pond, pulled stumps, made new roads, and generally changed the face of our homestead.
Then came the hard part. My wife and I dug a footing trench for the back wall, filled it with gravel, set up forms and rebar, and poured a little footing slab for the block wall.
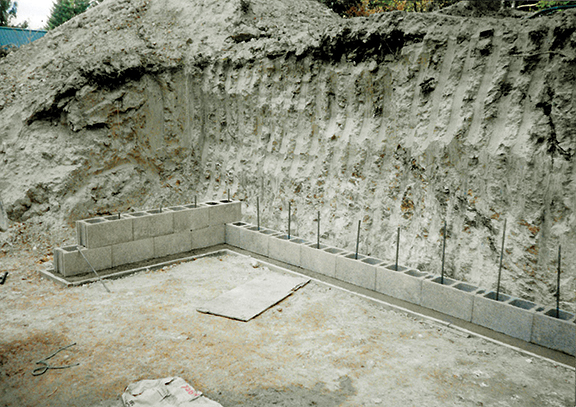
Then we dry-stacked concrete blocks to make the back wall, and filled the blocks with concrete as we went along. This was a lot of work, and took the two of us a total of seven days, often working in the fall rains and mixing all the concrete in our little electric mixer. Total weight of the back wall is about 12,000 pounds.
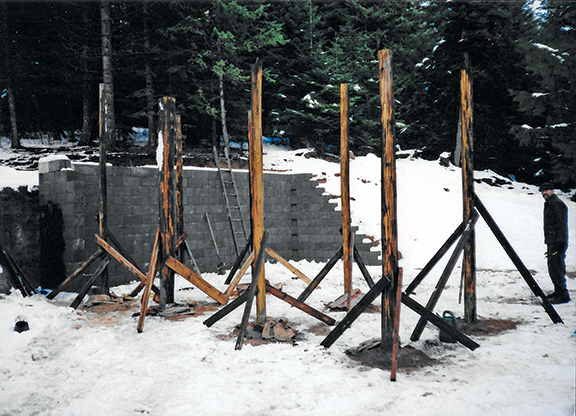
We set the cedar uprights after the first snowfall in freezing weather. We treated the posts by burning the butts in a campfire and soaking them in used motor oil. (For a detailed explanation of this process, see “Wooden posts that last,” Backwoods Home Magazine, Issue #158, March/April 2016.)
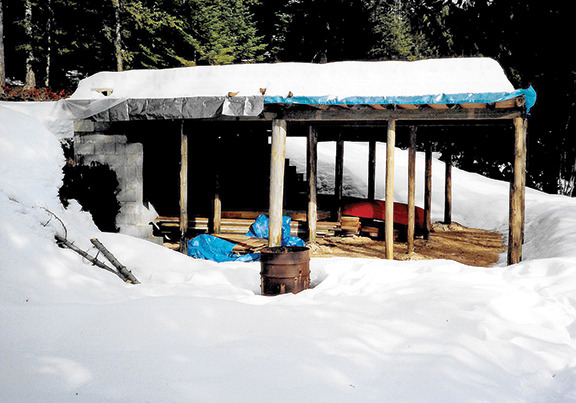
Then we raced to get the top on. We cut the upright posts level, topped them with horizontal 4″x6″ girders, and decked the span between the girders with logs on 18″ centers and a floor of two layers of ¾ plywood. (For details on this method, as well as working with dry-stacked blocks and making gambrel trusses, see “Build an off-grid root cellar, garage, and bunkhouse,” Backwoods Home Magazine, Issue #166, July/August 2017.) At this point, we covered everything with tarps and left it for the winter.
The next spring, the building site was a sea of mud. Rather than stomping around in it, we decided to work elsewhere and tore down an old barn from a relative’s property to make use of the materials. We worked at this six weekends in a row, often in the rain and once during a wet, driving spring snowstorm. Ever dismantle a metal roof in the snow? It ain’t fun.
When summer rolled around, we eventually started work on the trusses for the barn. They were laid out on the hayloft floor because it’s the biggest flat spot on the homestead! They are made of 2x4s with gussets of salvaged wafer board and plywood.
By the end of the summer, we had piled up 25 trusses and framed and sheathed the loft end-wall. The outside of the block wall had been tarred, covered with heavy plastic, and back-filled. It was time for a barn raising party! With the help of a few friends, we raised the end wall and all the trusses in one day. The trusses are on 12″ centers because of the heavy snow load they need to support. They are only 2×4 trusses, and I was being conservative.
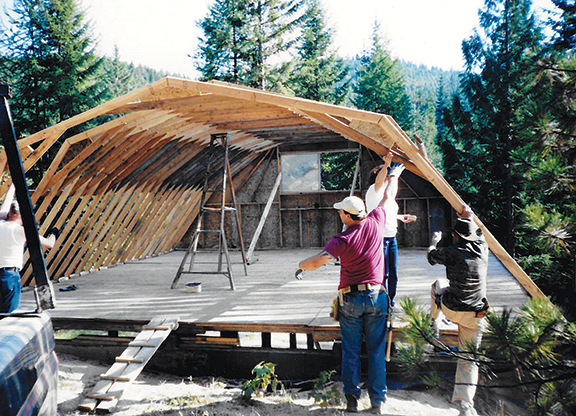
When fall hit, we went into overdrive again to get the roof on before snow flew. There is nothing like the taste of snow in the air to get a man working. Sheathing the roof was a bit of a challenge because I am certainly no carpenter, and there wasn’t a single straight or true line in the whole structure. But who cares? I’m not good enough a carpenter to be worried about that sort of thing. I simply snapped a chalk line from one end of the trusses to the other, and used that as a reference mark to set the roof on, shimming things where absolutely necessary.
The roof overhangs the sides by a full foot. This helps keep the snow at bay and simplified the building process. Since the top and bottom are completely separate structures, they don’t need to line up perfectly with each other.
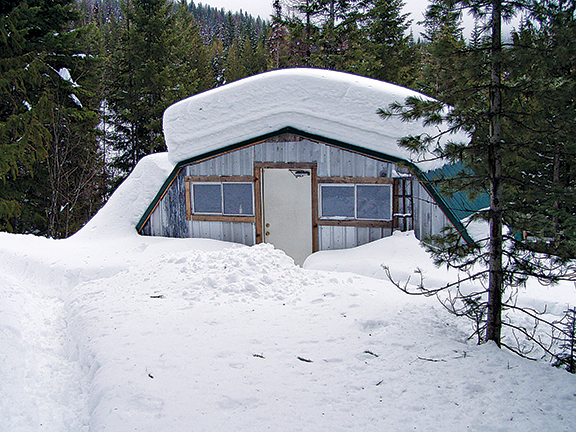
The bottom of the roof is quite steep, and working on it was a little precarious. We used temporary toe boards while laying down the 7/16″ wafer board and tar paper. When it came to putting the metal on, I worked from above in a rappelling harness while my wife fastened the bottom of the sheets while working on a ladder below. It’s amazing, but only a few years ago we’d never built anything, and now we can walk up a steep ladder with a full sheet of plywood on our back, sling it into place, and hammer it down to make a roof. It’s always surprising what can be accomplished if one works slowly, carefully, but consistently toward one’s goals.
Once the loft was done we hastily stacked in six tons of hay. We got the animals out of the pasture on Thanksgiving night, having worked all day to complete the lower siding and stalls. To finish things off, we eventually made a sliding door for the lower barn, got the milking bench off our porch and into the barn, and put up shelves.
Using the barn
I’m happy to report that the barn has been a great success. In the morning, I enter the hayloft, toss down enough hay for all the inhabitants at once, climb down the ladder, and distribute the hay. I take the goats out of their stall one at a time to the milking bench in front, where I clean and milk them, then turn them out. I was worried the place was a bit tight for horses, but they don’t seem to mind it at all.
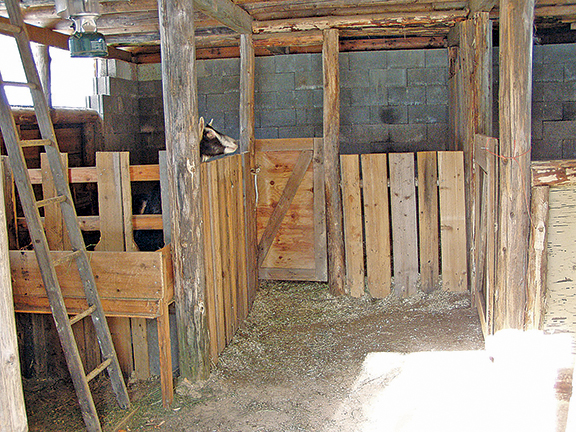
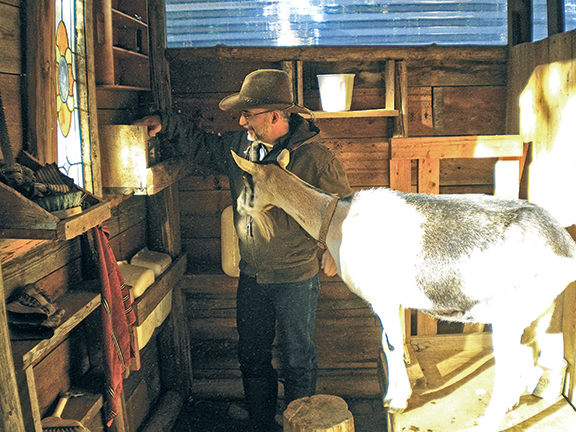
During the building process, I was careful to line the horse stalls with thick plywood and heavy cedar sill logs, so a horse cannot poke a hoof under the wall and get “cast.” The horses stay outside in all but the worst weather anyway.
If I built this barn all over again, I’d use a fibered, surface-bonding cement on the block wall, inside and out, for greater strength and waterproofing. The back of the barn does get muddy with all the meltwater during spring thaw. To deal with this, I don’t muck out the back goat stall in the winter and just keep adding fresh bedding. By springtime, the bedding is a foot or two thick, which keeps the goats up off the wet floor. The springtime cleaning is a heck of a chore, but the old bedding is great for the compost pile.
Materials and costs
The cost of the purchased materials back in 2005 was $3,159.
Purchased materials:
- 280 concrete blocks
- 128 80-lb. sacks of concrete mix
- 13 sticks of ½” rebar
- 24 sheets of ¾” plywood for the hayloft floor
- eight 4″x6″x12′ girders
- 48 96-inch-long 2x4s
- 48 10-foot-long 2x4s
- 16 pieces 38″ roofing metal
- 24 7/16″ wafer boards to sheath the roof
- two rolls 15 lb. building felt
- three 12-foot lengths ridge cap
- six 12-foot lengths rake flashing
- one 50-pound box of #16D nails
- six pounds roofing screws
- four 12-foot lengths of clear roofing
- two 5-gallon pails of tar foundation coating“Free” materials used:
- 16 stout cedar logs for upright posts
- 32 small logs with little taper, mostly Douglas fir, about 5″ butts, 14′ long for the beams to support hayloft floor
- miscellaneous cedar logs for sills and framing
- used motor oil to preserve posts
- enough old barn boards, roofing metal, tar paper, 2x4s, and plywood for the lower side walls, gable walls, truss gussets, and short
- parts, and to make the stalls, shelves, etc.
- three hayloft windows
- one fancy stained glass “window”
- the hayloft door
It’s hard to estimate the total value of the free materials, but I’m sure we saved several thousand dollars. I’m always surprised that more people don’t make use of the trees that grow on their land for anything but firewood. Round logs work great for poles and framing and are much stronger than sawn lumber.
It’s always interesting to see what you can pick up for free if you keep your eyes open as you drive around and use your imagination. For example, old refrigerators can be a good source for windows because many of them have shelves of tempered glass. Spread the word around that you’re looking for materials. In one case, I got a truckload of plywood sheets from a gun range that was being rebuilt. I didn’t mind the occasional bullet hole. Just be sure to get permission before you start salvaging anything — always ask first!







Great story! I don’t even know you and I’m proud of you. I can see in the picture why your roof had to be so stout—feet of snow! If I were you, I’d get at least a skidloader. They are a good investment, making quick work of most jobs; and you can use it to help others, and maybe make money to boot. We’re off grid, but have heavy machinery and five minutes from town. We get a couple inches of snow, but on a 18% grade paved driveway, it’s easy to lose a vehicle on slick snow; so we stay put. Our loader and excavator made a ton of orchard benches and two gardens plots, a shop area and parking lot, let alone a house pad. You’ve done good with few funds. God bless.