 |
|
| Issue #98 • March/April, 2006 |

In just a few minutes your completed snare is ready to put an end to your groundhog woes. A snare set vertically is very effective catching groundhogs with tunnel entrances under buildings.
The groundhog, otherwise known as the woodchuck, can waste a lot of your hard-earned garden bounty in a matter of hours. They’ll nibble a little bit on one melon and then move to the next one for a few bites. Then they’ll hit the squash, and whatever else tempts their taste buds, taking a few sample bites from each veggie. Every day each groundhog will consume about 3 pounds of fruits, vegetables, grasses, and clover. You can’t fence them out because they are excellent diggers and will just tunnel under the fence.
Their many holes and extensive tunnel system can put your livestock in danger of breaking a leg. The tunnels are usually about four feet deep with one main entrance and multiple escape tunnels. Some of these exits are as much as 40 feet from the main entrance. Within their tunnel system is a grass-lined chamber that serves as a bedroom, a nursery, and a hibernation chamber. The groundhog also digs a separate chamber to use as a toilet. The first time one of your prized animals has to be put down because of a leg broken in a groundhog hole, you’ll want to declare all-out war on these nuisance tunnel rats. You can shoot them if it’s safe enough to do so and you have the time to wait for them to show themselves.
They often undermine the very foundation of your home and outbuildings, causing extensive damage and costly repairs. When they do you’ll be ready to take a lesson from the movie Caddy Shack and bring out the dynamite.
But there is another way. For just a few dollars in materials you can make a simple and very effective snare to catch these critters before they do much damage. Your local hardware store will probably have all the supplies you need to get started. The self-sufficient nature in us usually won’t allow us to throw anything away that we might have a future use for. So you might already have a lot of the necessary materials on hand. I have been making these snares for many years myself and assist farmers and suburbanites to control their groundhog damage. The snares are also strong enough to use for beaver, coyote, fox, opossum, raccoon, and similar-sized animals that are causing problems. Though I don’t live in an area where gophers or prairie dogs are common, I suppose these snares would work equally well on them, too.
One of the advantages of this type of animal trap is that it rarely causes any significant harm to the trapped animal as long as there is no other object nearby they may become entangled in. The snare closes in snugly enough to hold the animal until you arrive to dispatch or release it. This allows you to use an effective trap in an area where it will cause relatively little harm (compared to other traps) to children, livestock, or pets that may accidentally become entrapped. Another benefit is that no baits or attractants are required. For groundhogs, you don’t even have to don the typical trapper attire of rubber gloves and boots.

These are the only parts you need to build your own groundhog snare. From the top: cable, end nut, dime washer, completed swivel, completed snare lock, drilled penny washer, end nut, snare restrictor, snare support, rebar stake.
Material list
5 feet 7x7x3/32-inch cable
2 1/2-inch nuts
1 dime diameter flat washer
6 inches #9 gauge wire
1 penny diameter flat washer
2 to 3 inches #12 gauge wire
3 feet #11 gauge wire
1/2-inch #12 or #14 gauge wire
2 feet 1/2-inch rebar stake

The parts and the completed assembly.
Snare assembly
1. Create a cable end stop by slipping one of the nuts over one end of the cable and smash it flat with a heavy hammer. The threads of the nut grip the cable preventing other parts of the snare from sliding off the cable.
2. Slide the dime washer from the open end of the cable to the stop. This washer will allow the cable to rotate freely and help prevent kinks and twists and allow more freedom of movement for the trapped animal.
3. Place a screwdriver handle or similar item at least 3/4″ diameter in the middle of a 6″ piece of #9 wire. On the opposite side of the screwdriver handle, hold the base of a 1/4″ drill bit or similar diameter metal rod perpendicular to the handle. Pull both wire ends around the handle until they meet the drill bit. Twist the ends of the wire around the bit to create a swivel as shown in the picture. Thread the swivel, loop-end first, through the cable until it rests against the dime washer. The loop should extend beyond the cable end.
4. Make a snare support connector by temporarily placing the #11 wire against a portion of the cable. Wrap the long piece of #12 wire around both the #11 and cable five or six times, keeping each loop tight against the other. Remove the #11 wire, leaving the connector on the cable.
5. The next step is to make a snare lock that will allow the cable to close tight around an animal yet not loosen without your assistance. Lay the penny washer flat and drill a 1/8″ hole in the side. Place the washer in a vise, leaving the half with the drilled hole facing up. Bend the washer over to a 90-degree angle. Remove the washer from the vise, and hold it in your right hand with the drilled hole up and the outside of the bend facing left. With the left hand, pass the end of the cable through the drilled hole about a foot. Bring the end of the cable back through the center hole of the washer about six inches. Apply the second nut to this end of the cable as in step 1 to create another stop. With a pair of pliers, bend the cable at the stop to a 90-degree angle.
6. If you have goats, deer, or other animals that might accidentally get a leg tangled in a snare, a snare restrictor should be applied. With the snare loop open, pinch the 1/2″ of #12 or #14 wire around the cable at a point where it will stop the loop from tightening around the animal’s hoof or foot. Large-hoofed animals such as horses and cattle should be separated from the trapping area since a restrictor set for those animals would provide a closed loop too large to hold a groundhog.
7. The last item you will need to make is a support for your snare. With a pair of pliers, hold the #11 wire about an inch from the end and tight against an object 5/8″ in diameter. Wrap the wire around the object a couple times, remove it, and you’re done. The whole process to make a complete snare set-up takes only 5-10 minutes.

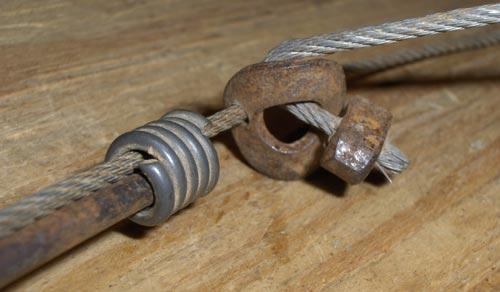
Close-up of the most difficult part showing the coil, washer, cable and nut.
Set-up and placement
Groundhogs are fairly easy to catch, giving you several opportunities each day as they enter and exit their burrows to feed on your veggie and flower gardens. They usually have several burrow entrances that they use at various times and for a variety of reasons. You may need to set snares on more than one hole if you want to catch them quickly.
To set up a snare, slip the snare support over the rebar stake with the one-inch end pointing down. Next, attach the snare by sliding the swivel end over the stake. Stretch the long end of the support wire horizontally so it just reaches the edge of the groundhog hole. Drive the stake in the ground making sure you’re not driving it into the burrow tunnel. With the long end of the support wire pointed at the burrow entrance, push the one-inch end into the ground to stabilize it.
To set your snare horizontally, open your snare loop until the loop is a half inch smaller in diameter than the hole. Slide the support connector to the base of your loop and slide the end of the support wire into the connector. Lay the loop flat and center it just inside or over the hole.
For a vertical set, stake your set-up so the long end of the snare support crosses the hole. Open the loop to a six-inch diameter. I have found it much easier to determine the right diameter by using an indelible magic marker to mark the cable during assembly. After the first cable stop is attached, measure from the opposite end of the cable and mark it at 20 inches. When your assembly is complete, opening the snare to this mark will give you a six-inch diameter loop. Set your loop vertically outside the hole or where the critter is coming from under a building. The bottom of the loop should be two inches from the ground.

Set a snare horizontally over each tunnel entrance, and you can’t miss.
Checking traps and follow-up
Now that you’ve got your snares set, you can go about other chores or relax under a nice shade tree while the snare does all the work and waits for the groundhog to show itself. It’s a good idea to check your snares at least daily. Sometimes an animal will not pass through the center of the loop and will push the set aside. Other times you might find the loop closed because the animal passed through it too quickly as the loop closed. Just reset it. If this happens too often, reduce the size of the loop when you set it.
A good deal of caution is in order as you approach to check your trap. Whatever is in it probably won’t be happy to see you. If you arrive at a trap and find the groundhog has been caught but reentered its hole, you set your stake too close to the hole. You’ll need nothing short of a tractor to get the groundhog out. I’ve even had to cut them loose to catch another day. The best method to euthanize your captured groundhog is a .22 short round in the head. Then you can simply open the loop to remove the groundhog. If the cable doesn’t have any kinks in it, you can reuse it to catch another. Otherwise, just replace the cable, recycling as many of the parts as possible. Once your snare has gone undisturbed for several days, you’ve probably caught all the groundhogs from that area.
Now that you have a freshly caught groundhog, there is no reason to waste the meat. They are perfectly edible and taste similar to squirrel. It’s no wonder, since they are a member of the squirrel family. The older ones can be tough and are best prepared with the use of a crock pot or left to simmer several hours.
After catching a few you can claim to be experienced at groundhog snaring, and start making a few extra dollars to help cover the cost of your snares and add a little something to the family budget. About 8 years ago, I started snaring free for other folks to gain more experience. Soon the word spread, and I had more requests to save yards and gardens from total destruction than I could fill. My costs for transportation and materials started to eat a hole in my pocket. I finally had to start charging a small fee to cover my additional expenses. The demand still grew until I decided to try making a dollar or two from each job or barter for things I needed. Customers needed help with other problem critters, too, so I finally expanded to snaring beaver, coyote, fox, opossum, skunk, and raccoon. Often customers are at their wits end with critter damage and don’t know how to take care of it themselves or just don’t want to deal with it. As a hobby, I have built a nice nuisance wildlife control supplemental income in my spare time. The additional money helps a lot with little extras around the homestead, and I get great satisfaction from helping others. The extra meat is also welcome at the dinner table.





Let me introduce myself. While riding on my property, my horse stepped into the hole and rolled in a somersault. I was hung up in the stirrup when falling. The horse broke his neck in the fall and I dislocated my ankle shattering the tibia and fibula at the ankle joint. I still limp 30 years later and have chronic pain.
The horse was euthanized.
Good instructions, I’ll have to give it a try. However, while I have heard the claim that woodchuck holes pose a danger to livestock (stepping into hole, breaking leg) I have never met anyone who could tell me they experienced this. Not once.