| Issue #155 • September/October, 2015 |

I am preparing honey, water, and flavoring ingredients for a batch of mead made with a commercial yeast.
Mead (honey wine) is one of the simplest alcoholic beverages to make. Although there are additional steps involved in creating a well-aged mead with a complex flavor profile, essentially all that is required is to add enough water to honey to bring alive the natural yeasts already present and dormant (in raw, unpasteurized honey, that is). Before you know it you have spontaneously fermented mead.
Equipment
Making a simple batch of wild-crafted mead that you can drink young (low alcohol and partially fermented) requires very little ingredients or materials. You will need a fermentation vessel, a stirring implement, and a cheesecloth or dish towel. If you desire to bottle a young mead for a couple of days to let the natural sugars carbonate, you’ll need a funnel or siphoning tube and a couple of bottles. I highly recommend starting this way to get accustomed to the process, and to receive simple short-term gratification.
However, it’s well worth aging mead long enough for a more refined flavor. The standard equipment available to do this ranges from half-gallon jugs to five-gallon carboys (glass or plastic narrow-necked vessels). If you really get into it, you can scale up and find equipment that will allow you to brew 20 gallons or more. To wild ferment, you’ll need an open-mouthed vessel to provide plenty of air for wild yeast to land in your must (unfermented mead) and propagate. This can be ceramic, glass, or food-grade plastic.
You will also need airlocks with corks, funnels, and food-grade siphoning tubes. You can get the latter two from a hardware store. You will likely need to get airlocks and corks from a homebrew supply store, but there are DIY options available. What is important is that you keep external air out but allow the gases of fermentation to escape. A balloon or a condom will provide the appropriate flexibility to do this, as will some plastic wrap and a rubber band. An additional item that is helpful is something to strain out solid materials when racking (transferring between vessels). Some funnels will come with a clip-in strainer, but I like to use a nylon mesh bag. To build your brewing inventory, ask around, visit secondhand stores, and browse online trade/barter groups (Earthineer, Craigslist, and Facebook all have groups for this). I’ve often found that people are willing to barter equipment that has been gathering dust in their basement for bottles of mead, wine, or beer.
If you’re going to the trouble to age your mead or wine in secondary-fermentation vessels, you’ll want to bottle for further aging. Save your own, ask friends to save some for you, or dumpster-dive at restaurants and bars. It’s best to purchase corks and caps new, and you will need corking and capping equipment to properly secure them to the bottles. Provided it has minimal-to-no carbonation, mead can be bottled in standard wine or beer bottles. If you plan on creating a highly carbonated mead, look for champagne, flip-top, or Belgian beer bottles. Flip-tops have reusable lids that can simply be clicked into place. Champagne and Belgian beer bottles require special corks and wire mechanisms for keeping the cork from popping out.

Equipment for small batches (one to three gallons) is easily available.

For larger batches of five or more gallons, you will need a five-gallon or larger open-mouthed fermentation vessel (ceramic crock or plastic bucket), a stirring implement, and a cheesecloth. Funnels, strainers, siphoning tubes, airlocks, and five-gallon glass carboys are also important to have for racking and long-term aging.
Cleaning and sanitizing
This is an area where I stray from the modern homebrewing mindset. Early on I did as I was told and sanitized religiously with laboratory-produced sanitizing and cleaning chemicals. I still use some of the sanitizers I’ve accumulated in my brewing inventory, but mostly I just wash and rinse. One of the core concepts behind wild brewing is that you want a wide range of microbes to participate in the brewing process. There are some that you don’t want, but if you take the appropriate steps in managing your ferment, you’ll create an environment that is conducive to allowing the good microbes to thrive. Not only is this how ancient cultures would have done it, but a growing subculture of brewers is choosing to forego the use of all chemicals in their brewing. Having done this with success myself and tasted some incredibly flavorful brews made by others, I can say that this is very much a worthy undertaking. Cleaners and sanitizers I recommend are: hydrogen peroxide, One Step, or iodide (not iodine). An old standby is bleach (one to two ounces per five gallons of water), but be sure to rinse your equipment thoroughly and allow it to dry.

Keep open-mouthed vessels covered with a cheesecloth to allow air and wild yeast in and to keep flies out.
Ingredients
Now that your equipment is ready and clean, you’ll need to decide exactly what kind of mead you want to make. Most of my meads are driven by season, locality, and spontaneity. Throughout the summer, I’ll gather and ferment (or freeze for later) fruits, vegetables, and other botanicals. All alcoholic beverages require some sort of sugar to give the yeast something to feed on. Mead by its very nature has a high degree of sugar from the honey added. There are a wide range of honey varieties out there, but I generally go with what is available locally. Not only is this more sustainable, but honey made from local pollens has additional health benefits. Some honeys have particularly distinctive flavors that will translate to your mead. For instance, buckwheat is a dark, thick, strongly-flavored honey that will dominate the flavor profile. Honey made from clover, wildflower, or the blossoms of trees such as sourwood, tulip poplar, or tupelo will work for practically any mead.
There are some ingredients that are standard for nearly all of my meads. Homebrewing recipes will often call for acids, tannins, and other ingredients that you can buy in a chemically processed form. However, many natural botanicals have everything you need. Tannins and acids help give body to mead and wine, and should always be added in some form. Also, mead needs nutrients to feed the yeasts that will be turning the honey into alcohol. I prefer organic raisins, as they provide nutrients, tannins, and wild yeast.
For additional tannin, you can add the leaves, sticks, or bark of deciduous trees such as oak, cherry, or walnut. Add these raw or make a tea out of them and put one cup of it into a five-gallon batch or a bit less for a one-gallon batch. A simple bag of black tea will also suffice (one per gallon). Not all mead needs acid, but it often helps. Flower meads and fruit meads (also known as melomel) made from low-acid fruits usually need a bit of acid. Any citric fruit will do, combined with a bit of tannin and malic acid from dried apples or orange fruit.

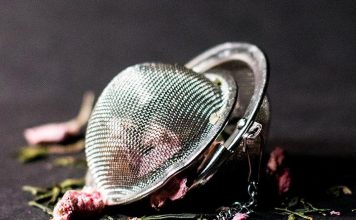
I gathered some oak bark and the “weed” Creeping Charlie (which has preservative, flavoring, and medicinal qualities) for making a tea to add to a new batch of mead.
Let’s make some mead!
Once you get your technique down and learn what ingredients work for your palate, the types of mead you can make are nearly limitless. You can make a traditional mead with only honey, water, and yeast, but I recommend adding a bit of additional flavoring until you’re comfortable with your technique. I defy modern mead-making conventions by making most of my meads with little-to-no heat. Don’t pasteurize it and definitely don’t boil it or you’ll lose a lot of flavor subtleties and nutritional benefits. My process is simple: I mix the proper ratio of honey-to-water, incorporate wild yeasts, or add a yeast culture I’ve saved from a previous mead, and stir to aerate and stimulate fermentation. I add additional ingredients through various phases of the process.
I start nearly all of my meads with a 1:4 honey-to-water ratio. This will make for a semi-sweet mead. If I want mead that is a bit drier, I’ll add more water or use less honey. For a sweet or dessert mead I’ll add more honey. If I’m using a lot of fruit, my ratio could go as high as 1:6 or 1:8 due to the fermentable sugars the fruit provides.

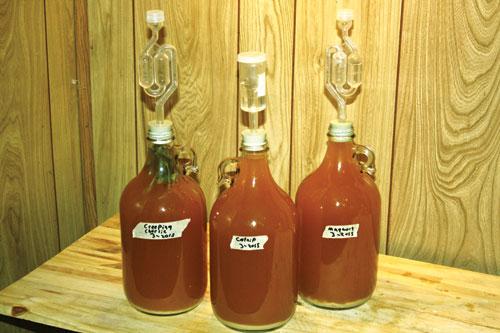
Small batches of mead will ferment quicker. I used three half-gallon jars to divide a small batch into three different medicinal meads.
Wild-crafted mead recipe
For one gallon (scale up for larger batches):
- Light to medium honey: 2 pounds for dry, 3-4 pounds for semi-sweet, or 5-6 pounds for dessert mead (save 1 cup for later)
- Good, clean, non-chlorinated water (start with enough to fill your fermentation jug to a couple inches below the neck)
- 10-20 raisins, one black-tea bag, oak bark / leaf tea, or other tannins and nutrients of your choice; larger amounts of honey will need more
- Additional flavorings such as fruit or spices; you can provide as much fruit as you want, but spices can be overdone (try starting with 1 cinnamon stick, 1-2 cloves, and 1-2 whole allspice per gallon)
- 1 teaspoon of yeast nutrient from a homebrew store if you don’t trust the raisins to do the job
- 1 teaspoon lemon juice, 2 tablespoons orange juice, or 2-3 orange slices
Every mead-maker has their preferred method, which you can develop over time and through experimentation. Always take thorough notes of ingredients, amounts, and any other details to help with adjusting future recipes. I prefer to use techniques for cultivating and saving yeast that have been used throughout time as opposed to the laboratory-bred yeasts of the modern brewing industry (which, as I’ll show, do have their place).
You will need a fermentation vessel that is at least a gallon larger than what your secondary fermenter will hold and a stir-stick. Both of these are items you can hold onto for future wild fermentations as long as you don’t sanitize them. The Norse and other ancient societies would pass along yeast-caked brewing vessels and stir-sticks (“totem” or “magic” sticks), as well as yeast logs made of birch or juniper that carried yeast strains in their crevices.
Start by mixing honey and water thoroughly in the fermentation vessel. It helps to warm up the water a bit for use in working all of the honey out of the jar. Save about a cup of honey to add to the mead later in the process. If you provide less sugar at the beginning, the yeasts won’t be overwhelmed. Add the rest of the ingredients and stir like crazy for at least five minutes. Organic raisins and fruit will provide wild yeasts, but save most of the fruit for secondary fermentation if you want a strong fruit flavor. Spices will also be stronger if added later. Cover the vessel with a cheesecloth and place it in a warm, dark corner. You can also prepare a starter prior to this in a quart jar with wild botanicals, a bit of water and honey, ginger shavings, and some orange juice. Bring it to the garden or on a hike with you and swish it around regularly. Some mead-makers swear that preparing a starter during a full moon results in a stronger fermentation. This is an intimate process. Become friends with the wild plants and community of microbes that are integral to the brewing success.
Usually you’ll see active fermentation in about a week. With enough yeast and the right environment, you may see something in a couple days. Just be sure to stir vigorously several times a day to aerate the must and mix in wild yeast that will be dropping in from the air. You’ll know you’ve invoked the brew spirits when you hear an audible fizzing after you’ve stopped stirring. You should also see some foam, which will be minimal for meads without a lot of adjuncts, but very visible for meads made with fruit. From here, you only need to stir a couple times a day.

For a wild ferment, stir vigorously several times a day to aerate the must and mix in wild yeast that will be dropping in from the air and clinging to the ingredients.
Age to perfection
If you want to age it for bottling, you’ll need to transfer it to a secondary fermenter with an airlock to keep it from turning to vinegar. Pour it through a funnel and strainer into a jug or carboy. Add 5-10 fresh raisins for nutrients and the honey and fruit you set aside earlier, mixed in with enough water to bring the level to about an inch below the cork of your airlock. You may get a lot of foam for some stronger ferments. Either take the cork out occasionally and clean it or use a blow-off tube by taking a siphoning hose and putting one end into the hole of the cork, and another into a bowl of clean water.
One-gallon batches and meads with smaller amounts of honey will ferment quicker. The best gauge is simple patience and monitoring. Once the bubbling in the airlock subsides to one or two bubbles a minute, you’ll see an inch or so of sediment on the bottom. This is when you take your siphoning tube and siphon it into another clean jug. You can do this a couple more times, but usually once is enough. Taste it when you’re doing this. If it tastes a bit bland, add a small amount of tannin. If it’s sweeter than you like with no noticeable bite, add a bit of acid. Don’t overly aerate at this point unless you feel it could use some help finishing off fermentation. Vigorous aeration while racking is a good technique for restarting a “stuck” fermentation, but if you like it how it is, be gentle.
There’s nothing wrong with adding a commercial yeast any time during this process. Some wild yeasts just won’t give you a strong fermentation. You can start with a wild ferment to get the wild character and then finish off with a commercial yeast that will impart its own unique benefits. Or, you can pitch a commercial yeast at the beginning of the process. Either way, if you get into a rhythm, a cup of an actively fermenting batch can be used to start the next batch. This is called the “barm” in older recipes, and is also known as “backslop.” There are many commercial yeasts available, all with their own unique traits (usually outlined on the packet). Generally, a sweet wine yeast such as Lalvin ICV D-47 (Cotes du Rhone) or White Labs WLP720 will work for sweet and semi-sweet meads. For dry meads, look for champagne yeasts like Red Star Premier Cuvée or Red Star Pasteur. The latter have high alcohol tolerance and can produce meads of up to 18%. Because of this, they are good candidates for kick-starting a sluggish fermentation. Bread yeast or brewer’s yeast can even be used to make a flavorful young mead.
I’ve discussed bottling equipment already. Timing on bottling is important and will vary based on the type of mead you’re making, the type of yeast, the amount of honey, and other factors. For a five-gallon batch, you may need to wait six months to a year to bottle. When you look at the airlock and see no bubbling after a couple of minutes, the mead should be sufficiently flat and ready for bottling. If you want a sparkling mead, you can bottle it when there is still occasional bubbling in the airlock. You can also add about a teaspoon of honey or sugar per bottle to “prime” the bottles for carbonation. Be very careful with this. If you anticipate any sort of carbonation, it’s best to use thick-glassed bottles such as champagne or flip-top bottles. Regular wine bottles with non-wired down corks may pop a cork or even explode with too much carbonation. You can use standard wine or beer bottles to make mildly carbonated meads, but you’ll need to develop an eye for carbonation levels to do this.
Mead is simple to make, and doesn’t require large amounts of time or attention. Many people like to make it complex, but it doesn’t have to be.
Skal!
Follow my blogs as RedHeadedYeti at Earthineer.com or sign up for my book mailing list (jereme-zimmerman.squarespace.com) if you’re interested in following along on my travels into the realm of Viking mead-making.


