 |
|
| Issue #143 • September/October, 2013 |

The finished passive-solar dehydrator maintained a fairly constant temperature of 150° F throughout most of the day without any repositioning, which shows that this design can easily provide the temperatures required by any dehydrator recipe.
Humans have been drying fruits, herbs, nuts, vegetables, meats, and fish using just the sun for thousands of years. Early Egyptians used wooden racks to sun-dry thinly-sliced strips of meat and fish. As early as the 1700s, people were improving the dehydration process by constructing drying enclosures built over slow-burning fires. By the early 1900s, commercial dehydrators became available that included powered fans and small electric heaters similar to the designs in use today.
This article describes how you can build your own solar-powered food dehydrator, but I will not be going into detail on how to actually prepare and season foods for dehydration. There are numerous reference materials, recipes, and detailed instructions on the dehydration process, which are easy to find in other BHM articles and on the Internet.
Dehydrators come in every size and design imaginable. Residential units usually are about the size of a large microwave oven and use a bottom heating element to improve the drying process. Simple homemade units have been built using everything from cardboard boxes with a small light bulb in the bottom for heat, to larger homemade dehydrators made from discarded refrigerators, wooden shipping crates, and metal shelving.
The main design feature for all dehydrators is multiple porous racks that will support small slices of fruits, meats, or garden herbs spaced closely together while still allowing good airflow around and through these racks. Good airflow is mandatory; the goal is to slowly remove the moisture from the food, not cook it.

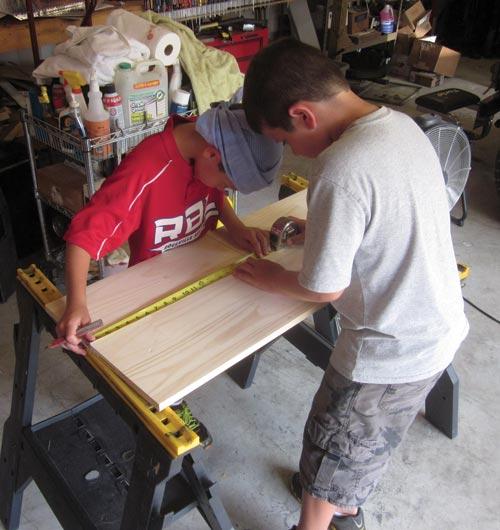
This dehydrator is very easy to build. Two of my grandchildren, eleven-year-old Christopher and nine-year-old Stephen, did all of the cutting and drilling to fabricate the wood components shown.
Most dehydrators have ventilation near the bottom, so that the air passes up through the drying racks before exiting near the top. Since heated air rises, some dehydrator designs do not require electricity and rely on natural air convection to provide the airflow. More expensive dehydrators will include adjustable air dampers and exhaust fans to draw air through the racks and out the top. This dehydrator project includes air intake vents located on each side near the bottom, and a larger outlet vent on the back near the top.
The second design issue is the size of the enclosure, and this will be driven by the size of the racks. Since you want metal racks that are easy to clean and offer good support, while still having minimum air restriction, the racks will normally be a manufactured product. However, you can use the metal racks from a discarded refrigerator, old stove, or even commercial screening material. Once you have found or purchased the racks you want to use, this will determine the width and depth of the enclosure. The enclosure itself can be made from metal, wood, or heavy cardboard, depending on your budget and available scrap materials.
Since the fruits or meats to be dehydrated will be sliced very thin to improve moisture removal and reduce drying time, the individual shelves can be much closer together than you would normally see in a standard refrigerator or oven. In fact, shelf spacing of two to three inches is typical in both homemade and commercial dehydrators, so the number of shelves and their spacing will determine the height of your homemade solar dehydrator.
Finally, by covering the interior with reflective aluminum foil and adding a clear glass or Plexiglas® front cover, you can forget electric heating and use the sun to drive the dehydration process. Remember, this is not intended to be a high-temperature solar oven and you are not trying to cook the fruits, herbs, or meats. Almost all foods will be properly dehydrated by keeping the inside temperature between 120 and 140° F, but I recommend following the pre-seasoning, drying temperature, and drying time recommendations found in your dehydration recipes.
While some fruits such as thinly-sliced, peeled apples may be fully dehydrated in six hours, moist fruits such as bananas and strawberries may require 12 to 16 hours before they are fully dehydrated. Thinly-sliced meats may require slightly higher temperatures and up to 16 hours to fully transform into jerky.

Here are all the materials needed to build a solar food dehydrator.

Completed back
Construction
I wanted to design a solar-powered dehydrator that would utilize low-cost materials and be very easy for anyone to build using basic hand tools. While you can modify my basic design to accommodate your choice of metal racks, I found some very inexpensive racks at Lowe’s that are designed to fit barbeque grills. These racks are made from 12×18-inch perforated aluminum sheets and sold in packages of two for less than $5. Eight racks will cost $20 and since they were designed to cook foods on a grill, they are perfect for our needs. Eight of these racks will easily fit in a dehydrator that is 24 inches high, including extra space at the bottom and top.
To save construction time, I chose 16-inch-wide finished shelving lumber to make the sides, top, and bottom, and ¼-inch plywood to make the back. I also found a 18×24-inch stock size of pre-cut Plexiglas® and pre-formed metal rails to support the thin Plexiglas®. While I spent about $90 for all materials, if you have discarded appliances or scrap building materials you many not need to buy anything.
Since I recently had major shoulder surgery, my current workshop projects are seriously limited for the next few months, so I enlisted the help of two of my six grandchildren. Eleven-year-old Christopher and nine-year-old Stephen did all of the cutting and drilling to fabricate the wood components shown, so I only had to do the final assembly using construction adhesive in a caulking gun and a pneumatic nailer, both easy to operate with one arm. While not intentionally trying to prove this project is child’s play, it does show that this solar dehydrator is fairly easy to build. And keep in mind, if you find a good deal on racks of a different size, you can modify this design as needed.
By adding a small solar-powered fan on the top, you can significantly improve the performance of this dehydrator. I have also tried to utilize a design that eliminates the possibility of insects getting inside since some types of fruits or meats have dehydrating times that exceed the typical six to eight hours of sun available per day. This could require having to leave the fruits or meats outside in the dehydrator for multiple days to fully dehydrate, depending on the weather, so insect screening is mandatory.
I have covered all exterior ventilation openings with low-cost metal louvers that include internal insect screening, and all joints are nail and glue construction for a tight fit. Once the Plexiglas® front panel is slid into position, you are ready to start dehydrating. I added a kitchen thermometer with a long probe inserted through a drilled hole near the top to monitor the inside temperature. You will want a thermometer with a range of 90 to 200° F if possible. Candy thermometers register up to 400° F, which is too high for our purposes. By periodically checking this thermometer, the drying temperature specified in the recipe can easily be maintained by orienting the dehydrator toward or away from the direct sun.
During my initial testing, this homemade solar dehydrator stayed a fairly constant 150° F throughout most of the day without any repositioning. While you may want to orient the dehydrator slightly away from the direct sun to lower this temperature, this does show that this design can easily provide the temperatures required by any recipe.

Attach rack supports to each side.

Assemble both sides to the back.
Step-by-step construction
1. Cut all parts as shown. Note the top is set back 1¼ inches from the front edge to clear the sliding front so it can be pulled up and out.
2. Add the rack supports to both left and right-side boards, then drill the air vents as shown between the lower two racks.
3. After cutting out the three openings in the back to fit the top louver, glue down a layer of heavy aluminum foil before adding the rear rack supports.?
4. Cover the underside of the top board, and top side of the bottom board with a layer of heavy aluminum foil before final assembly.
5. Assemble the sides, back, top, and bottom using construction glue and finish nails or screws. Sand all rough surfaces and corners.
6. Finally, install the metal rails to support the removable sliding Plexiglas® front. This front Plexiglas® could also slide in grooves cut into the sides and bottom, which would eliminate the metal rails.
Since this solar dehydrator will be outside when in use, I added two coats of a semi-gloss exterior paint to all outside surfaces. However, I left all exposed interior wood surfaces unpainted to avoid paint fumes affecting the taste of the dehydrated foods. Although the bottom of this dehydrator is covered with heavy aluminum foil, you may still want to add a small pan to catch drippings if you will be dehydrating meats.
The 12×18-inch aluminum racks are fairly flexible, and since they will only be supported along the left and right edge and the back, I bent down a ½-inch lip across the front edge which significantly strengthened the racks. Since these racks are thin, it was fairly easy to bend by hand to form the lip with the bend passing through the first row of holes.
Conclusion
While you are free to copy my design and material selection shown, I encourage you to utilize your own discarded materials to reduce costs which may require adjusting the dimensions and construction to fit.


[weaver_widget_area id=’articles_about_yago’ class=’text3′]






Where did you buy the racks for this project?
Vote of special thanks to your educative creativity and innovation. God bless you