| Issue #153 • May/June, 2015 |
I think there has to be something ingrained in the human brain that loves things built of stone. Maybe it’s our desire for strength and safety or the timeless beauty of stacked stone masonry. We have a connection with stone construction reinforced by historic buildings, engineering marvels, and even the fable of the three little pigs.
But why isn’t it as common anymore? In general, faster and more efficient methods of construction have taken hold in the modern day. And quite frankly, most people don’t have the patience for this type of construction on a large scale anymore. So if you still want stone but aren’t a patient or skilled mason … build a gabion wall!
For the homestead, the gabion offers a great solution for those desiring the look and utility of stone but without having the tedious masonry involved. This is not to say that it’ll be easy … you’ll still be moving large amounts of rock, but at a much faster pace and without having to select and shape each stone for that perfect fit. Some fitting will be required, but nowhere near the same level of masonry as with a traditional stone structure.
A gabion wall can serve a variety of purposes on the homestead and can be relatively cheap to construct. No fancy tools are required in the construction of the wire basket and any type of stone, rock, or concrete chunks will suffice.
History
The history of the gabion wall goes back further than many might think. Originally used in the medieval times, they were a mobile fortification in which lightweight wicker baskets were filled earth, rocks, and other debris. The combination of the basket and the debris fill made stout walls able to withstand most types of weaponry and protect soldiers while they set up their mobile artillery in preparation for a siege. Similarly, gabions have been used with success in Iraq and Afganistan to protect military camps from small arms fire, rockets, and vehicle assaults.
More commonly, gabions are used in civil engineering projects such as erosion control, flood management, and retaining walls. Road projects and erosion control are the most visible examples seen on a large scale. However, smaller projects include municipal landscaping, small stream check dams, and water weirs.

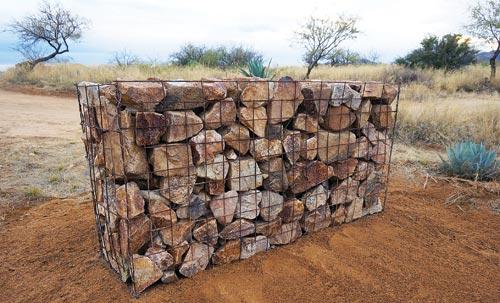
These are some of the gabion walls I’ve built around my homestead.
Uses for the homestead
For most Backwoods Home readers, the gabion wall will have three potential functions the most common being for landscaping or gardening purposes. Retaining walls and decorative dividing walls can create dimension and boundaries to a yard or garden, not to mention adding wind protection and aiding in the creation of microclimates on the western face of such walls. Microclimates can enable the planting of warmth-loving plants in cooler climates due to the heat sink that the western wall face can create.
The second function is for erosion control and water management. Gabions can be used to fortify eroding banks, driveway edges, and hillsides by holding the earth back but still allowing the water to pass through the structure. For those with livestock ponds, gabions can serve as a water diffuser in the spillway or at the base of the dam to keep churning water from eroding the base of the berm or dam wall.
Additionally, they can also be effective for those in dry climates by slowing seasonal flood waters within dry creeks. The eventual build up of silt behind the gabion will not only harvest moisture for surrounding vegetation but also aid in creating good game habitat as well as additional forage for homestead livestock.
The third function that these walls can provide is that of security. Those of us who have ever lived near a moderate-sized road know the danger of an out-of-control vehicle. We’ve all seen the “car into a house” story on the news, and it never ends up well for the wood-framed house or the occupants. Appropriately sized, a gabion wall could provide a very rapid deceleration of a runaway vehicle through its sheer mass and flexible wire basket nature.
Whatever it is, there’s a use for a gabion on your homestead. I’ve enjoyed mine for the last five years and have more in the works as I write this. Gabion walls will add beauty and function to your homestead for years to come.
How to build a gabion wall

1. Assemble the gabion panels and cut to size.
2. Tie wire the staggered pieces together for extra support.
3. Put together the gabion basket, using the wired panels.
4. Wrap galvanized wire around the seams of the basket.
5. As you fill the basket with stones, use interior support wires
to keep sides from bulging. Place the flat-sided stones face out.
6. Dress the top of the wall, placing flat-sided stones face up.
Materials:
5×5-inch concrete remesh (galvanized wire is recommended for wet or salty climates)
bolt cutters
galvanized wire
tie-wire (thin gauge)
rock (4-5 inches in size or larger)
Wire basket construction:
Start by cutting your remesh bottoms and sides into the lengths and widths for the wall desired. You’ll have five sections total. Next, cut four more pieces for the sides and ends but at one square less in length and width. This is to enable you to stagger the pieces so that you’ll have smaller squares in which to hold the stone better. Once the pieces are laid together in staggered fashion, tie-wire them together so they are secure and won’t slide. After all the staggered pieces are attached to the main sides, tilt them upright and connect them to form a rectangle “basket.” Use galvanized wire to weave the corners together. Once finished, you will have the completed basket ready to be filled with stone.
Filling the basket:
As you fill the basket, you can place the stones in any fashion you like so long as the outer stones have the flat sides facing outwards. This gives a nicer look and keeps the basket from deforming. As you fill the basket with stones you’ll need to add galvanized wire cross-braces every two feet of the length of the basket and at every foot in height of the basket. This is necessary to keep the sides from bulging outwards. For example, if the basket is 10 feet long and three feet in height, you’ll need five cross-braces for the first foot in elevation, then another five for the second foot in elevation, and so on.
Finishing the top:
For this style of basket, you won’t have any wire on the top so it’ll be up to you how much time you want to spend arranging the stones. But for a nicer look you can organize them so that they lay evenly with the flat sides facing up. Once this is complete, the wall is done and ready to enjoy.
Joe Mooney is a passionate advocate for self-reliant living and can usually be found working on a new DIY project or reading the latest issue of Backwoods Home Magazine. More can be found at his blog www.homesteadonomics.com and on his YouTube channel www.youtube.com/user/homesteadonomics.


