| Issue #150 • November/December, 2014 |
When it comes to gardening, almost anything can be used to create a raised bed. Tires, blocks, rocks, and scrap lumber are just a few of the most plentiful resources one can use for this project. But why, you ask, should I even put the effort into building a fancy raised bed? Well, my answer is twofold depending on your goals. First, for your own garden they give the benefit of great drainage in wet climates while at the same time saving the backs of us located in rocky soil locations. Additionally they can help to “ease” that reluctant spouse or friend into growing food and moving at least one step closer to a more self-reliant life.
Secondly, with the current food movement, everybody from yuppies and corporate executives to backyard gardeners and urban homesteaders is taking to gardening like wildfire. This has led to a huge demand for all things gardening, and while most BHM readers are more to the DIY slant, many people would just rather purchase a pre-built raised bed. And that’s where the backwoods entrepreneur can make a bit of extra cash to help fund all of those other homestead projects that you’ve been letting stack up for quite some time!
The beds I make aren’t usually much more expensive than simply using basic lumber, but they have the added benefit of making my wife happy and making my garden more aesthetically pleasing. I’ve built beds out of pretty much everything and I’ve done it not only for myself but also as a source of side income. Advertised through Craigslist and word of mouth, these beds sell for anywhere from $65 to $140 per bed (depending on size) and while they won’t make me rich, they do give me a little bit of extra money (and materials) for my other homestead projects. Some of my favorite materials to use include broken-down pallet wood, cheap redwood or cedar fence boards, and corrugated roofing metal. All are commonly available and generally affordable.
These three types of beds are beautiful, durable, affordable, and may give some of you backwoods entrepreneurs an idea to make a little extra income this year … or at least give a little more appeal to your own garden.

The pallet bed:
(18″W x 36″L x 12″H)
- 2 decent-shaped pallets
- assortment of nails/screws, whatever you have available
- Cost: Free, not including hardware.
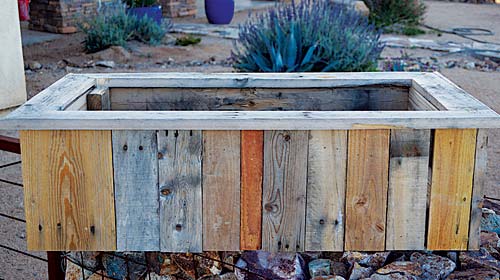
This bed is certainly the cheapest and only requires the extra effort of breaking down a couple of pallets. To start the pallet breakdown procedure, I recommend a reciprocating saw with a bi-metal blade. Instead of prying apart the pallet like so many struggle to do, simply cut through the nails with your reciprocating saw blade. I can break down a pallet in about 2-3 minutes with this method. It’s quicker and reduces damage inflicted to the aged wood by prying the boards apart.
Once you have all of your pieces broken down, set aside your thicker pieces to make your frames. Usually, there will be 3-4 large thick pieces that all of the slats are nailed to. Use these to make two rectangular frames the size you want. The bed pictured is approximately 18″ by 36″ for the frames. Once you have the frames constructed, cut your vertical pieces at the height you wish your bed to be. Mine are approximately 13″ in height. After the slats are cut, nail the nicest and straightest pieces to the corners of one frame. Then flip that frame over and set those pieces over the corners of the second frame, nailed in as well. Once those are attached, you can fill in the rest of the areas with the remaining pieces. Lastly, use your straightest boards for your “top cap” to the bed with mitered 45s on the corners.

Construct top and bottom frame. Nail the nicest and straightest pieces to the corners of one frame.

After nailing the corner pieces to one frame, flip it over and set those pieces over the corners of the other frame and nail them together.

Fill in the rest of the areas with the remaining pieces.

Use the straightest boards for your “top cap.” Mitered 45s on the corners create a nice finished look.


After building the frames for the vertical tin bed, attach corner flashing the same length of your tin to the inside corners of one of the frames. Flip it over, set the pieces just inside the other frame, and attach.

Attach strips of corrugated metal to the inside.

After attaching a top cap, you will have a very attractive raised bed.
The vertical tin bed:
(2’W x 4’L x 13″H)
- three 2x3s (pine, redwood, etc.)
- two 4″x6′ fence boards for the top cap (redwood or cedar)
- one 6′ sheet of corrugated tin
- four 12″ sections of 3″ corner flashing
- nails/screws, whatever you have available
- Cost: Approximately $20-25 using all new materials, as sourced in my local area.
Here’s where the beauty and durability of the corrugated tin really shines. The first time I built a bed like this, it was shortly after I built my pump house and I had a bunch of 12″ strips of corrugated metal left over from the project. They were too short for most other potential projects I had but were just too dang cool to throw away! So I figured I’d use them for a decorative bed for the garden.
To make this bed, start out like the pallet bed by making two frames approximately 2’x4′ or of the size and shape you’d like. Mitered 45s on the corners will be needed as they will be exposed for all to see. Wood selection can be most anything; I’m using redwood in the pictures because I got a smoking deal in the Home Depot 70% off bin! But any 2×4, 2×3, or similarly-sized dimension lumber will work just fine.
Once the frames are complete, you’ll need four sections of corner flashing the same length as your tin. I’m using 12″ in the pictures. Attach these to the inside corners of one frame, flip it over, and set the pieces just inside the other frame. Once attached, you’ll have the basic structure built and can attach your strips of corrugated metal to the inside as shown in the pictures.
The final step is to attach mitered 1″x4″ redwood (or other wood) fence boards to the top to create a nice top cap that can be used for sitting or setting tools on while tending to the garden bed.

The horizontal tin bed:
(20″W x 36″L x 15″H)

After attaching the 18″ pieces on the ends, you’ll need to fill in the gaps with the 6″ filler pieces.

Attach corrugated metal to the inside and finish by attaching top cap.
This bed may look the most complex but it really isn’t any more difficult to build than the others. For side income purposes this bed has been the most popular bed that I have sold on Craigslist and to friends. It looks very ornate but is simply fence boards and a few pieces of corrugated tin put together.
- six 1″x4″ (6 ft.) redwood fence boards (cut into four 35″ pieces, four 18″ pieces, and 2 full pieces for top cap)
- two 1″x6″ (6 ft.) redwood fence boards (cut into eight 14″ pieces to serve as corners)
- one 4′ length of corrugated metal to be cut into 4 pieces (two 12″x30″ pieces and two 12″x16″ pieces)
- one additional 1×4″ redwood board to cut into eight 6″ filler pieces (see photos)
- assortment of nails/screws, whatever you have available (nail gun is helpful in this project)
- Cost: Approximately $20 using all new materials, as sourced in my local area.
To start this bed, build two square frames flat on the ground with the 35″ (4″ wide) boards as your long horizontal pieces and 14″ (6″ wide) boards as your vertical pieces (see photos). Once they are nailed/screwed together, nail/screw the other 14″ (6″ wide) vertical pieces on the ends to start the creation of the end sections of the bed. With the ends attached, they should be able to stand on their own and you’ll be ready to attach the 18″ (4″ wide) end pieces in the same fashion as the 35″ pieces (again, see photos).
After attaching the 18″ pieces on the ends, fill in the gaps with the 6″ filler pieces. These will go into the spaces between the top and bottom horizontal boards, giving the corrugated metal a good surface to attach to. Following this, the basic frame will be complete and ready for the corrugated sheet metal to be attached to the inside in a horizontal fashion. Please note that all interior exposed screws should be galvanized or protected in some way from moisture. Caulking and/or some paints can aid in this. Another option would be to line the inside with a billboard tarp, commonly available on Craigslist in most communities.
The final step with this bed is to use your last two full-length fence boards to make the mitered corner top cap. Note: Additional strength and longevity can be had by adding screws to all corners and joint areas.
As you can see, these beds are not only easy to make and useful in your own food production system, but also potentially in your income stream. Have a go at one of these at worst you’ll have an extra area to plant your garden veggies!
Joe Mooney is a passionate advocate for self-reliant living and can usually be found working on a new DIY project or reading the latest issue of Backwoods Home Magazine. More can be found on his blog www.homesteadonomics.com and his YouTube channel www.youtube.com/user/homesteadonomics.








Used hardware cloth followed by landscape fabric on the bottom of ours. Keeps the voles, moles and pocket gophers out . . . But lets water freely flow through. Works great! Also, I would be cautious about the corrugated metal, especially if it is galvanized, due to leaching into the soil. Just my 2 cents!
I have been making pallet beds for many years. Same as the description in the article.
Since I have moved to a new piece of land this past year I am getting ready to make a lot more. Big pile of pallets outside, (currently under a lot of snow), but will begin construction of a dozen raised beds this winter. Really looking forward to it.
Re the bottom, I stapled a piece of Landscape fabric to prevent weeds from coming up from below. I then read that moles and voles will sometimes tunnel up from below to munch on the tender veggie roots, so I also stapled a piece of screen to the bottom. No other bottom, I set them in a sunny part of the lawn and everything just drains straight through.
What did yo use for the bottom of planter, did I miss something?
I had the exact same question as Marcy. While it looks really nice and artsy, I would think the inside would get a lot of heat during the hot summer heat.
Thank you I was wondering if the corrugated metal heats up soil within the box? Love this project it’s nice looking