| Issue #138 • November/December, 2012 |
Since my property is almost half a mile away from the nearest road and I can’t keep the dirt road to it plowed all winter (I don’t live there yet), I need some sort of sled to get supplies and food from the truck to the cabin when I stay there over the weekend. The hardware-store, flimsy-plastic variety works alright for light loads, but for hauling a chainsaw, gas can, and all the other woodcutting paraphernalia, I need something stout and rigid.
A couple of years ago I built my first sled out of rough cut, one-inch lumber; its 2-foot-wide, 5-foot-long deck gives me plenty of room for bigger loads. Overall, that sled has worked great for the past two winters. I only made one crucial mistake: I made the runners out of 2x8s, set on edge. They work fine on older, packed snow, but in a nice 10-inch layer of fresh powder, the runners sink in right to the deck and it feels like I’m pulling an anchor. The bearing surface just isn’t large enough to keep the loaded sled “afloat.”
I began thinking about other options, like a toboggan-style sled where the entire deck rides in the snow. While putting away my skis one day after a skijoring trip with my dog, Powder, I had an “aha” moment. If two slim cross country skis could support me, four wide downhill skis should be able to float a whole lot bigger load.

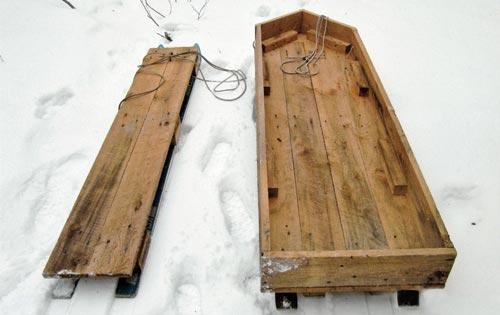
The completed sleds
It took me almost a year, but I finally managed to get three old pairs of skis in decent condition for free (out of a day-after-the-yard-sale pile of stuff). Since I now had one extra pair I thought I would build one narrow sled for light loads and another wide one with a box on top for larger, heavier loads and also for hauling firewood.
The lumber I needed came from the local sawmill and didn’t quite cost $30. A one-pound box each of 10d nails (for the deck) and exterior coated two-inch wood screws (to fasten the skis to the spacers) was all the hardware I used. Construction itself was easy and I built both sleds in about eight hours, without power tools.

My dog, Powder, oversees construction of the small sled.
Tools:
24-inch hand saw
set of drill bits
hand drill
25-foot tape measure
screwdriver
speed square and pencil
hammer
Materials needed (for one small and one large sled):
3 pairs of used skis (preferably downhill)
8 pieces 1×6, 8 feet long
1 piece 2×6, 8 feet long
1 piece 2×4, 8 feet long
1 pound 10d nails
1 pound two-inch wood screws, exterior coated
If your skis still have bindings, then those have to be taken off before anything else. Usually they’re held down by four to six screws and should not be a problem to get off.

The larger sled (Big Brother) uses two pairs of skis for additional loft in the snow. This sled is twice the size of the smaller sled.
Small sled
To build the small sled, take two skis and screw three spacers to each one; one a few inches behind the tip, one about midway, and one a few inches from the end. The spacers are three-inch-long pieces of 2×6 stock. I used three screws per spacer, but two might also be enough. The holes through the skis have to be pre-drilled and countersunk (for the latter just use a drill bit that’s the diameter of the screw’s head). I arranged mine in a triangle pattern for more strength. Next, the spreaders (cut from 1×6 stock, 12 inches long) are nailed on top of the spacers. The deck for the small sled is made from two pieces of 1×6, cut 5-feet 6-inches long and nailed to the spreaders. A couple of holes are drilled through the deck, a length of rope threaded through, and voila one sled is done.

The larger sled can accomodate all of my woodcutting equipment.
Big Brother (large sled)
Building Big Brother is essentially the same, only a couple of minor changes are necessary. Since this one runs on four skis, they are arranged in two pairs; the spacers being 6-inch pieces of 2×6 stock. Drill, countersink, and screw together as before. To carry a bigger load the deck is twice as wide (24 inches instead of 12 inches), so the spreaders are three 24-inch pieces of 1×6 stock, nailed to the spacers. The deck consists of four 6-foot-long 1x6s, again nailed on top of the spreaders.
I wanted a box on top of this sled so I could haul firewood or other small stuff without tying it down. This is built with 1×6 stock for the sidewalls and 2×2 stock to beef up the corner where the box and deck meet. The sawmill I use doesn’t cut 2x2s so I had to rip down pieces of 2×4 stock. I angled the front sides “plow-style” so any snow would be pushed off to the sides and would not act as a brake. Once more I drilled a couple of holes in the deck and sides, ran the tow rope through, and Big Brother was ready to go.

The smaller sled is the right size for hauling in food and supplies for a weekend at my cabin.
Performance
I had to wait until the week after Christmas to finally have enough snow to try out my new contraptions. Both sleds pulled really nice without any load, as I expected. Next, I loaded up Big Brother with my chain- saw, axe, helmet, and everything else needed for the day of cutting firewood. There was still plenty of room left for some lunch and other small stuff. With the heavy load it sank right up to the deck at first, but once I got the sled moving it actually rode up on top of the snow again. The best way to pull a load like this is to run the rope across your chest and lean forward so your leg muscles can push instead of your arms pulling. Snowshoes also help, not only to keep you from sinking into the snow but also because their larger surface area gives you more traction compared to just the soles of your boots. I bought a pair of military surplus boots for about $50 some time ago (bindings included) and they are light and practically indestructible.
Moderate climbs are doable with the sled loaded heavily provided you take a good running start, but a steep hill will have you sliding backwards unless it’s really short. Going downhill, it is best to walk behind or alongside to control speed and direction, also you won’t get run over if you lose control.
Big Brother would also work great being pulled behind a snowmobile, although you would need a rigid tow setup instead of a rope. I’m also thinking about adding a third pair of skis to the bottom for some more “lift” in light snow; I’ll just have to shop the junk piles some more.
The small sled is just about the right size for hauling my food and supplies for a weekend to the cabin. The only drawback is that I have to tie everything down; but having no sides and a smaller deck cuts the weight down, so it’s really easy to pull, even uphill. With the narrow base, the small sled tips over easier, especially when the snow is packed unevenly. It also picks up speed faster on the downhill run and again the best way to control it is from either side with a short tow rope.
Overall, I’m very happy with the way the sleds turned out, mainly because I didn’t spend a lot of money for two very sturdy pieces of equipment that should last me quite some time. Happy sledding!


