| Issue #145 • January/February, 2014 |
Does making four or more loaves of bread at a time, with no hand kneading, no electricity, and only one container to clean sound appealing?
If making one loaf of bread at a time in an electric bread maker just isn’t cutting it for you anymore with that odd shape and that awkward hole in the bottom that makes cutting difficult you might want to consider using a bread bucket.
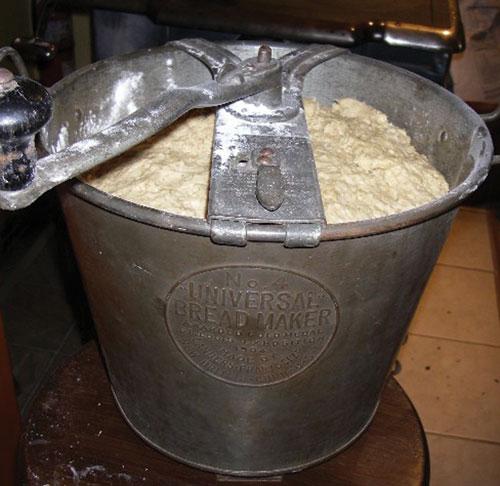
What is a bread bucket? It is literally a metal bucket that stands about 10 inches high, with a blunt hook on a turning handle that attaches to the lip of the bucket. There is usually a clamp to attach the bottom of the bucket to a table or countertop. Don’t be fooled by those plastic dough-rising buckets; a real bread bucket is much more sturdy and is meant for all the bread-making steps from proofing the yeast, to kneading and the risings.

This universal bread maker by Landers, Frary & Clark
makes it easy to “crank out” big batches of bread.
I first heard of this neat invention in Home Food Systems by Rodale Press where it is described as being a dough hook. I scoured garage sales and secondhand shops for several years with no luck, but my first eBay search turned up several, and that’s how I bought mine. And then I waited, I’ll admit a bit nervously, for it to arrive. Would it live up to the billing Rodale gave it? Would it be worth the amount of money I’d sunk into it what with the cost of the auction, postage, and customs duty fees to bring it north? The answer is a resounding yes. It has churned out countless loaves of bread and does an amazing job.

For the second rise, put the dough into greased bread pans
and cover with a clean tea towel.

The baked bread loaves cool on wire racks.
How to use it
It is not at all complicated to use a bread bucket. I clamp mine to a tall stool rather than my counter or table. The counter is too high for me to comfortably turn the handle on the bucket. I like having it on a stool so it’s portable and I can move the bucket and stool to a warm spot for the rising process.
I often start off by rinsing the bucket in very hot water to warm up the metal before starting to proof the yeast. Proof the yeast in the bottom of the bucket, usually in water and with whatever sweetener the recipe calls for.
After proofing the yeast, add all of the liquid and anything wet called for in the recipe. At this point, attach the kneading hook to the bucket. Then add a couple of cups of the flour, salt, and anything else that is dry. Start to turn the handle and watch as the mess in the bucket begins to resemble dough. Keep adding flour, a cup or two at a time, and the dough will form up nicely. Where hand kneading is usually a 10-15 minute process, a bread bucket cuts that down considerably total turning (kneading) time is about three minutes. Put the lid on the bucket. Mine has a slot in the lid that fits over the churning hook handle. You don’t pull out the hook yet, just leave it in place and set the whole thing to rise. You can peek to see if it’s working.
If your recipe calls for two risings, just turn the handle and stir the dough and then leave it for the second rising.
After the rising period is finished, bring the bucket back to the kitchen, and turn the handle a few times to punch down the dough. Lift off the lid, undo the hook from the edges of the bucket, and pull out the dough hook. The dough will usually slide off the hook very easily; just run your fingers along the length of the hook from top to bottom (don’t worry, the hook isn’t sharp). Pull the dough out of the bucket and onto a floured surface. Set the bucket in the sink and fill it with hot soapy water to make cleanup a breeze later.
Divide up the dough into loaves; I like recipes that make four loaves at a time. (My oven doesn’t do a good job when I try to bake more than four at the same time some will get too dark.) Put the dough into greased bread pans, cover with a clean tea towel, and leave the loaves to rise in a warm place and then bake as your recipe instructs.
When I first got the bucket there was a grinding noise when I turned the handle. I lubricated all the moving parts with vegetable oil and that solved the problem. I oil it every four months or if it starts to make noise again.
So where do you find a dough bucket? Likely eBay or Live Auctioneers (http://www.liveauctioneers.com/) will be your best bet. This is a vintage item, so try terms like “vintage or antique” with “bread dough maker” or “bread bucket” in your search. You’ll have to wade through the search results to find one. Make sure the hook is still with the bucket, and it’s a bonus if the clamp is also there. Expect to pay upwards of $45 plus shipping.
My bucket is embossed on the front with:
No. 4 UNIVERSAL BREAD MAKER
Awarded Gold Medal St. Louis Exposition 1904
Made by Landers, Frary & Clark
New Britain & • Conn. U.S.A.
The lid is embossed with these instructions:
Put in all liquids first then flour. Turn three minutes. Raise in Pail. After raising turn until dough forms a ball. Take off cross piece, lift out dough with kneader.
Landers, Frary & Clark operated from 1865 to 1965 and they made quality products if my bread bucket is anything to go by! It seems that the name “Universal” was adopted for the company’s products in 1890. The bread maker bucket was considered quite a revolutionary household product for its time.

The assembled pieces: the lid, dough bucket, table clamp, and handle.

Managing Editor Annie Tuttles’s daughter, Olga,
helps to make bread for the family’s evening meal.
Here’s a favorite recipe I like to use.
Bucket bread
1 cup lukewarm water
2 tsp. sugar
3 Tbsp. active dry yeast
6 cups warm water
½ cup honey
½ cup vegetable oil
1 cup oat bran or multi-grained cereal, such as Sunny Boy, Red River
2 Tbsp. salt
7 cups whole-wheat flour
10 cups (approximately) all-purpose flour
Put one cup lukewarm water in bottom of the bread bucket, stir in sugar, then sprinkle yeast over top. Allow the yeast to puff for 10 minutes.
Add the wet ingredients to the yeast in the bucket: water, honey, and vegetable oil.
Dump two cups of the whole-wheat, one cup of the cereal or oat bran, and salt on top of the liquid ingredients. Attach dough hook to bucket and turn handle to combine ingredients. Continue adding whole-wheat flour until all seven cups are used. Continue to add flour from the 10 cups of all-purpose flour until the dough is the right consistency. Depending on the temperature and humidity, you may or may not need all of the 10 cups. Turn handle for three minutes until the dough is well-formed, place lid on top of the bucket, (if yours doesn’t have a lid, put a clean tea towel over top), and set in a warm place to let rise until doubled (about 1½ hours).
After rising, turn the handle a few times to punch down dough, and turn out onto a floured surface. Cover with a tea towel and let rest for 20 minutes. Punch down and divide into four or five pieces (depending on the size of your bread pans). Place in greased bread pans. Cover and let rise again until almost doubled (about 1 hour). Bake at 375° F for 45 minutes (check near the end of baking time). Remove from pans and cool on wire racks.
I usually use oat bran. Sometimes I’ll substitute two cups of the water with two cups of sourdough starter and then continue on with the recipe. An egg or two makes for a nice rich bread.
My bread bucket is one of my favorite things in my kitchen. And remains well-worth my initial investment.










I’m interested in a bread bucket. Do you know where I can buy one. In working order
is the cam co aluminum newer one identical in use, method to the #4 Landers, Frary, Clark?
Mine has not been used for years. What metal are they made of? How best to clean up? The top is very rusty. Everything works (or will with a bit if oil) but it has been neglected (mea culpa) for too long – would like to make it look more cherished , cleaner, but don’t know how best to accomplish that. Do not want to use a cleaner that might damage it…
Try a CamCo aluminum bread bucket. Even vintage ones are usually pristine. I paid about $25 on eBay for a nice vintage one but that was many years ago. It makes four loaves’ worth of dough at a time.
I just found a bread bucket that’s been in the basement for years. It’s a little rusty. Has anyone ever cleaned rust off one? Not sure what to use.
Here is the recipe for bread that was handed down from grandmother to my mother and I have been using for years .In a seperate bowl soften 2 packages of active yeast with a dash of sugar in 1/2 cup warm water . scald 2 1/2 cups milk / when done add 2 table spoons shortening , 4 teaspoons salt , 1/4 cup sugar , stir till all is melted . Add 2 cups cold water to help cool milk mixture , when luke warm add yeast mixture . Sift 12 cups of flour ( I use King Arthur all purpose ) add all to mixer and mix till all comes together in a ball . Grease top with butter and cover , and let rise , about 45 min. is done when you stick your finger and it leaves the dent . Grease 4 pans with shortening , turn dough hook a couple of times to punch down the dough . Remove from mixer with the hook , quarter and place in pans . help the dough move into nice loaf shapes , raise again until it rounds over nisely , about 45 min. Bake 35 to 40 min. at 350 , until golden brown . Remove from pans and cool on rack . ENJOY
Thanks for a great recipe! I got one of these buckets and it’s a treasure.
I’d love to know where you got your large bread pans. They are nice!
Happy bread making!
Debi D.,
I have a bread bucket and use any bread recipe that makes about three or more loaves. Doesn’t have to be a special one for bread buckets.
I love my antique bread bucket!!!!
Are there any more recipes for the bread bucket other than the one in this article? I baked this one and the loaves turned out great! I’m ready to venture out with something different. Any suggestions?
I share the childhood memory of the bread-bucket bread making process with my sister, Erica, and I own a bread bucket.
Wonderful article! I have been making bread for more than 50 years; my siblings & I grew up with it. In the 1960s, my mother collected buckets, fixed them up & passed them on to relatives & friends as wedding presents. I am using my grandmother’s bucket, which is a “Universal” #4.
Thank you for the pictures and the clear, descriptive article.
Erica Brinton