 |
|
| Issue #133 • January/February, 2012 |
If you take pride and pleasure in growing your own organic garden foods and raising your own chemical-free meats, then consider rabbits.
Domestic rabbits are an easy-to-raise, reliable meat animal that’s ready for table use in about 90 days. One doe can produce four or more litters of 7 to 8 kits each in one year, but to keep a doe in good form I’d suggest not allowing her to have more than a couple of litters a year. If she’s allowed to have too many, the young ones may need fostering which takes a little “rabbit-rearing” experience, so it is best for beginners to work with manageable numbers.
A two-month-old rabbit, often referred to as a “fryer,” weighs in around a couple of pounds and an older, heavier rabbit, one that’s matured beyond fryer status, can weigh anywhere from 3 to 7 pounds depending on breed. Mature rabbits are best suited for canning, pot pies, stews, and recipes that call for longer, slower cooking. A fryer can be used in place of domestic chicken in almost any recipe, including frying.
Rabbits are especially well-suited for hobby farmers, backyard enthusiasts, or anyone with limited space since they don’t take up a lot of room and can spend their entire lives living contentedly in close confinements. Getting started with rabbits is easy on the budget and they are super productive. A couple other little “bonus deals” that come with raising rabbits is that the soft fur can be sold as a craft item and you’ll also end up with some very rich manure for the vegetable and flower gardens.

This two-story wood-and-wire rabbit hutch provides comfortable living quarters for rabbits and easy access for the breeder.
Housing your rabbits
When getting started with rabbits the first and, no doubt, biggest expense is building your housing units or cages for your stock. If you do it right the first time around, you’ll find that a well-made, carefully planned unit should last for many years.
Your primary consideration is location. You want to select a spot that offers extra protection from the heat of the summer sun and, especially for colder zones, helps shield wind, rain, and snow during the winter months. Building your hutch by adding it as an addition to the side of an existing building, such as a barn, tool shed, or workshop, works great for this purpose.
I like the Old World “hutch-style” housing as shown in the photo. This common type of housing system provides a comfortable and safe home for the rabbits and is easy to access for the breeder.
When laying out plans for your rabbitry, you’ll find that most books on the topic recommend the inside cage measurements be roughly about two to three feet long for smaller breeds, four or five feet for medium-sized breeds, and six to eight feet for giant breeds. You can use these measurements as rough guidelines when you draw up your plans.
For beginners, or those with limited space, I’d recommend a smaller to medium-sized unit as giant breeds are on the more expensive side for starting up with. But if you are familiar with the larger breeds and they are the choice that fits into your plans and budget, then the bigger cages will serve you best.
The depth of smaller or medium-sized cage should be no more than 2½ to 3 feet for easy access to reach the rabbits. Larger cages can have more depth as needed.
The front of the hutch (doors) and one or two sides of the cage should be covered in heavy wire so the rabbits get daily light and air, and can enjoy the outdoor scenery while being protected from predators. Hang the wire fronted doors on solid hinges and fit them with dependable latches or buckles.
The floor (or floors) of the unit should be wire so droppings can fall through to the ground. Use good quality wire, not chicken wire which is too fine and thus may be hard on the rabbit’s feet.
Once the rabbits are housed, you can strew the floors with clean straw daily to protect their feet, especially breeds that don’t have heavy padding.
If your building is a two-tiered unit, the second floor can have built-in trays for catching droppings. This makes clean-up easy and protects the lower floor residents.
I have seen three-floored complexes but you should keep in mind that sanitation and ventilation becomes harder to control with each additional floor, not to mention that the height makes it harder to access, so I recommend keeping the unit to one or two floors with desired number of “suites” going lengthwise instead of a high-rise.
When the unit is finished, ensure that there are no sharp or jagged pieces of wire sticking out which could cause injuries to your animals.
The remaining solid walls can be built out of wood. Since rabbits tend to gnaw on wood I would suggest using a heavy, untreated wood in any areas that they will have access to.
A good way to discourage rabbits from gnawing on wood is to provide them with a nice, freshly-cut, juicy branch to divert their attention. Make sure it is an edible wood such as a fruit branch or willow, not one that may be poisonous, and then be sure to change it as often as needed to keep their interest.
If wood gnawers remain a problem, you may have to cover the vulnerable parts of the hutch with metal such as galvanized steel or tin sheeting which is relatively cheap and quite pliable, making it easy to work with.
The hutch should be built on legs so that the house is sitting off the ground protecting your rabbits from dampness and where the droppings from the bottom floor dwellers can fall through to the soil below.
Make sure your rabbitry has a good solid roof. Canvas or plastic tarps are used by some breeders who live in warmer climates, which are removable when protection is not needed, but for colder zones I find it more suitable to make the roof out of wood. This will do a good job providing shade in summer and yet keep out rain, sleet, and snow in winter.
Keep in mind that rabbits do need a dose of daily sunshine so those that are housed inside of buildings where no direct sunlight can be had will need to have vitamin D supplements added to their feed, one of the reasons why I prefer housing which allows natural exposure to sunlight.
You will need to provide “nest boxes.” Wooden fruit boxes (the kind apples or vegetables are often shipped to stores in) make common birthing beds but you can also build a “drop box” which sits below the floor of the cage and allows the doe to use her natural instinct to “go underground” when kindling (giving birth.)
The bed must be lined with a clean, comfortable absorbent material such as straw, sawdust, wood shavings, or cotton hulls, the latter being a little harder to come by.
After you’ve added your feed containers or food hoppers and set up the crocks to hold drinking water or have purchased modern-day, no-drip water bottles to keep them supplied with plenty of fresh water, it is time to consider feed.

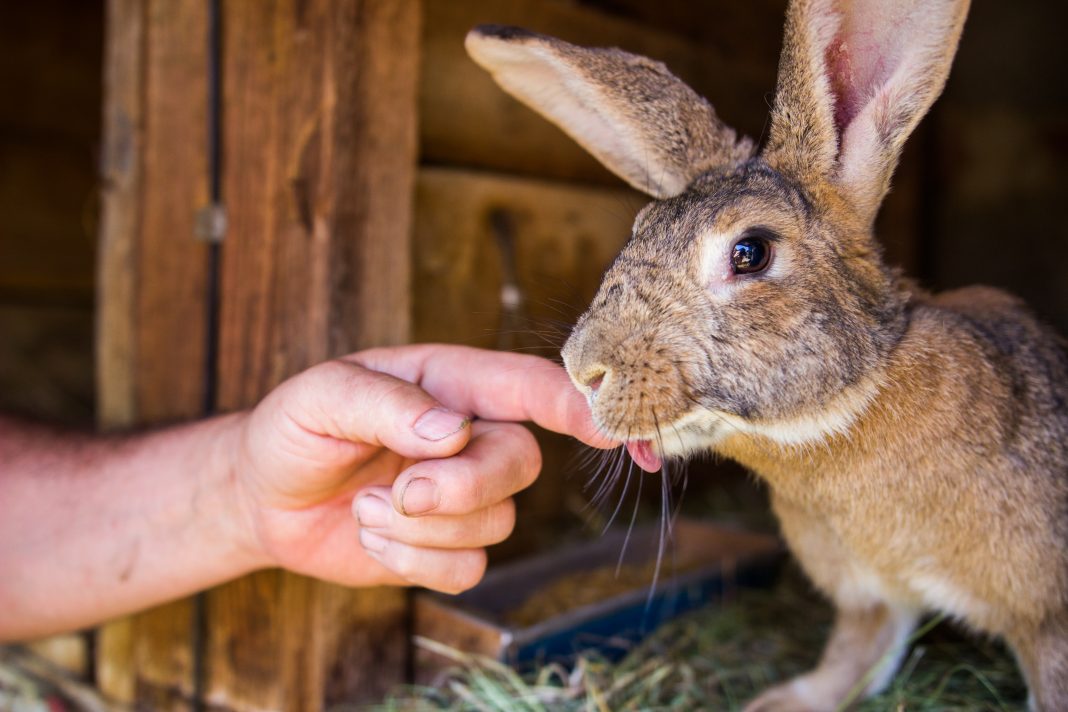
A single doe can produce several litters each year.
Feeding your rabbits
Rabbits naturally love fresh grains and greenery. Any leafy garden green such as outer leaves of lettuce, carrot and beet tops, spinach, Swiss chard, pea greens, and other garden scraps make fine dining as do wild greens such as palatable weeds like pigweed, dandelion greens, and clover. You should introduce fresh greenery to young rabbits in smaller amounts to avoid digestive upsets. And always be sure to gather weeds for feed in areas where they will be clean and free of road dust, herbicides, and pesticides.
You can also feed your rabbits commercial feed pellets that contain everything they need for a well-balanced diet. Ask an experienced breeder which brand they prefer or get advice from your dealer or vet on brands that might work best for your need and breed.
Another option is to buy various feeds and mix and match them to suit your need or your rabbit’s own tastes. Or simply use pellets as a feed supplement to ensure your rabbits are getting all the good stuff they need such as protein, carbohydrates, fats, mineral salts, and other nutrients that are vital to good health and well being
Another option, especially well-suited for smaller numbers, is to make up your own menus, serving the rabbits a different meal several days of the week in proportions to suit their size and appetite. Such a menu could include crushed oats or other grain, some pellets and garden scraps or other greenery one day. Another day it could be made up of timothy, pellets, and gathered wild greenery. Getting yourself a good book written by an expert rabbit breeder can help you draw up such menus to keep your rabbits well-fed and content.
You should increase your rabbits’ grain and pellet feed in winter as they will burn more calories when the weather is colder. As for obtaining greenery in the winter, the sale tables in the produce department of larger grocery stores often contain affordable greenery at reasonable prices. You could also ask your non-rabbit raising neighbors to save up their green scraps such as cabbage leaves and hearts, outer leaves of lettuce, and various peelings for special treats.
Breeding
There are many different breeds to choose from, something a beginner shouldn’t stress over too much. When raising rabbits for the family meat larder, breed is not as important as it is for those who are doing it on a commercial scale or those who raise animals for show.
I would suggest you find someone in your neck of the woods that raises rabbits successfully and buy your foundation stock from them. This will also give you access to a knowledgeable person who, I am sure, will be more than happy to share advice. Regardless of breed, don’t start with too many rabbits! For a novice rabbitry, one buck and two or three does should be good for starters.
Keep in mind that no more than three does should be bred to a buck within a week’s time as this may harm his fertility. You can build up your stock as you progress in the hobby but this will give you a nice workable number to manage. A doe should reach adult size and weight before allowing her to breed. Smaller breeds will reach maturity around five months and larger breeds around nine months.
House your doe near the buck’s quarters. When she goes into heat (signs include thumping her feet and grunting) she will be ready to breed and can be placed in with the buck. She can be housed with him until she nears her full term of pregnancy, at which point she should be moved into her own quarters where her nest box is ready and waiting.
Raising healthy rabbits
The biggest secret to raising a healthy family of rabbits is providing them with clean living quarters. Good housekeeping helps prevent and control diseases. The area around the hutches should be kept clean and tidy, too, to discourage vermin from using the litter as nesting material.
After cleaning out the hutches, put down a fresh absorbent layer of wood shavings, sawdust, or peat moss to absorb urine and keep the living space comfortable and smelling fresh and dry. And change the straw on the sleeping quarters regularly.
Some common rabbit ailments that you can tend to yourself are constipation caused by lack of greenery or too much dry feed; a balanced diet is needed to avoid this problem. Fleas and lice are a nuisance and when heavily infested, can cause the rabbit to become anemic and even lead to death. You can buy dusting powders from your vet to rid the invaders. Heat stroke can be prevented by keeping your animals out of direct sun and can be treated by placing the affected rabbit in the shade with plenty of cool water and greenery to revive him. When you’re not sure what’s wrong with your rabbits, you should consult a veterinarian.

A fryer rabbit can be used in place of chicken in almost any recipe.
Butchering
The prime slaughter age is around 90 days. There are a number of ways to mercifully dispatch a rabbit. The Old World way is to deliver a very sharp blow to the head, placing it directly in front of the ears which will stun the animal. Hang upside down by one hind leg and remove the head with a sharp butcher knife. Allow to bleed out, then continue to skin and gut the animal. Save the organ meats as they are delicious. It is now ready to take into the kitchen to be washed in cold water and prepared according to the day’s menu. To cut a rabbit into serving-sized pieces, remove legs first, then make three to four cuts across the back.
Recipes
You have now reached the point where you and your family can enjoy the fruits of your labor. Rabbit meat is delicious. It is white, fine-grained, and delicately flavored. It is a super healthy choice of protein, being low in fat and calories.
I liken rabbit to chicken and if you are unfamiliar with how to cook rabbit, try it as a substitute for chicken in any traditional recipe. Below are a few of my favorite ways to enjoy rabbit.
Canned rabbit:
This is a handy recipe when you have to downsize your rabbit population and need to put up the excess bounty for future use. Canned rabbit can be eaten cold as a luncheon meat or done up into meat pies, casseroles, or served with noodles or dumplings. The broth is rich and delicious. To make a hearty luncheon spread, chop the canned meat until it is fine and then blend it with homemade mayonnaise and minced onions and use as sandwich spread, or puree and serve as pate with crackers.
Cut rabbits into equal-sized pieces and sprinkle with salt, pepper, and a little cayenne or sweet paprika. Working in batches, fry the rabbit pieces in hot shortening or oil in heavy cast-iron skillet until golden on all sides. Set aside and continue until all pieces are browned.
Pack into hot, sterilized canning jars. Add a few cloves of whole peeled garlic, a sprig or two of fresh rosemary, thyme, parsley, or other herb of choice along with a few dried red hot chili peppers to each jar, if desired.
Cover with homemade rabbit stock, use chicken stock, if you’d rather.
Leave an inch headspace. Wipe rims or jars with damp cloth, put on lids, and process in pressure canner following manufacturer’s directions for canning chicken if a rabbit recipe is not included in the manual. My recipe calls for quart sealers to be processed for 1½ hours at 10 pounds of pressure.

Pressure can rabbit for 90 minutes at 10 pounds pressure (adjust for your altitude).
Rabbit stock:
Put saved up rabbit carcasses into stockpot. I find that the ribs and belly are excellent for stock making so I always set them aside when using the prime portions of meat (the legs and back) for frying. You can also add the organ meats, if you wish. Add minced onion, diced celery, turnip, cabbage, parsnip and carrot trims, chopped garlic, fresh or dried basil, rosemary, thyme, and salt and pepper to taste. Cover with water. Bring to a boil, reduce heat, cover, and simmer for about two hours, adding more water as needed. Strain, taste, and adjust seasonings.
Smoked rabbit:
Put 3 or 4 cut-up rabbits in a large earthen bowl. Cover with a marinade made from 1½ cups red wine, ¼ cup olive oil, 1 tablespoon salt, 6 cloves minced garlic, grated rind of half of a lemon, 1 tablespoon freshly grated black pepper, 2 tablespoons onion powder, and ½ cup brown sugar. Cover and marinate in fridge for at least 12 hours, turning frequently. Remove from marinade and pat dry with paper towels. Cold-smoke in smoker at 75 to 85° F for about two hours or until desired smokiness is reached. Hot smoke for several more hours or until meat is thoroughly cooked. Or, after the first two hours of cold smoking, transfer rabbit pieces to baking sheet, place in 225° F oven, and roast until meat is done, brushing occasionally with vegetable oil to form a glaze and to keep meat from drying out. Cool and store the smoked rabbit wrapped tightly in paper in fridge for up to two weeks. It makes a delicious appetizer when sliced thinly and served with baby pickled onions and pumpernickel.
Fried rabbit:
This is always a family favorite. Every rabbit lover has a special recipe for fried rabbit. This old one of Mom’s is how I do it and it is finger-lickin’ good.
1 rabbit, cut into serving-sized pieces
¾ cup flour
1 tsp. each garlic and onion powder
1 tsp. salt
¼ tsp. black pepper
2 (or more) cups brown beer (Mom used Dad’s homemade malt beer, but any dark beer will do. If you do not wish to cook with beer, apple cider or juice will suffice.)
vegetable oil for frying
Mix flour and seasonings in paper bag, add rabbit, and shake until coated. Heat a frying depth of vegetable oil in heavy skillet or Dutch oven and brown rabbit on all sides, turning frequently. Reduce heat and add the beer. Cover and simmer 40 minutes, adding more beer as needed until meat is tender. When meat is cooked and the last addition of beer has evaporated off, turn up the heat, uncover, and fry the meat until it turns crisp and golden, about 15 minutes. Serve with French fries and apple cider vinegar for shaking over the chips.







You can eat as much rabbit as you want. However, your body needs fat calories, and rabbits are generally low in fat; wild rabbits will have even less fat. If intend to only eat meats as a source of calories you will need a meat with plenty of fat to sustain your caloric needs, otherwise you slowly starve.
I’ve been told, and it may be an “old wives tail”, that you can’t eat mor than 2-3 servings of rabbit per week because it doesn’t provide enough nutrition in your daily/weekly diet.
Any truth to that?
Thanks and it was a great article.