| Issue #144 • November/December, 2013 |
Editor’s Note: Several readers have contacted us asking about the exact model number of the vest pictured in this article. We contacted the author and he replied:
The vest I have doesn’t have a model number. The brand is Moose Creek. You might refer the folks to Cheaper Than Dirt (www.cheaperthandirt.com). They have a good selection of vests. Just remind them to purchase a good quality vest that will give them years of service. A good one will run around $50.00 and I believe it is money well spent.
When we were younger, my friends and I would go deer hunting, starting as soon as the season opened. We would always go the day before the season opener and scout out the territory where we intended to hunt. The hardest thing about deer hunting is the scouting; we were in pretty good shape because we always covered a lot of territory. When all the leaves have fallen and after a rain, the footing is especially treacherous. A hunter who has never taken a fall while scouting hasn’t done a lot of scouting. You haven’t lived until you have been slapped in the face by a branch that someone let go before you could get a hand on it. One of my friends even fell out of his tree stand. I asked him how far he fell and he replied, “All the way to the ground.”

My fully-loaded vest is a perfect companion to a “grab-and-go bag.”
There are many ways we could have gotten hurt while we were out in the woods and I guess we were just lucky that none of us were ever seriously injured. Minor bumps, bruises, and scrapes were all we ever got, which was good because we never even carried so much as a Band-Aid.
One day, while browsing through one of the many sporting goods flyers that I receive in the mail, I spotted a vest with a lot of pockets. I realized that it would be the solution I was looking for in order to carry just about anything I wanted and still keep my hands free. That was how my utility vest came about. The first thing I purchased was a small first-aid kit. After that I would add an item here and there until I had a pretty useful utility vest. At the time I never thought of it as being a survival vest.
There have been many articles written about so-called “bug-out bags,” “grab-and-go bags,” etc. All I have read about are very good. My problem is, if I needed something, I would have to rummage through the bag to get whatever I needed. I think my survival vest would be a perfect companion to the bags. Everything you might need in a hurry would be right at your fingertips, plus you could wear the vest while hiking or hunting. When not in use, it can be kept in a vehicle for other emergencies. With the vest, you always have your hands free to carry other things.
The vest
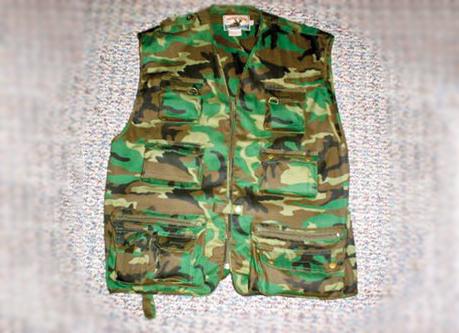
Vests come in all different colors and patterns. Picking one out is simply a matter of personal choice. Some vests that I looked at didn’t appear to be strong enough to hold up under rough conditions, and a lot of them had nylon mesh built into their construction. I would avoid one of those because the mesh would be likely to snag on things. My vest is a Moose Creek brand and is 65% polyester and 35% cotton. It feels like canvas, is very strong, and has taken a lot of rough treatment. But you can see from the pictures that it still looks great.
The vest I have has nine front pockets: two with zippers, three with double snaps and Velcro, and four with Velcro-only closures. It is highly unlikely that any item in these pockets will ever be lost by accident. There are four inner pockets: two with zippers that hold both of my handguns and two other pockets that have Velcro closures. On the back of the vest there is a large pocket with a zipper that will hold larger items. The front pockets are more like pouches since they will expand to allow a lot of stuff to be loaded into them. The entire vest is made of two layers of material for added strength. The vest is not insulated, which I think is a good feature. This allows me to wear a loose-fitting winter coat over the vest and still have good freedom of movement.
Vest contents:
- 7×7-foot tarp
- small first-aid kit
- signal mirror
- 52×84-inch Mylar space blanket
- Silva orienteering compass
- two triangular bandages
- small bottle of insect repellent
- Russian Dynamo flashlight
- Gerber bypass pruning shears
- folding lockblade knife with saw blade
- Simmons 8X binocular (folding type)
- Gerber Suspension multi-function tool
- magnesium fire starter
- military poncho
- magnifying glass with case
- FM 21-76 U.S. Army Survival manual
- two semi-automatic handguns*
- Storm emergency signal whistle
- parachute cord
*With the exception of the two handguns, I store all the other listed items in the vest at all times.
Handguns

The vest showing placement of two handguns.
The photo shows the vest zipped down and two semi-auto handguns placed in the zippered pockets located inside the vest in a perfect position for easy reach. Although they are shown partially inserted into the pockets, they will fit entirely inside. If we had to leave in a hurry, both of these weapons would be in the vest. The gun on the left is a Walther P-22 in 22 caliber. The gun on the right is a Glock Model 27 in 40 caliber. The .22 can be used for hunting small game. The 40 caliber is for personal defense and can be used for hunting larger game. For safety reasons, these weapons are carried without a loaded chamber. If your state issues carry permits, I suggest that you obtain a permit. I have a carry permit, but even if I didn’t have a permit, I would not hesitate to go armed in an emergency. I selected the two guns because of their small size and their reliability. I believe that a person without an obvious weapon seems like less of a threat to other folks.
Pruning shears
Some might think that including a pair of pruning shears is a little odd. I have found that the shears are one of the most versatile tools that I carry. You can cut dead limbs for a fire, make a pole for fishing, and do other things that you might ordinarily do with a knife. Cutting saplings for an emergency shelter is a snap with this tool much easier and faster than with a knife.
Russian Dynamo flashlight
I included the Russian Dynamo flashlight because it does not use battery power. The energy needed to power the light is supplied by pumping the grip. I have had this one so long, I didn’t know if anyone still sold it. But Nitro-Pak Preparedness Center, Inc. still sells them at www.nitro-pak.com/russian-dynamo-flashlight or call at 800-866-4876. This is a tough little light and it has two settings. A switch on top changes the light from beam to flood. It isn’t as bright as a regular flashlight, but it is nice to have when you need it and it will get you to where you want to go at night.
U.S. Army Survival Manual
This is one of the most comprehensive survival manuals that I know of and I believe it is a must-have book for anyone expecting to be outdoors for any length of time. It covers water, food, firemaking, and survival in special areas. There is a chapter covering hazards to survival. I keep my copy stored in a Ziplock bag with all the air pressed out. Paper will absorb moisture, but after several years, mine still looks brand new.
Military poncho
When it comes to staying dry in wet weather, I don’t think you can beat a military poncho. The poncho is roomy enough to cover a backpack and your body down to your knees. It has a hood with a drawstring and you can keep your hands inside it for warmth. They even make a blanket liner for additional warmth. Most sporting goods stores carry the plastic variety for limited use, but for a survival situation I recommend that you get one that will stand up to heavy use. Cheaper Than Dirt (www.cheaperthandirt.com, 800-421-8047) has the poncho and the blanket liner if you are interested in adding it to your vest.
Fire starters
I carry a medium-sized prescription bottle full of cotton balls saturated with petroleum jelly. When I want to start a campfire I use one of the cotton balls to start the fire. They will light instantly with a match or lighter and will burn for a long time long enough to get a fire going pretty good. These fire starters are simple to make and are lightweight to carry in the vest. If you make these, just be sure not to hold them with your fingers when you light them or you might get a nasty burn. Place one on the end of a stick before lighting and then place it in the kindling. In a few minutes you will have a nice fire going. Another option is to purchase a magnesium fire starter.
Parachute cord
I always carry several feet of parachute cord in my vest. You can use the cord to make an emergency shelter, to lower yourself down a slope, or for anything else where you would need a rope. It is another item that stores well in a Ziplock bag.
Simmons binocular
The Simmons binocular folds into a small package and has a case. I selected it because of the size. It is a little difficult to use because of the small size, but the trade-off is worth it. Anything larger would not fit into the vest.
Emergency whistle and other small tools

With the exception of the handguns, all other items are stored in the vest.
I always carry a Storm emergency signal whistle. It is very loud and can be heard up to half a mile away. The whistle has even been tested under water and can be heard for 50 feet. Go to www.wind-storm-whistles.com or call 314-830-4887 if you would like to purchase one of the whistles. The whistle sells for $5.50 plus shipping. It is something that you would rather have and not need than need and not have. This whistle is used by the military and other government agencies.
You might want to carry several extra Ziplock bags. They are excellent as water or food containers in an emergency and they add very little weight to your equipment. Cut a length of heavy-duty aluminum foil, fold it and place inside the survival manual. You can mold it into an emergency drinking cup and even boil some water in it to make it safe to drink. At some point I plan to add a small fishing kit.
Conclusion
If you are thinking that this vest is heavy, you are right. However, a few minutes after you put it on, you don’t notice the weight because it is pretty well distributed.
My utility/survival vest has served me well over the years. It has given me a sense of well-being knowing that if I ran into a difficult situation, the vest would be there when I needed it. Because I enjoy getting out into the woods, I like having something that will make my stay there a lot more comfortable. With the vest, I can make an emergency shelter, build a fire to stay warm and dry, and if necessary, feed myself.
If you want to make one for your own use, you can expect to pay around $50 for a good vest. Surf the net and you will find several different vests to choose from. Some look very good and others I wouldn’t waste money on. You might want to buy one that is slightly oversized so you can wear extra layers of clothing underneath it during cold weather. After you get the vest, take time to measure the pockets so you will know what size tools will fit in them. Pick tools that you are comfortable using and don’t scrimp on quality when you purchase them. Buy something that you are willing to stake your life on because some day you might have to.
After you have bought your vest and stocked it, why not make one for other members of your family? If the time comes when you have to bug out, you won’t be doing it without the family. Young boys and girls would like to have their own, I am sure, so give it some thought. You might someday be glad you did.


