| Issue #124 • July/August, 2010 |
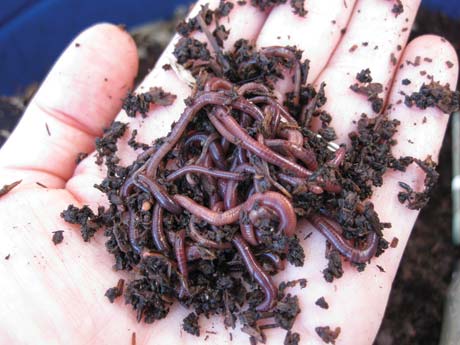
Vermicomposting takes composting to another level using Eisenia foetida (commonly known as red wiggler, brandling, or manure worms) to break down organic matter such as food scraps from your household, clippings from your yard, and even “night soil” (human poop), to create rich compost that can be used to amend soils in your garden.
|
Vermiculture has become a buzzword among backyard gardeners, urban farmers, and homesteaders looking to raise worms for personal use or to supplement a homesteading income.
Vermicompost contains water-soluble nutrients and bacteria that not only provides excellent fertilizer but ideal soil conditioners. Vermicast, or worm castings (worm manure), is the end-product of the vermicomposting process.
Amanda Egdorf-Sand, Vermiculture Specialist at Piedmont Biofuels in Pittsboro, North Carolina, conducts workshops to educate the public about vermiculture and the ease of creating your own vermicompost setup.
“Most people don’t realize how much waste they produce, and the potential worth of that waste,” said Egdorf-Sand. Folks who compost think about food scraps, coffee grounds, and yard clippings, but you don’t often hear about the benefits of using poop. “This human creation is rich in nutrients and a good source of fertilizer. The organisms that are harmful to humans that exist in your waste are a bounty of goodness for the worms.” Egdorf-Sand says it is possible to feed the waste directly to your worms. “A system that just collects the poo and either allows the pee to drain through or doesn’t collect pee is ideal, because otherwise there is too much liquid and the salts are too high for the worms to handle.”
Other food sources for your worms include kitchen scraps, newspaper, junk mail, compost, manure, grass clippings, and leaves. “Basically anything that will decompose, minus any meats, oils, or dairy—they will get super stinky and slimy,” said Egdorf-Sand. “Any of these can be fed directly the way they are, ground up (depending on quantity, your shredder size will change) using a small kitchen blender for household kitchen scraps or even wood chippers for larger sized operations.”
As the worms dine off the waste and scraps you feed them, they are creating manure of their own which is called castings. “Castings contribute the most benefit by protecting the plants from harm. The biological activity within the castings penetrates the soil and root zones of the growing plant, fighting off those diseases that can cause harm,” said Egdorf-Sand.
|
Even an urban backyard can develop a vermicompost system. “You can have as small a space as a five-gallon pail to as large as a warehouse. The worms self-regulate based on the size of their bin and the quantity of food given to them, so no worries on world worm domination,” she says. “A good healthy population will be between 1-2 lbs. per square foot of surface area (around 1000-2000 worms per square foot).”
If you want to create an operation to sell worms, Egdorf-Sand says the industry is always looking for worm growers. “There are projects out there right now that are looking for thousands of pounds of worms (and it is hard to come by that quantity at one time).”
“If you go this route, then your by-product is the castings (which you can also sell, although you will need to check with your state government on composting rules and permits required for the size of your operation as well as the feedstock you are using for the worms).”
|
||||
Depending on the size of your operation, the time before harvestable material is available will vary. “If you are using a household Rubbermaid bin, then it will be probably 6-9 months before you are able to harvest any material.”
When harvesting, you can choose one of the following options, depending on the size of your operation. “Dump the bin onto a tarp, allowing the worms to dive down into the pile. You scrape off the top and sides and allow the worms to dive down further. This whole process will take about 20 minutes and eventually you will have just worms in the bottom.”
|
Your next option is to stop feeding the worms for two weeks, then provide food a cup at a time in one corner of the bin. “After a few days, all the worms will be in that corner and you can harvest the opposite half of the bin, then repeat for the other side.”
Once you have harvested the worm castings, how do you utilize them?
“You can use the worm castings and vermicompost in a couple of different ways: as a portion of your potting mix for seed starting, direct application in the field as a side dressing on a plant, as a transplant amendment, or as a tea,” said Egdorf-Sand.
Potting mix shouldn’t contain more than 15-20% castings as the effectiveness does not increase above that point. If you are transplanting, put a handful in the hole prior to adding the plant, making sure the plant roots are touching the material.
|
“As a tea, you would take about a cup of vermicompost for 5 gallons of water and aerobically agitate it for 24 hours prior to use. This agitation can be accomplished by using a basic fish tank aerator (bubble stone).” Use the tea within 24 hours for maximum effectiveness.
Your vermicompost operation can last year round, indoors or out. “If you start your bin outside, then you should leave it outside, because outdoor bugs will be in there and you don’t want those in your house, however you could bring it into your garage,” advises Egdorf-Sand. “The worms will slow down in the cold winter and they will eat less only because the temperatures aren’t warm enough to sustain decomposition of the food. The worms will basically ball up together in the bin and move to a warm corner.”
Raising worms could be the ideal way to increase your homesteading income, and provide the very best nutrients to amend your garden and landscape soil.
For more information on where to find worms and how to set up, troubleshoot, or purchase a pre-constructed bin, visit www.p2pays.org/compost. To start your own worm business and learn more about the industry visit www.wormdigest.org and www.worms.com.
|


