 |
|
| Issue #130 • July/August, 2011 |
I was in a Lowe’s store yesterday and happened to walk past the appliance section, where I saw gleaming stainless steel, black, and white washing machines and clothes dryers that looked more like something from a spacecraft than a laundry room. They all had hefty price tags yet boasted of their energy and water savings. If I used that much energy and water to do laundry, I’d be horrified. My money can be spent on much better things than that.
So how do I wash and dry clothes, you may ask? A scrub board in the creek? Pounding clothes on rocks? Naw. Been there, done that; but didn’t like it much.
I wash and dry my clothes like both of my grandmothers and my mom did when I was young. I have a wringer washer and a clothesline just a few feet outside the front door. I don’t use the clothesline in mid-winter anymore, although I have in the past. Now I have a propane clothes dryer to use during rainy spells, winter, and when I’m in a hurry.
|
Advantages of a wringer washer
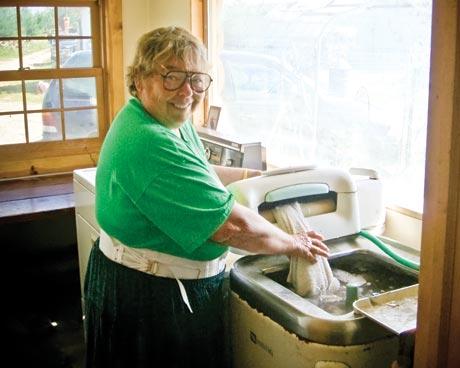
While using a wringer washer is a little more labor-intensive than using an automatic washer, on the homestead the wringer washer wins, hands-down. First of all, it uses much less water. I fill the wash basin with 15 gallons of water. The rinse tub holds 30 gallons, but I only fill it with 15 or less. That may seem like a lot of water, but with that water, I typically wash six or seven loads of laundry. I start with whites, I progress to light-colored t-shirts and towels, then to darker, but not-so-dirty shirts, darker towels, and good jeans, then move on to dirtier shirts and work jeans, and finally to really dirty work jeans and rugs.
So those 30 gallons of water wash six or seven loads of laundry. And the water doesn’t have to be hot, either. Beat that, automatic washers!
Did I mention that my clothes really come cleaner in a wringer washer than they do in an automatic? Well, it’s true. While we were in “camping” mode on our new homestead, I took our clothes to the laundromat in town. Not only was it horribly expensive, but also my clothes never came as clean as I was used to. I tried stain removers, scrubbing before washing, and hotter water to no avail, but as soon as I got my wringer washer set up, my clothes once again came clean.
And for those “dainty” or fragile washables which I have very few of you can easily swish them around in the tub for a few minutes, wring them out, and be happy that they didn’t fall apart or shrink.
Likewise, for those really, really dirty work jeans, you can leave them in to agitate for an hour if you need to and they come clean enough that your neighbors think you beat them on rocks in the creek all day.
Best of all, you can find a good used wringer washer on sale for less than $100. Mine came from the dump. It had the cord cut off, but we put a new one on and it has worked perfectly for years. I’ve seen them at yard sales and in newspaper shoppers for $25 to $50.
Once you bring home a wringer washer, you can expect it to wash clothes for you for years, trouble free.
|
Tips on buying a wringer washer
Although you can still buy new wringer washing machines, including a gasoline motor-driven washer that Lehman’s Hardware, among others, carries, most of us choose an “experienced” (used) washer, for financial reasons. And, while most used wringer washers are in good shape, it pays to know a little bit about them to make sure you’re getting what you want.
The wringer washer has a large tub with a removable agitator in the center. Under the tub is an electric (or gas, in a few cases) motor with a plug on it. The motor drives the agitator and wringer. The gearbox is under the tub, next to the motor. There is gear oil in the box to lubricate the gears. This box sometimes leaks dark oil; check for signs of leakage. You can always add more oil, but if the box is dry, your gears won’t last too long.
Some wringer washers are equipped with a pump to pump the water out of the tub after use. The pump will pump the water up and into a drain pipe, similar to that of an automatic washing machine. Or it will make quick work emptying the tub if you choose to empty the dirty water into your rinse tub or even out onto the ground. My aunt washed clothes in her kitchen and pumped the dirty water out into her kitchen sink to drain. After she was done washing, she rolled her wringer washer back under the stairway and hung her tub up on a nail, pulling a curtain across to hide them. There are many various ways to handle a wringer washer, other than having a designated laundry room.
If your washer doesn’t have a pump, the tub will drain by gravity. Mine never had a pump and we have plumbed it permanently into a PVC pipe, to drain out into my flower bed next to the house. My old wringer in Montana had no pump either, but I washed outdoors and just drained the water out onto the ground. Think about this when you go to look at your prospective washing machine; you don’t want a gravity drain if you must have your washing machine inside, in a conventional laundry room, and don’t want to re-plumb to suit your new machine.
The tub should be relatively clean. When plugged in, the knob on the outside of the tub should turn on the agitator when pulled out, stopping it when pushed in. The motor should run quietly, with no odd clanking or squealing.
The cord should not be cracked or have bare spots. Of course, you can always replace a frayed, broken, or missing cord, as I have done. It is quite an easy and quick job. Because water and a bad cord can cause a fatal electric shock, never use a wringer washer with a faulty cord.
The wringer is removed by pulling it straight up off the driving shaft. Set firmly in place, the top roller and bottom roller of the wringer should meet firmly when the top is pushed evenly down and the tightener on top turned down. The rollers of the wringer should roll smoothly when the handle on the side is turned. One way makes the wringer pull the clothes away from the washer into a rinse tub, the middle is stop, and the opposite way will make the clothes back up into the washing machine again.
There is a safety release above the rollers, usually a blue or chrome flat bar. In the event that clothes (or your fingers!) get trapped in the wringer, you can smack this bar with your hand and the pressure will instantly release from the wringer. The rollers will pop apart with a loud noise; to put the rollers back in place, just press down so that they are even, then turn the lever on top to lock them back in place.
You should check all of these features, if possible, before buying your new washer.
|
Advantages of drying clothes on a clothesline
Like washing clothes with a wringer washer, drying clothes on a clothesline is a little bit more work, but it isn’t work-work. It is quite peaceful and rewarding. All you need are clotheslines, a sturdy clothes basket, and a bunch of good clothespins. How cheap is that?
Your clothes smell so good after drying outside in the sun and wind that people actually sniff you when you stand nearby, wondering why you smell so good. No dryer sheet can ever imitate that wonderful fragrance. When I take my clothes down off the line, I can’t resist burying my face in the clothes, just to inhale that windblown perfume.
Yes, your clothes sometimes come off the line stiff and with some wrinkles, but modern fabrics are quite resilient and the wrinkles will come out soon after you get dressed, even without ironing.
Towels may not look as “fluffy” as those out of the drier, but boy, do they ever absorb the water when you use them. You’ll dry off in half as much time by using these nature-dried towels, and enjoy the process as they retain their great outdoor fragrance.
You can even hang clothes all winter, as I have done in the past. Despite snow and ice, they will eventually “freeze-dry” on the line, without having to bring them in first. Of course, you can also use a clothes-drying rack in front of the wood stove or in your bathtub to substitute for your clothesline in the winter. I’ve also had clotheslines in my basement, to use during the winter. The clothes dry very well, although they don’t have that outdoor, windblown fragrance.
Installing a clothesline
The simplest method of hooking up a clothesline is just to run it between two sturdy tree trunks or a tree and a building. You’ll want a clothesline made of plastic-coated wire so it won’t stretch. The plastic will keep the wire from rusting and staining your clothes and will also soften the “bite” on your clothes. A rope will work in a pinch, but it will eventually stretch and sag to the point of being useless.
A long line of wet clothes is extremely heavy. Couple that with the flapping these heavy clothes will do on the line and you’ll quickly see why you need to anchor the clotheslines with sturdy fasteners, such as screw eyes or strong hooks. With long lines, you will also need a propping pole, as even the strongest clotheslines will sag down under this weight to the point that some clothes may drag in the grass and dirt. A simple sapling with a Y in it is sufficient.
Although you can use the tree-to-tree or building-to-tree anchoring method, often you’ll want your clothes-hanging area in a spot devoid of trees. The alternative is to set in your own clothesline poles. These can be treated 4x4s, or steel 2-inch pipes. (You want your lines about 1 to 1½ feet above your head, for ease of reach; for me, lines 6½ feet high are just right. The posts should be sunk 3 feet in the ground. To gain extra line room, a 4-foot cross bar is fastened to the top.
When you have your post cut to length and cross bar fastened securely to the top, drill holes through the cross bar, spaced evenly. Through these, put eye bolts, to which your clotheslines will be fastened.
Dig a 3-foot-deep hole at least 6 inches wider than your post. Either pour a 4-inch concrete pad on the bottom of each hole or sit a 4-inch rock on the bottom of each hole, on which to rest your post. Cut some braces and stakes, then plumb and level your posts, one at a time. Mix up a wheelbarrow load of cement, a little on the sloppy side, and shovel it into the holes, being careful to work out air pockets and keep the posts plumb and level. Bring the cement up just a little above ground level and trowel it off so it slopes away from the posts. Let the cement cure for two days, then remove your braces.
Measure and cut your clotheslines, making sure to leave sufficient line to anchor each end. You can simply tie one end with two good knots, then stretch it tightly to the other end and tie that too, but I’ve found that it’s better to include a tightening turnbuckle on one end, as even the best of clotheslines will stretch and sag with use. With the turnbuckle, you can easily and quickly re-tighten your lines.
Yes, you could just dig a hole, put in a post, and tamp the dirt around it, but that post will eventually fall over under the weight of the clothes, even with a bracing wire run to a stake in the ground. Take the time to use the cement and you’ll be happy for many years to come.
|
Wash tub, clothes basket, and clothespins
To rinse your clothes, you’ll need a wash tub. You can either buy a new one from a large store, such as Home Depot, Menards, or Lowe’s, or use an old galvanized tub you’ve bought at a farm store or yard sale. Now that I have my new laundry room, I opted for a new plumbed-in plastic-on-legs tub. Before you plumb in a new tub, check out which side of the washer you’ll need your tub to be located on. The wringer on a washer can swing around to several locations; just be sure the knob to turn the agitator on and off is handy and that the wringer swings easily to both the wash-to-rinse tub location and the rinse tub-to-laundry basket position.
While you can use just about anything to carry your clothes, I prefer to use a good willow clothes basket, lined with a piece of old sheet. The sheet keeps the clothes from snagging on the basket and can be taken out and washed, if need be. Any water will drain through it. The basket is lightweight and airy, and dries quickly after use.
Some people like the wooden clothespins that simply shove down over the clothes. While I have used them, I really prefer the spring loaded ones that you squeeze open with thumb and finger. The one-piece pins seem to split and break easier, where the others last longer.
If you keep the pins handy in a clothespin bag on the line, hanging clothes is so much easier. You can just push the bag down the line as you hang clothes, with the pins always ready at hand.
Washing clothes
In the olden days, ladies washed their clothes, especially their whites, in boiling water. Back then, it not only ensured very clean clothes, but it also killed any lice in them. Today, that’s not usually much of a concern with us, but hot or boiling water will make washing with homemade lye laundry soap easier.
Fill up your washing machine with water, either hot or cold, to within about an inch of the top of the agitator. Add bleach, if desired, and laundry soap or detergent. Pull out the knob on the side of the tub so the agitator engages. Add your white clothes. Pre-treat stains before adding to the washing machine, if you wish.
Unlike the automatic washing machine, you have total control, down to the second, of how long you leave your clothes in to agitate. I usually leave my whites in for about 15 minutes. If you are using very hot water, you’ll do well to have a clean stick handy to fish the clothes out of the water in order to wring them. Turn on your wringer so that the rollers will pull the clothes from the tub toward the rinse tub.
Always be extremely careful when wringing clothes, as your fingers, hands, clothes, or even hair can be pulled into the wringer. For this reason, watch any children nearby, as well as your own fingers. My late husband, Bob, was “helping” his grandmother wash clothes when his hand got pulled into the wringer. By the time his panicked grandmother reacted and hit the emergency bar, his whole arm had gone into the wringer! Luckily, other than pain and bruising, Bob got off easily. Just be careful. I’ve used a wringer washer for more than 40 years and neither I nor any of my children has ever gotten into the wringer, but I always think about it.
Wring your whites into the rinse tub, then swish them around with your hand well. Swing the wringer around to the into-the-laundry basket position and wring the clothes dry. Put your next load of light-colored, lightly soiled clothes on to agitate and go hang the first load.
Washing tips
To keep bra and other hook-and-eye clothing from having the hooks squashed flat, run a sock, towel, or other larger, soft piece through the wringer with the hooks. To keep buttons from popping off as you wring the clothes, fold the buttons inward and also run a soft, large piece of clothing through the wringer at the same time to cushion them. Buttons are usually “pinched” off when the cloth goes through the wringer and the buttons are trapped on the outside, popping them off back into the washer.
Zippers can be a bugger in a wringer washer. But if you fold the zipper to the inside as you fold the waistband in half, burying the zipper, it will help prevent damage.
|
How to hang your laundry
Let me tell you right here, I don’t think any two women agree on how to hang clothes on the line. I’ll tell you how I do it, and you’ll have to take it from there. I don’t argue religion, politics, or how to hang clothes.
I hang my socks in pairs, by the edges of the cuffs, underwear by the waistbands, and T-shirts by the hem (being careful not to stretch them too much). Twin and double sheets are draped lengthwise over one line and pinned on each end and in the center on windy days. Queen or king-sized sheets are draped over two lines, using pins on each line. This keeps them from dragging in the grass or dirt. I hang pillowcases by the end seam. Back when I had diapers, I hung them by one end.
By holding the edge of your wet clothing in both hands and giving it a vigorous snap, your clothes will have fewer wrinkles.
I hang my shirts by the collar, folded over the line, so the shoulders don’t dry with a clothespin “pinch” mark in them. Jeans and pants are hung by the waistband. If you want a nice crease in your pants, fold the legs, making the crease, then hang the pants by the cuff. It does leave a pinch mark on the cuff, but that usually wears away quite quickly and the pants need no ironing to keep the crease.
Laundry soap and detergent
While you can use any store-bought laundry soap or detergent, you might like to use your own homemade laundry soap, made with your own bars of lye soap. It’s what Grandma used, and I’ve used it for years. It doesn’t suds up like store detergent does, but it does clean clothes. This recipe does work best with hot or boiling water, though. Hard water will result in even less suds, but it will still clean.
To make your own laundry soap, grate up a bar of lye soap. I use the medium holes in my food grater, not the finer ones; you’d be grating all day! Then add just enough water to the soap to dissolve it. Heat the soap-water to hot, but don’t boil it. Stir it well and when it is totally dissolved, add this to three gallons of water. Add one cup of washing soda (available at your grocers in the laundry area; not baking soda!) and mix well. Pour into gallon jugs. You’ll be using about a cup of this per washing in your wringer washer. So you see, this recipe goes a long, long way…and is cheap, too!
By using your own homemade laundry soap, along with a wringer washer and a set of good old clotheslines, you’ll quickly see a huge savings in your household expenses. Your clothes will look and smell fresh and clean. And you will actually get some enjoyment out of laundry days. It’s one of those little pleasures that too many people have forgotten about or never learned in this hurry up world. Remember to smell the wind in your clothes!
|


It’s my dream to have a clothesline. I have Herrick Kimball’s fine, home-made ashwood clothes pins and a cloth clothes basket on a frame and wheels, just like what my mom had. Just waiting for my husband. . . Your way of life is so wholesome and wonderful. Congratulations!