| By Jackie Clay-Atkinson |  |
| Issue #152 • March/April, 2015 |

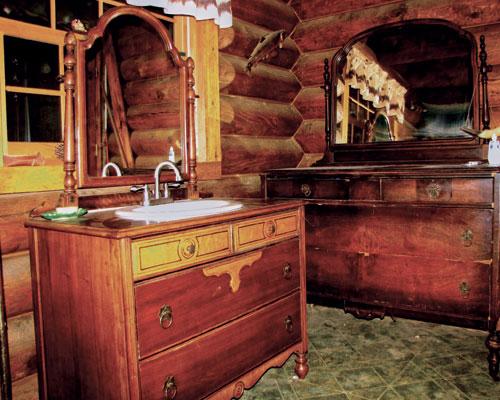
Here’s the finished vanity with our unfinished dresser
that will store our extra towels and linens.
We’ve had our log home built for more than eight years now, but until recently, we were still washing our hands in either the bathtub or kitchen sink because we had not yet installed a bathroom vanity. We window-shopped Menards and Lowe’s, and boy, oh boy, were they expensive! Will examined several vanities in the $300-500 range (without the top, sink, or faucet) and found that they were all made at least partially of particle board, stapled together.
So we decided to save some money and recycle an antique dresser into a bathroom vanity.
On a local online auction (Do-Bid.com), Will was able to find an old dresser. It was nice enough (with a stunning mirror), although it would need refinishing. He won the bid at $88 and we brought our diamond in the rough home. Yes, it was kind of rough with the laminated cherry veneer peeling up on the top and the finish scratched and ugly. But it only had a couple coats of varnish (no paint). After only a couple weeks of work, we now have a very pretty bathroom vanity.
To make your vanity, first consider all the possibilities for turning pieces of furniture into a bathroom vanity. Dressers are the most common choices they are close to the right size and have several drawers that are useful for additional storage.
But there are other pieces that make nice vanities, as well. Years ago, I used an old pipe organ to make my vanity. I removed the keyboard and replaced it with tile-covered plywood and a sink. I also removed the foot pedals and straps and replaced them with finished doors. I added a small mirror where the music stand was and a candle holder on each round base on either side of the sink. Just one coat of varnish, and I was in business.
Some antique tables make nice bathroom vanities. Many have gorgeous wood and ornately-turned legs. These usually work best when the drain is out through a wall rather than straight down through the floor. It is hard to hide the drain pipe and supply lines when there isn’t a front on the table. Another choice is a dry sink (basically a cupboard that was used as a washstand). These look very rustic.
Buy a piece with “good bones”
No matter how potentially beautiful a piece of furniture is, it won’t work if it is beyond your ability to rehab structurally. If it just needs some glue to tighten up a joint or a refinish on rough varnish, even a beginner can work magic. But if it is missing a drawer, has missing chunks of veneer, or severely cracked framework, you might pass it by and look for a more sound piece. If you’ve never removed paint from a piece of furniture, you might choose a dresser that is only varnished. It is easier to remove a layer or two of varnish instead of many layers of old paint.
It’s also a good idea to avoid dressers with drawer slides in the center of the drawers as this makes cutting out for the plumbing more difficult.
Remove the old finish
You can skip this step if your dresser has a nice finish or if you choose to go with the “shabby chic” look.
Pick up a good quality paint and varnish remover. I didn’t know what I was doing and bought a not-so-hot “quick stripper.” Will tried it and was less than thrilled. So he grabbed a gallon of carburetor cleaner. (He’d read the directions and it said not to get it on paint or varnish because it would remove the finish.) After painting it on an inconspicuous spot and seeing how quickly the varnish peeled up, he did the whole piece with it. If you’re not so adventurous, you might stick to a regular furniture stripper. Use a pair of rubber gloves as it can irritate your skin and be careful not to get it in your eyes or near your kids and pets.
When the finish is wrinkled and bubbled loose, remove it with a putty knife. A stiff nylon brush will remove the finish from grooves and designs in the wood. Sometimes it takes a few applications to get all of the finish removed. Just repeat until the surface is clean.
Rinse the stripper off with a damp rag, cleaned out with warm water between uses. Do not get the surface of the wood soaked or you may have the veneer peel up or the wood warp.

We used clamps after gluing down the loose veneer.
The plastic bag under the wood block keeps the glue from sticking to the block.
Glue down any veneer that is loose
One of the most common things wrong with old dressers is that the veneer on the top and sides is bubbled up or coming loose. This happens when it gets damp or just because the glue has gotten old and let go.
Will filled a livestock syringe, complete with 18-gauge needle, with a good quality wood glue and very carefully lifted the loose veneer up with a finishing nail and injected the glue where needed. Using a block of wood to evenly distribute the squeeze, he clamped wood clamps and C clamps down to hold the block in place until the glue dried. Right after clamping, he wiped any excess glue off with a damp cloth.
It took several times to get all of the loose veneer glued down, as you can only do a few spots at a time. In one spot on the side, he had to replace some chipped off veneer. To do this, he waited until he’d made the sink cutout, then used the veneer from that to repair the bad spot on the side. You can’t see it at all.
Lightly sand the finish
We were lucky; once the varnish was removed, most of the surface of the dresser was very clean and smooth. But in order to get a nice finish, you must sand the surface, regardless. And if your dresser’s surface has any bumps or rough spots, sanding is even more important.
Using a strip of fine grit sandpaper wrapped around a block of wood or a sanding block will make short work of this job.
Once sanded, wipe the entire surface with a damp rag to remove any clinging sanding dust.

The sink fits perfectly in the cutout.
Cut out the sink hole
Before we get to cutting out the hole, and before you even buy a sink, be sure to measure the top of your dresser! I didn’t, and ended up driving 30 miles to buy a sink that was too fat to fit the dresser top. Like Dad always used to say, “Too soon old. Too late smart.” But we’re learning.
Nearly all new sinks come with a template that you can use to lay on your surface and draw around, so you know your sink will fit the hole you cut out. Place that as it best fits your dresser top and draw around it with a pencil. If you are installing a used sink, you’ll have to create your own template. A brown, opened up grocery bag or piece of butcher paper works well. Turn the sink upside down and trace around it to make the template. Make your initial cut a bit smaller than your outline. You might have to cut a few times before you get it right. When finished, the template should slip right over the bowl of the sink, leaving the flange of the bowl sticking out.
Once you have your line drawn, you’ll need a drill, a 1/2-inch or larger paddle drill bit, and a jigsaw with a medium-toothed blade. Drill your hole next to but not on the line, on the inside of the “hole.” Then, with a jigsaw, insert the blade in the hole and press down the saw firmly. Begin to cut out the hole, carefully following your line.
It helps to have a helper support the cutout from the bottom (with the drawers removed). They should support it just enough so it doesn’t drop down and split the wood when the cut is nearly complete.
Cut the drawers to fit the plumbing
The most difficult part of re-doing a dresser for a bathroom vanity is cutting the drawers so that the plumbing can be run through them. Most dressers have two or more top drawers. It’s best to choose a dresser with deep top drawers as it gives more room to allow for the sink. Ours had shallow drawers and Will had two options: he could re-do the drawers so they were half-width and still keep them usable or he could just remove the faces of the drawers and fix them permanently to the dresser frame. He chose the first option, as we could use more storage space.
Each dresser and sink is different, but basically, you’ll want to make a cutout in the drawers to allow for the plumbing. The back of the drawers will look U-shaped instead of straight across. Will took several measurements and trial runs, and when everything fit, he both glued and tacked the 1/4-inch plywood with brads.
The top and second drawers require more fussing with because of the sink bowl. The bottom drawer is pretty easy, only requiring a small box to allow for the drain and supply lines.

You need to box in the cutout for the sink and/or plumbing in each drawer.
Finish the surface
Will chose an oil-based polyurethane to seal the dresser. We feel that oil-based polyurethane is much more resistant to moisture and longer lasting than water-based products. He used a satin finish as we didn’t want it to look too glossy.
Paint the polyurethane on with a paint brush. Don’t use a cheap brush because the hairs will fall out and you’ll be constantly picking hairs out of your nice finish as you apply the poly. Let the poly dry completely before sanding and re-coating. After each coat, gently brush over the shiny finish with a sanding block. You don’t want to “sand” the wood, only roughen up the poly to accept the next coat. If you don’t, you may have bubbles form on the surface that will eventually work loose.
Will gave the sides three coats and the top five coats, as the top would see more possible water than the sides.
Install the faucets
Modern faucets are very easy to install, even for a beginner. Luckily they come with detailed directions and are very basic to put into place. Basically, all you have to do is slip the faucet pipes through the holes in the vanity and tighten the plastic/nylon nuts down snugly on the underside to hold the faucet in place.
Fasten down the sink
To securely hold the sink in place as well as to prevent moisture from getting under the lip of the bowl, run a complete ring of silicone sealer around the outer edge of the lip. Then carefully set the sink into place and press down firmly for several minutes. Wipe off any excess silicone carefully. Let cure for 24 hours.
Hook up the plumbing
All of our house plumbing is a combination of PVC drain line and PEX tubing supply lines. Both are very easy to use and repair. It used to be that you needed an expensive PEX clamp to press PEX tubing fittings into place on the lines. But now there are quite inexpensive clamps for the homeowner’s use, making PEX flexible lines much more desirable to use in your plumbing projects.
One tip we’ve learned is to use the plumbing trap or P-trap that is the shortest when using a dresser. You will have to cut into the lower drawers much less. But please do use a trap. If you don’t, you’ll get an overpowering smell of sewer gas in the house!
I also very strongly advise taking the time to install shut-offs on both supply lines to the faucets. In that way, should you ever have to replace or repair a faucet, you only have to shut off the water under the sink to make your repairs, not shut down and drain your entire water system.
Our vanity costs were: dresser $88, sink $32, and faucets $52 a total of $172, which is much cheaper than even a “cheap” bathroom vanity.
We love our vanity so much that we bought a similar dresser on Do-Bid for storing towels and extra linens. What a treat it is not to have to stand on my head to wash my hands in the bathtub.


Jill, thanks so much for the description of the job. I want to work on my old dresser (maple) from when I was 7 yrs old (nearly 50 yrs ago), but I had no idea what to expect; so this was a timely article!! About how many hours or days did it take to take old finish off and new one on? Sure like your magazine, and the book about your life in Minnesota. So glad to learn that now you are married again. Good for you, and God bless from far northern California.