| Issue #126 • November/December, 2010 |
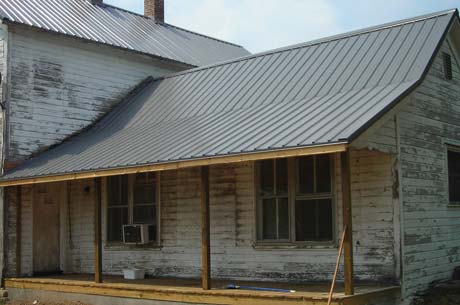
One of the reasons steel roofs have become so popular is the simplicity and economy with which they can be placed over an old shingle roof. Still, despite the ease of installation, there are some important guidelines you should follow that can make the difference between a roof that’s a work of art and something people look at and cringe because of sharp unfinished edges or the spattering of screws that look as if they were laid out by the distant blast of a shotgun. Follow a few simple guidelines and your roof will look appealing as well as last your lifetime.After completing construction on a new barn, the customers asked me about the possibility of putting a metal roof on their home to match the roof on the barn. A little reluctantly, I agreed and thus began a 15-year journey of installing more than 500 metal roofs. Since I’m getting tired, and I’ve made just about every mistake there is to make, I’m ready to pass along some tips I’ve learned and hopefully help a few wayward roofers.
The life of steel roofing has greatly increased in just the past five years due to a technologically advanced paint process that no longer fades. We’ve all seen the steel siding on barns and other buildings that gets chalky and faded after just a few years. No more. The same baked-on enamel coating used in the automobile industry is now used for metal roofing, and it barely fades at all. This has been noted in the warranties which have changed from a vague 10-year guarantee against rusting to, in many cases, a 40-year guarantee against even fading.
Another factor that has increased the popularity of metal roofing is the logistics. Why would you pull all those shingles off and haul them to the landfill, just to have to put down a new vapor barrier to replace the now-gone shingles? Not to mention the wear and tear on your back, the precarious time you spend on your roof, and the time everything under it has to be exposed to adverse weather during the installation.
|
|
In most cases, installing a steel roof is the do-it-yourselfer’s dream. Because you’re just laying it on top of the old shingles, you don’t have to worry about how fast it gets done or how much damage you will inadvertently do if you can’t complete the installation in one weekend. You simply don’t tear off any vents or other items that might cause leaks until you know you can get it covered immediately, so nothing down below is left exposed.
“Wait! (Says the man in the back). You can’t put all that weight on my house! There’s two layers of shingle up there already!”
For a moment, the man in the back forgot that I’ve already heard every question, made every mistake, and have almost all the answers.
Shingles typically weigh in at 150 to 200 pounds per square (100 square feet). The average roof I’ve installed over the past 15 years was 25 squares. That’s around 5000 pounds of dead weight. Steel, at 65 pounds per square, is not dead weight, it makes your roof stronger.
I’ve put many steel roofs over shingled roofs that were not even 10 years old, but had failed due to various factors. In every instance, after making attempts to rectify either a faulty product or a faulty installation, the homeowner was left in the lurch, being told by the installer to go chase the manufacturer or the manufacturer to chase the installer. This ultimately led them to seek out a roof they would never have to worry about again.
My own estimate is that a properly installed modern steel roof will last 50 years before it needs to be touched. It is also my contention that the paints you would use to eventually repaint them are steadily improving and will be even better by the time you see your roof fading. Therefore, why fill up the landfill? Why go to all that trouble, expense, and waste?
Still, if you decide to install a steel roof over old shingles, there are five things you have to keep in mind:
|
1. Condensation
Steel will condensate if there is any air space under it. It’s that simple. Steel has to be laid flat on a vapor barrier. Anyone who has stepped into a barn on a sunshiny, frosty morning and forgot his rain coat can attest to this fact. Whether the air space under the steel is a half inch or six inches, the condensation factor is the same. So, put the steel directly down on a vapor barrier. Either leave the shingles on or, in new construction, put down felt paper.
If you have a roof that absolutely requires you to put wood strips down, which I’ve only had to do maybe 20 times in 15 years, either use treated wood, or an insulation designed to be applied under steel. Otherwise, avoid them.
Whichever way you do it, ensure you have adequate attic ventilation, summer and winter. (If you put plastic bags on your turbine vents in the winter because you’re trying to conserve heat, take them off.)
2. Fastener application
The steel should be fastened with screws in such a manner that the spacing creates an appealing pattern when viewed from the ground. The screws should be applied as the manufacturer specifies, which is in the flat of the steel, not on the rib. (Give it up old-timers we’re not using nails anymore).
The screws should be spaced between 24 and 30 inches, skipping every other rib, thereby creating no more holes in your new steel roof than are absolutely required and necessary and to make it look professionally installed.
Normally, a 1½-inch screw is perfect for installing steel in new construction or over one layer of shingles. You can increase the length to accommodate two layers of shingles.
3. Manufacturer specifications and warranty
When installing a product that is going to last 50 years, how necessary is a warranty? Will you really be able to track someone down in 40 years, have them come to your house, assess the problem, and write you a check? Even if you do, after depreciation, that check would be about $12. So my advice is, buy the best product you can afford, install it properly, follow the manufacturer’s specifications, and, after about five years, pitch the warranty.
|
4. Trim
The most important aspect in the cosmetics of your new steel roof is the trim. Every edge has to be wrapped with flashing. Not only is this done for appearances, it also gives your roof resistance to blowing wind, rain, and snow.
Drip edge trim should be put down along the gutter line edge of the roof. Check the existing shingle edge to make sure your new drip edge will allow the water to drip directly into the gutter. This, for some reason, is greatly overlooked, and is one of the worst mistakes you could make. Water comes off steel about 10 times faster than shingles and you could very easily end up with your water landing out in the yard.
This is a good time to mention ice guards. If your roof is 6/12 or steeper, you will need some type of ice guard to prevent a build up on your gutters. If you have no gutters, then still consider this in traffic areas for safety.
Rake trim is what wraps the ends along your gables. (The raised edge of your house, not the gutter line edge.) I use a 4″ by 6″ rake trim rather than the very standard 6″ by 6″ and put the 4″ to the outside of the house. This is a much more “residential” look, not a barn style. Rake trim needs to be screwed down only enough to hold it down, with the screws evenly spaced. A good trick is to tack the bottom piece and snap a line to the peak once you know how your bottom piece is going to lay. And always, always, get someone on the ground to look up the trim for you. There’s nothing more demoralizing than getting down off your finished roof to find a piece of trim that sticks out like a sore thumb. By the way, trim can look pretty nice on the roof, and look pretty bad from the ground, and the ground is the vantage point from where everyone in the whole world is going to be making their critical reviews.
Ridge cap is hard to mess up, except at the very ends. Take the time to trim those ends back at an angle and, again, it will be worth your time once you’re on the ground looking back up.
5. Safety
Wear gloves! I’ve cut myself hundreds of times. Every time I think, “I’m going to just move this one piece,” or “It’s just a piece of trim,” I get in trouble. So for the past few years I don’t touch steel unless I have gloves on. Why risk it?
Don’t handle steel in the wind. If it’s mildly windy, keep the steel downwind from you. In other words, the wind to your back. This way the steel may flop a little, and if an unexpected gust comes up it won’t take you and the sheet off the roof.
A properly installed steel roof will last the rest of your lifetime. I hope these tips will help your new roofing project to be a great success.


The building code prohibits installation over multiple roof coverings.
Great article , my sis had that done a number of years ago. One question alludes me. How much overhang for proper gutter functioning ?? We get a good rain and they are useless .