 |
|
| Issue #64 • July/August, 2000 |
Every now and then, wild critters wear out their welcome around the homeplace. Gardens are raided, garbage cans ransacked, pet food filched, and other shenanigans are performed by marauding little beasties. When push comes to shove, it becomes time for a furbearer relocation project.
Although many states permit the killing of wild animals when they are destroying gardens, chickens, or other property, I hesitate to do so outside of the legal hunting or trapping season. It just seems like a waste. Sometimes, however, pestiferous pilferers need to be taken care of during the spring or summer months. Then, I break out the trusty livetrap and get to work. In fact, if you live near a town of any size at all, you can make some good money by livetrapping and relocating wild animal pests. Be sure to consult with your local fish and wildlife management agency before you undertake this endeavor because regulations vary widely across the country.

I have had to move many animals here on our place. Most of them were raccoons that took a liking to the cat’s food, the mulch pile, and the tastiest parts of the garden. We relocated one family of the masked varmints by catching them, one each night for about a week. They were so eager to get caught that they climbed right up in the back of the pickup truck to get to the peanut butter and marshmallows that I had placed in the livetrap there.
The trap described here is simple to make. As with many of my workshop projects, I just used what I had available to do the job. You may wish to adjust the size of the trap you make to fit the target animal you are trying to catch. Here is an idea of appropriate sizes:
- Raccoon 12″ x 12″ x 36″
- Opossum 10″ x 10″ x 32″
- Skunk 10″ x 10″ x 32″
- Cottontails 8″ x 8″ x 28″
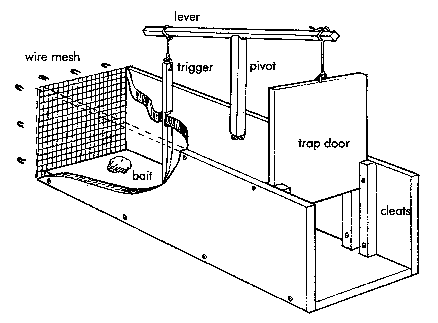
The accompanying photograph and drawing show various details of the livetrap construction. Some of the specific parts for this rabbit-sized trap are listed below:
- 3 1″ x 8″ x 28″ boards
- 1 1″ x 8″ x 24″ board
- 7½” x 9″ piece of ½” hardware cloth
- 12 light wire staples
- 24 #6 x 15/8″ multi-screws
- about 4 ft. of ¾” square wooden stock
- about 3 ft. of ½” square wooden stock
- 1 pc. of ½” x 12″-square wooden stock
- string
The trigger for this trap is simplicity in itself. In a nutshell, the notched trigger stick is held in place in the hole in the top of the trap. When the animal tries to reach the bait, it must push past the trigger stick, releasing it and causing the door to drop behind it.

The trigger stick is made from the piece of ½-inch stock. It has a notch cut into it that is hooked on the edge of the hole to set the trap. The notch is about as deep as one half the stick’s thickness. Cut the notch a bit longer than the thickness of the top. That will give it plenty of room to get knocked loose.
As you can also see, the trap door is held in place by the lever stick which is made from the ½-inch stock. The lever stick is supported by a notched stick about 9 inches long which is made from the ¾-inch wooden stock. I rounded the bottom corners of the support stick and secured it in a blind hole bored into the top of the trap.
The sides of the trap have cleats attached to provide a groove of sorts that the trap door slides in. Those cleats are also made from the ¾-inch stock. The trap door has a light wire staple in the center of the top. A piece of stout string attaches the door to the end of the lever stick. On the other end of the lever stick, another piece of string is threaded through a small hole drilled through the trigger stick.
I attached a wire mesh back panel in the trap to aid in distribution of the scent of the bait. The stout hardware cloth is necessary to prevent determined detainees from busting out.







Can I get the blueprints
12h× 24×24 wood box frame,with 1/2″ top screen.
Propped up with 10″ forked
Twig,with 15′ of strong string.Place food under box trap. Sit in chair just after dark, wait for coons to meander out of the woods.When they’re under the box….
PULL THE STRING! Catch and release