 |
|
| Website Exclusive • July, 2007 |
So you want to raise some critters that taste just like chicken? There’s no better critter than the chicken itself. Chicken has become the most sought after meat in the marketplace. Raising your own birds can save you a few bucks at the grocery store. Even more satisfying is the great sense of accomplishment that comes with raising your own food from egg to dinner table and providing this healthy meal to your family.
Raising a small flock of chicken tenders is relatively inexpensive, their care is not complex, and they don’t take up much space. The birds are easy enough to rear that every member of the family can participate, from feeding to plucking to cooking, and of course eating. The birds you raise will taste better than store-bought, contain little or no chemicals or hormones, and live happier lives.
Hefty breeds
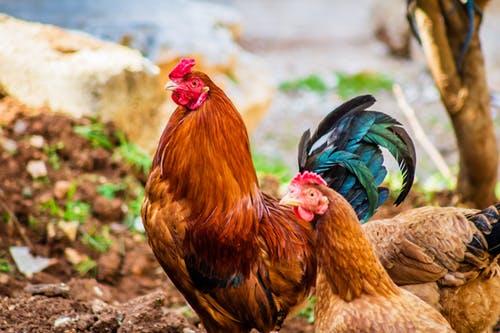
Some of the largest growing meat chicken breeds are Austrolorp, Buckeye, Cornish, Dorking, Java, Rhode Island Reds, Rocks, and Jersey Giants. These birds put on the most muscle and some do it faster than other breeds. The Jersey Giant is aptly named since this monster cockerel (male under 1 year old) reaches 11 pounds in less than a year and tops out at 13 pounds when he comes of age as a rooster. His sister, the pullet (female under 1 year old), is quite a big girl at 8 pounds growing to 10 pounds when she becomes a full-fledged hen. Next in line is the Cornish cockerel weighing in at 8½ pounds with a plump pullet reaching 6½ pounds. The Jersey Giants and the Cornish are slower growers so expect to put out more in feed costs for these two biggest varieties. These chickens tend to grow their bony frame first and tend not to put on significant muscle growth until about 6 months old.
|
||||||
The Buckeye, Dorking, Java, and Rock cockerels are all about the same size maturing at 8 pounds; however, the females tend to vary. The Java pullet is 6½ pounds, the Dorkings and Rocks fall in the middle at 6 pounds, and the most petite of the big girls is the Buckeye pullet at 5½ pounds.
While these are some of the biggest chickens you’ll ever meet, they are not always easy to find. The most common meat chickens are the Austrolorp and the Rhode Island Red. The cockerel of both breeds top out at a hefty 8½ pounds. The pullets reach a plump 6½ pounds making these two breeds a fine choice that are not too hard to round up. These weights are at full adulthood but can help you determine speed of growth and resulting feed requirements. To get the best bang for your buck you might consider selecting a cross-breed. They usually convert food to meat more efficiently. Cross-breeds also tend to grow faster than purebred birds. A Rock-Cornish cross is an excellent example.
Flock management
You have several options to obtain your meat chicken flock. You can buy the eggs from a hatchery, incubate them, and begin your flock with your own hatchlings. The only drawback to this method is the incubation equipment needed and daily monitoring of humidity and temperature for a successful hatch. There is a certain level of satisfaction though in hatching the eggs yourself and there is less stress on the young birds. The other option is to buy live chicks. Often, local farm stores carry a limited variety of chicks for sale in early spring. Check with the stores in late winter to see what varieties they plan to carry. If they aren’t going to have the breed you want, try ordering from a hatchery or a local breeder. Hatchery chicks are shipped live without food or water in cardboard boxes so have an area ready with food, water, and heat prior to their arrival.
|
Before a chick hatches it absorbs the egg yolk. This provides them with all the liquids and food they need for the first three days of life. After that the cost is on your tab. For best meat production, feed your chickens starter mash or pellets with 20-23% protein content for their entire lives. Most farm or feed stores keep ample supplies of this feed. If you want organic chicken meat be sure to buy feed that is certified organic and range them on grasses that have not been chemically treated with fertilizers, herbicides, or insecticides.
If you are growing roaster chickens you can replace 10% of the starter with corn after six weeks and another 10% after ten weeks. Each chick will eat about 10 pounds of feed in their first 10 weeks (if they don’t end up on your dinner table first). Allow 3 inches of feeder space per bird placing the feeder at mid-back level. To prevent wasted food, fill feeders only half full. Most birds like to eat as though they’re in a food fight with their neighbor, tossing their food about as they dig for the tastiest morsels. As chickens age, the conversion of feed to meat is less efficient. Generally, it takes about two pounds of food to produce one pound of live chicken.
|
As with any critters, always supply ample fresh water daily. About six gallons for 100 birds with one inch of water surface per bird should keep them sipping happily all day. Placing the water at mid back level will reduce spoilage from droppings. These birds just don’t have good toilet manners.
Chicks need to be raised indoors or in a well-ventilated draft-protected area. Heat can be provided with a light bulb of sufficient wattage to maintain the temperature at 95° F for the first week. Reduce the temperature five degrees each week until it is equal to room temperature or equal to the outdoor temperature if the birds will be raised outdoors. Your chicks should have adequate feathers to keep themselves warm by six weeks of age. Even though heat is no longer a factor, meat birds like to burn the midnight oil and still need about 23 hours of light each day. A 25 watt bulb for every 100 square feet provides enough light and reduces the heat.
Allow enough space for your chicks to mature in a healthy environment and they’ll provide you with a healthy meal down the road. Newborn chicks need about a ½ square foot of floor space per bird until four weeks old. Double the floor space every four weeks until the birds are 12 weeks old. At 12 weeks of age each meat bird will need 3½ square feet of floor space. You can continue to raise your birds indoors or move them outdoors to a portable coop or allow them free range. Both portable coops and free-range habitats help reduce feed costs. Portable coops need to be large enough to provide adequate ground space for each bird. The coop needs to be moved once or twice daily to provide fresh greens for birds. Free-range birds help reduce your labor by not having to move a coop, but at their own peril. Free-range birds are open to every predator that likes a nice chicken dinner as much as you do. Even when free-ranging, it’s a good idea to bring your birds into a safe coop at night and provide the extra light they need for quick growth.
|
||||
From Flock to Freezer
When to butcher your birds varies on the variety of bird you have, the feed, light, and amount of exercise the bird has had. At 4-6 weeks of age you should have raised a meat bird weighing 1-1½ pounds. These make excellent “game” hens if you are raising a Cornish variety or crossbreed. Broilers and fryers are ready anywhere from 5-13 weeks as they reach a weight of 4-4½ pounds. As chickens near adulthood they are best used as roasters. At this stage you have been feeding them three to five months and the birds have reached a fat, juicy 6-8 pounds. Butcher your birds when they reach the preferred weight range rather than age. Approximately 62% of a chicken’s live weight remains after cleaning. Add another 10% if you are saving the giblets (neck, heart, liver, gizzard.)
Never pleasant but always necessary, killing your hard-earned flock has got to be the most difficult part of raising any food animal. But it is a must unless you own a chicken food factory. The best method for this unpleasant task is bleeding out. Devise or buy a holding cone especially designed for this purpose. The large end of the cone is slipped over the chicken until its head protrudes from the small end. Pick up the chicken holding it in the cone and turn it upside down. Cut the chicken’s throat from jaw hinge to jaw hinge without severing the spinal cord. Severing the spinal cord reduces bleeding leaving blood in the meat. The chicken will quickly bleed out while the cone prevents the bird from flopping about as a nerve reaction.
Once your bird has bled out and while it is still warm the feathers can be dry-picked. Once the bird begins to cool off the feathers become harder to remove. A bird that has cooled off can be dipped in 128-130° (F) scalding water to loosen the feathers. Plucking a bird by hand should take anywhere from 5-15 minutes. Once plucked and dried, pass the bird over an open flame to remove any hairy feathers. Another option is to skin birds. For those that prefer eating skinless chicken this is the quickest and easiest method to clean the birds.
Once your bird gets naked, you can remove the feet, head, and wing tips, if desired. Slit the skin on the back of the neck lengthwise; cut through the neck meat at the base and remove it. Remove the windpipe and the crop (a small sac containing food.) Remove the oil gland on the top side of the tail or remove the tail completely. Make an incision from the anus to the tip of the breastbone being careful not to puncture the intestines. Remove all internal organs from this opening. From the pile of organs remove the giblets if desired. The gizzard needs to be cleaned by slicing into the large end until you reach the center. Rinse the grit from inside the gizzard and peel away the tough inside liner.
|
||||||
Storing
As with most meats, chicken should be aged for a couple days in the refrigerator before storing. Chemical changes in the meat during aging provides a more tender and tasty chicken. The refrigerator temperature needs to stay below 40° for the entire aging period to prevent spoilage. Freezing is a good method of storing raw chicken if you plan to use the giblets in less than three months, cut up chicken in less than nine months, or whole birds within a year. You can also cook the birds and freeze them but they won’t keep as long. Cut-up cooked chicken will keep in the freezer for a month. Pack it in gravy, broth, or prepared as a casserole dish before freezing and it’ll keep six months. Fried chicken will keep in the freezer for about four months. These storage times are good as long as your freezer maintains a frosty 10° F below zero or colder. If your freezer isn’t that cold, reduce the storage time. Since freezing doesn’t stop bacterial growth completely, the meat will begin to deteriorate in quality when frozen too long. Since fat deteriorates first, it’s a good idea to remove as much of it as possible before freezing. When wrapping your bird for the freezer, get as much air out of the package as possible. Meat exposed to freezer air will dehydrate. This is known as freezer burn and it’s not very tasty.
If you have a pressure canner and know how to use it, you can store your chicken indefinitely. To make sure your canned chicken meat remains safe to eat, be sure to follow standard canner processing guidelines and processing times for your altitude. If at some time you end up with a bulging or leaky canning jar lid, off colors or odors from your canned bird, it’s best to be safe and toss the contents in the trash. The meat may be infested with deadly botulism bacteria. Any canned meat can still contain some botulism bacteria even if it appears and smells good. The best way to prevent botulism poisoning is to boil the contents of the canning jar for at least 20 minutes before tasting or adding it to recipes.
Nutrition
Chicken is a very healthy meat. It has considerably less fat and calories than other commercial meats. The white breast meat contains even fewer calories than the dark leg and wing meat and almost half the fat. White chicken meat is nearly twice as high in niacin as dark chicken meat but the dark meat offers almost three times as much zinc and iron. You can cut the fat from chicken even further by removing the skin where much of the saturated fat is located.
So if you want to become more self-sufficient and put healthy meat on your dinner table, raising chickens is a great way to start.
(Allen Easterly is a freelance writer building a hobby farm in the Allegheny Mountains near Basye, Virginia. He can be reached via www.alleneasterly.com.)


