| Issue #154 • July/August, 2015 |

Little hands are ideal for helping to stuff jars with vegetables. Just be sure to “pay” your help — but don’t let them eat it all!
For a homesteader, it is important to be prepared to preserve the harvest in as many ways as possible. As summer wanes, you’ve likely filled your pantry and freezer with canned, dried, and frozen food. Fall gardening provides its own influx of fruits and vegetables ready to be preserved. While juicing, canning, and dehydrating are great methods for long-term storage, they take time and equipment, and require vigilant care be taken to ensure proper food safety.
Why not take a break from standing over a hot canner and try your hand at fermentation? While fermenting food and drinks does have its procedures, it requires little or no specialized equipment other than what you already have in your kitchen or can procure easily from a second-hand store or a recycling center. Fermentation is not necessarily useful for long-term storage of food, but rather is a way to work with the rhythms of nature to harness wild bacteria and maintain ongoing cultures to create fresh and healthful culinary delights.
Fermentation is safe
Food safety is a concern that is often brought up when people ask me about fermentation wild fermentation in particular. Once you’ve created a successful ferment, you’ve created an environment that is full of microbes that actively fight off any potentially harmful bacteria. The process of fermentation itself is a detoxifier, so there is zero concern about illness or death resulting from food and drink that has been properly fermented. The clostridium botulinum (C. botulinum) bacterium, which causes the disease known as botulism, is present in all fresh food, and in garden soil itself. Botulism was a rare disease until the advent of technologies that allowed long-term preservation of food via sterilized canning processes. Fermentation and canning are polar opposites as to how they preserve food. As fermentation expert Sandor Katz notes in his book, The Art of Fermentation (Chelsea Green Publishing), “In fermentation, we rely upon native microbial communities, or cultures introduced in sufficient concentrations to assure success, to create an environment too acidic to allow the development of C. botulinum or other pathogenic bacteria. In canning, we apply heat in an attempt to kill off all microorganisms. Canning is vulnerable to botulism because it so happens that when stressed by heat, C. botulinum produces a spore that has extraordinarily high tolerance to heat.”
Equipment
Most vessels that have been used for preparing or storing food will be safe to use for fermentation. Be sure to conduct a thorough examination first, or ask the previous owner what it has been used for. Never use anything that has been used to store non-food items with the potential to permeate toxins into the vessel. If you’re unsure, move on. There are plenty of vessels in the sea.
Ceramic crocks are ideal for fermentation. Some older crocks may have lead glazing on them. The best way to test this is with a lead-testing kit that you can pick up at most hardware stores. Check for any cracks or chips in the glazing. These can be sealed using beeswax and propolis, pine-resin, or another natural, non-toxic sealant. For hairline cracks, first clean thoroughly with vinegar or hydrogen peroxide, seal them with the above method, and reinforce the outside with a wet leather strip to serve as a buffer to outward pressure. If all else fails, ask a potter to re-glaze it and have them design some customized vessels for you while they’re at it.
Glass is another type of material that is ideal for fermentation. Like ceramic, it is heavy and fragile, but it can last several lifetimes if handled properly. Fermentation in any sealed container can cause pressure buildup due to the high levels of CO2 that are a direct result of an active ferment. Always be careful when fermenting in a sealed glass container. At best, you may end up with a ruined ferment and broken jar; at worst you could cause serious harm due to a fermentation grenade.
Wood can also be used for fermentation, but make sure it’s watertight. Used bourbon and whiskey barrels are great for fermenting alcohol or large batches of food.
If you use plastic, make sure it’s food-grade. Much as I dislike the idea of using plastic, there is a lot of it out there. The scrounger and the conservationist in me likes the idea of reusing when possible. Plastic is also light and therefore ideal for fermenting large volumes that may require being moved around. Inspect plastic containers for deep scratches, and avoid cleaning them with rough materials like steel wool. Bacteria (not necessarily the good kind) can harbor in scratched plastic. This is primarily a concern for alcoholic beverages, which sometimes require being stored for several months. The worst that will happen, though, is that your ferment will develop “off” flavors. Another reason to avoid plastic would be the chemicals that even food-grade plastics could potentially leach into your ferment. If you’re concerned about this, you may want to avoid plastic altogether, or look for BPA-free or HDPE (high-density polyethylene, or #2) plastic.
Any kind of metal is bad for fermentation. You can use stainless steel pots for preparing ingredients, but always move the ingredients to one of the above-mentioned vessels for initiating fermentation. Wineries, breweries, and distilleries will use large, stainless steel vats for fermentation, but these are expensive, industrial-grade, solid stainless steel and far exceed the budget of the standard homesteader. Even high-quality kitchen pots only have a thin layer of stainless-steel coating. The acids generated by fermentation can corrode this coating over time, leaching toxins into your ferment. An exception is enameled pots. As with ceramic crocks, inspect these thoroughly for nicks. If they’re nick-free (or you’ve repaired any blemishes), then they’re safe to use for fermentation.

Summer garden bounty can yield an excess of colorful vegetables well-suited for fermentation. To play around with flavor, add other homemade brines, ferment liquids, or whey to your freshly-made brine.
Other materials
For most fermentation, a vessel is the only item you really need to do the job. There are, however, a few other materials that are helpful to have. As many ferments require aerobic (with air) as opposed to anaerobic (without air) fermentation, you’ll want to use a wide-mouthed vessel with the lid off to provide plenty of air contact. However, you also want to keep flies, bugs, and debris from dropping into your ferment. This is where a cheesecloth, clean t-shirt, or dish towel can come in handy. Simply place it over the vessel and, if there are a lot of flies present, tie it to the vessel with a string. Another item, particularly for alcohol ferments that require regular aeration, is a spoon (I prefer wooden) for stirring or pressing.

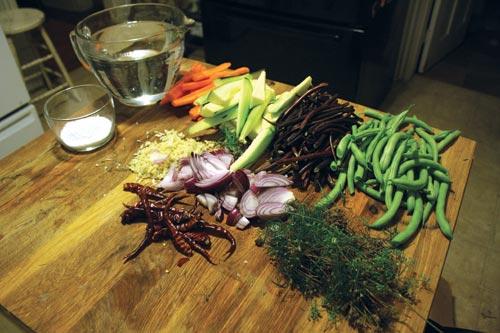
Water, salt, chopped vegetables, and brine-seasoning herbs and spices laid out in preparation for fermentation.
Fermented vegetables
Any vegetable you grow in your garden can be fermented, and most can be fermented with the same basic technique. The process for fermenting vegetables is lactic fermentation, as lactic acid bacteria is what initiates vegetable fermentations. You can ferment vegetables in as large a container as you desire, but the best way to start out is to ferment them individually in quart jars. A classic recipe to start with is dilly beans. You can include vegetables other than beans for a colorful vegetable medley, or use just beans.
Dilly beans
enough beans to fill 1 quart jar
red or green chile (fresh, dried, or seeds, to taste)
¼ to ½ cup chopped red or white onion
2-3 cups non-chlorinated water (chlorinated water will inhibit fermentation)
2 Tbsp. kosher/pickling/non-iodized salt
1-3 sprigs of fresh dill or 1-2 Tbsp. dried
1 tsp. dried dill seed (optional)
1 tsp. peppercorns (optional)
1 tsp. celery seed (optional)
½ to 1 tsp. pickling spices, to taste (optional)
2 cloves garlic
1. String beans and peel any additional vegetables with bitter, tough skin, such as carrots or squash.
2. Chop all vegetables to a length that will reach no more than 1-2 inches below the lip of your quart jar.
3. Pour one cup of room-temperature water into the jar and add 1 tablespoon of salt.
4. Add all spices and chopped or crushed garlic cloves.
5. Pack all vegetables into the jar, trimming any that breach the surface of the brine.
6. Cover the vegetables with water, and add one more tablespoon of salt.
A true lactic acid fermentation is arguably more healthy due to the bacterial diversity of a fresh wild ferment. However, I will sometimes use brine from previous batches as a starter, or add a bit of liquid from another ferment, such as whey from kefir (a lactic acid fermented milk beverage akin to yogurt). This gets the fermentation moving quicker and adds a unique flavor element.
If you can locate something that is a bit smaller than the opening of the jar that you can use as a weight, do so. I like to use smaller jars filled with water as weights or a slice of stale bread. Place a lid loosely on each jar or cover with a cheesecloth or towel. Store the jar(s) at room temperature and check daily to release any pressure buildup if you’ve used a lid. You may encounter mold growing on the surface. If it’s a white, filmy substance, it’s the pellicle, and is not harmful. Its job is to act as a barrier to contaminants. If you see greenish mold, carefully scrape it off. If a bit of it makes it into the ferment, don’t worry. Fermentation creates an environment that won’t allow harmful bacteria to thrive.
In 3-4 days, you can start sneaking tastes, but in about 1-2 weeks, you’ll notice the color has started to drain from the vegetables and the water has become cloudy. This means they’re ready for you to eat them, or to transfer to the refrigerator. Leaving them out won’t cause them to go bad, but fermented vegetables do have a shorter lifespan than canned or pickled vegetables. Provided you keep a lid on them to prevent outside air from coming in, and transfer them to smaller jars as you work through them, they’ll be good for six months or more. Simply use the standard criteria you would for any other food. If it starts developing mold beneath the surface, send it to the compost.

Layer cabbage directly in the jar, salt every couple inches, and press down with your hands or a wooden spoon to extract moisture.
Fermented cabbage
Cabbage is perhaps the vegetable that is most ideally suited to fermentation. Although Germany and Korea are both known for their fermented-cabbage traditions (sauerkraut and kimchi, respectively), many other cultures incorporate cabbage into their food-fermentation traditions. Don’t feel the need to be bound by tradition when fermenting. There’s nothing wrong with creating your own.
Cabbage can be fermented without the addition of any water, as it has a high percentage of water content. The best way to get this water out is a three-pronged approach: chop (or grate) it, squeeze (or mash) it, and salt it. You can add other vegetables to a cabbage ferment; radishes and onions are good companions and add a sweet edge to the flavor. A straight cabbage ferment has a wonderful flavor that is all its own, though.

Excellent sauerkraut can be made from red, white, or green cabbage.
When I do a cabbage ferment, I will sometimes pack a large crock full of cabbage and then transfer it to jars over time as it reaches a flavor I like. Or, I just pack it right in the jar. To start, take as many cabbage heads as you have available, and any other vegetables, and chop them roughly. To extract moisture from the cabbage, my preferred method is to layer an inch or two in a large bowl, sprinkle salt liberally over the surface, squeeze it with my hands, add more cabbage and salt, and continue. Once you’ve done that, let the bowl sit for a couple hours, squeezing occasionally. The salt will naturally draw the moisture out of the cabbage. You can also pack directly into the jars and press down on the cabbage with your fist or a wooden spoon. Either way, pack the jars as tight as you can until the cabbage is submerged in its own liquid. You can add a bit of water to cover the cabbage by an inch or two, but I’ve rarely found this necessary.
From here, it’s simply a matter of covering and waiting. I use old canning lids and rings. Since you’re not canning, there’s no reason to use a new lid. Screw the ring on loosely to allow CO2 to escape. It’s well worth waiting at least two weeks before tasting, although I’ll sometimes sneak a taste of crunchy, salty cabbage a bit earlier. Fermentation will soften the cabbage and impart its own unique tang. You can leave the jars for months in a cool spot, which will allow the flavor to continue to “ripen.” If you ask someone of German ancestry, like myself, kraut never truly goes bad. Like old Germans, it improves with age. However, you can refrigerate jars as the flavor reaches a point you enjoy and the fermentation will slow significantly.
I’m enjoying a jar from last year’s harvest as I write this in the bitter cold of winter, and it’s just as good (if not better) as when I made it. The juice itself is flavorful and nutritious. I like to add it to a bit of gin for a delicious, tangy kraut-tini, with a bit of cabbage for garnish, of course. And don’t forget to have some on grilled rye with corned beef, Swiss cheese, and homemade Russian dressing for the best Reuben you’ll ever have.
If you’re just starting on your fermentation journey, be warned it’s an addictive, healthy, and vastly enjoyable pastime. Keep on fermenting!
Jereme Zimmerman is a writer who lives in Berea, Kentucky. He blogs on sustainable living, homebrewing, fermentation, and other subjects as RedHeadedYeti at Earthineer.com. Visit jereme-zimmerman.squarespace.com for updates on his workshops and upcoming book on wild-crafted mead-making.


I am disappointed in the misinformation presented here. Granted, I am no expert, but I have been fermenting for about 8-9 years. I have always been told the fermenting foods need to be submerged below the surface of the brine because the lactobacillus needs an ANaerobic environment. The Aerobic environment (where the air is) is where harmful bacteria can thrive. The following statement is misleading and could make an inexperienced fermenter sick: “As many ferments require aerobic (with air) as opposed to anaerobic (without air) fermentation, you’ll want to use a wide-mouthed vessel with the lid off to provide plenty of air contact.” And speaking of getting sick, the author recommends simply scraping off mold from the surface because the “Fermentation creates an environment that won’t allow harmful bacteria to thrive”. Mold does not come from bacteria, it comes from spores, which can absolutely be present in the brine below the surface where mold is growing. While I appreciate the attempt at making fermentation seem like something anyone can do (which it is, but with correct knowledge), I am really disappointed that this article is so misleading.