|
By Claire Wolfe Standing near the top of the trail, looking down. The bright sunny spot in the middle distance will be the site of my future camping “pagoda;” it will have a small view. This portion of the trail, the first we completed, taught us one lesson: Use more steps. The slope here is graceful looking, but it isn’t fun to walk on, up or down. |
|
| Issue #91 • January/February, 2005 |
You can turn a “useless” piece of land into a useful one and create something beautiful by building a trail in your backyard. It doesn’t even matter whether you have a lot of land or just a small scrap of nature.
|
In my case, my useless patch was a mere half acre choked with blackberry brambles and other largely impenetrable weed species. Only a few tall trees (all that was left after a 10-year-old clear-cut) poked above the brush. To make it even more useless, the whole area ran so steeply downhill from my cabin that in places you couldn’t stand on it.
The original idea was simply to cut a swath through the blackberries to be able to harvest more of them. But as we ground through the brush, small views began to emerge, along with little niches that cried out to have benches, sculpture gardens, or picnic shelters placed in them.
The resultstill very much a work in progressis a steep, winding trail just under a quarter mile long that presents both challenges and surprising beauties.
Opening the trail
Any book on trail building will admonish you to survey carefully before cutting your trail. This is great theory, but not much good when you can’t see or walk on the terrain you’re working with. In my case, surveying meant standing at the top of the hill, pointing, and saying, “Around that big cedar tree, then over there toward those two pines poking up. Within that area, do whatever works.”
Using a chainsaw, brush-cutter, and a ho-dad (a grubbing hoe), a friend who spent years building fire trails for a local timber company bulled his way into the bramble. I chickened out on doing that part myself, and I’m glad I did. His instinct for which turn to take or which terrain to cross was uncanny, especially given that he couldn’t even see most of my landmarks once he was down in the brush.
The trick was to be flexible, to be ready to change our minds, and to consult often about where the path was heading.
It would have been nice to have a loop trail, but we ended up with a one-way path (you have to come back up the hill to the cabin the same way you went down) because there was only one route that worked.
On the upper slopes, we cut openings through the brambles about six feet wide, using the brush cutter and chain saw. Then within that opening we used the ho-dad to level a walking surface (treadway) 30 to 36 inches wide. Lower, where the trail winds its way through more obstacles, our treadway narrowed to as little as 18 inches.
It took about 18 hours to open the trail and to cut (and brace with treated 2x8s) the 30 steps required to get us through the steepest stretches.
Surfacing the trail
Because my soil is a mixture of slick clay, year-round mud, and only a bit of good, dry loam, I decided to surface the trail with gravel. If you live in a place with dryer conditions or more sandy soils, you might not need to surface the entire course. But almost every trail needs rock or gravel fill along some portion.
I chose 3/4-minus rockthat is gravel whose largest pieces are 3/4-inches, but whose smallest bits are just grit. This turned out to be a great choice; the gritty “minus” part enables the rock to pack down into a stable surface, and the 3/4-inch maximum is kind to the feet. This rock was also inexpensive, costing about $5.50 per ton.
The standard calculation says one ton of gravel equals 90 square feet of coverage, 2 inches deep. But there was nothing standard on this project. Depth of the gravel varies from about 1½ inches over good soils to as much as 6 inches in swampy areas, in hollows around tree roots, and at the base of bridges. I bought 12 tonsa full dump-truck load. What doesn’t go on the trail will patch my driveway.
One of the experts around the local pot-bellied stove recommended that I start graveling at the farthest end of the trail and work back up, reasoning that if I worked from the trailhead downward repeated trips with the wheelbarrow would tear up the newly graveled surface. That was another good piece of theory that didn’t fit the reality. Once we’d grubbed the vegetation out of the treadway with the ho-dad, the exposed clay slopes near the top of the trail became impassibly slippery and had to be graveled ASAP.
Yes, the wheelbarrow did tear up the surface a bit, requiring minor repairs (particularly since I used the barrow’s legs as brakes in steep patches). But all the back-and-forthing also helped pack the surface down. Simple fact: If I hadn’t graveled the top of the trail first I’d have never made it to the bottomat least not on my feet.
Graveling is without a doubt the most time-consuming, labor-intensive part of trail building. In my case, the truckload of rock had to be dumped 100 feet from the trailhead, then carried by wheelbarrow down the very steep upper slopes. Half-way down, the trail becomes too steep, narrow, and twisty for the wheelbarrow. From that spot I had to carry the rest of the gravel in plastic buckets.
|
I paced myself by hauling a couple of barrow or bucket loads down, then stopping to spread the gravel using the back (not the tines) of a metal rake.
Before I started the bucket portion of the job, the prospect of such primitive, time-consuming donkey-work seemed mind-boggling. My lazy brain had fantasies of hiring a helicopter to ferry scoops of gravel to the otherwise inaccessible trail. But carrying small amounts of rock in buckets actually turned out to be easier and far more relaxing than having my 130-pound self pulled downhill by a heavy, unstable wheelbarrow. The slow-paced work was almost contemplative.
Building bridges and turnpikes
Midway down the slope, we discovered a surprisingly flat area about 150 feet wide. You’d think this was a good thing. But no; it turned out to be far and away the most difficult part of the project (and a portion of the project I’m still working on). This whole area was one giant, muddy seepso gooey that in places it would suck your shoes off.
It took various tricks to get through Mudville.
|
Over well-defined rills, or in places where the sucking mud was only a few feet across, I constructed a series of small footbridges. I built them with 2×6 pressure-treated decking screwed onto stringersno handrails or complex understructures required. (Official trail builders call these simple bridges “puncheons.”) I used pressure-treated 4x4s for the stringers.
Some very useful trail-building books (especially Lightly on the Land: The SCA Trail-Building and Maintenance Manual, published by The Mountaineers, Seattle, Washington) show how to carve flat-surfaced stringers and make planking out of native logs. If you have a lot of trees, that could save you money and give a nice, natural look.
In my case, however, since I was working in a 10-year-old clear-cut, most of the trees were too young to be useful, the few mature trees were too precious to cut, and any logs lying around were already rotting. I had lots of 4x4s from an old building project, and they were a good choice for stringers. Even in the deep woods, commercial decking is commonly used on puncheonsand it was certainly easier than any alternative.
Trail-building manuals recommend 36-inch-wide bridges for hiking trails (wider for ski or equestrian trails). But with this trail being strictly for personal use, I made my first bridge 30 inches widethen quickly decided even that was overkill. My remaining bridges were all just 20 inches wide. Since none of them had to cross any vertigo-inducing gullies, and none were more than 10 feet long, they were fine. My 30-inch bridge now looks like the Godzilla of puncheons to me.
Generally, I built the framework for the bridges up at my cabin, then carried them down the hill and decked them, using 2½-inch decking screws and a cordless drill with a Phillips screwdriver bit. I figured framing them at the cabin would make it easier to get them both level and square. But it made very little difference. I built one bridge in place and had no difficulties with it.
To anchor the bridges, I laid down several inches of well-tamped gravel at each of the four corners, set the bridge in place, then built up more gravel around the ends of the structure. Where the mud was particularly oozy, or where one corner of the bridge needed to be raised, I set 2x8x16-inch concrete blocks (another leftover from an old construction project) on top of the gravel pad, pressed them in firmly, laid the end of the bridge on them, and built up more gravel around them.
The bridges are quite stable, even in areas where the mud was most soupy.
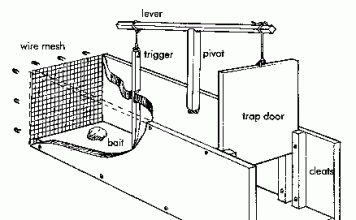
One muddy stretch was too long and too awful for a footbridge. In that patch I’m in the process of building a turnpike. A turnpike is a raised course which, in conjunction with drainage ditches, lifts the surface of the trail above the seepage.
To build a turnpike, you border the muddy area with a “box” of logs, treated lumber (e.g. 6x6s), railroad ties, or very large (100-pound plus) rocks, anchored well into the ground. Fill the box with more large rocks (if they’re available) and spread gravel or good soil on top of those. If rocks aren’t available, you can fill your “box” with gravel or good mineral soil. It’s very labor-intensive, heavy work. But it gives you a dry trail.
The book Lightly on the Land describes other options for coping with wet passages, including simpler options (like a waterbar, which uses a log or line of stones to direct flowing water off the trail). The turnpike is not the easiest option, but it was the most suitable one in this spot.
Coping with surprises
Finding Mudville was only one of many surprises we discovered on this short trailsome pleasant, some not-so-pleasant, and some that caused us to shake our heads before we decided to turn them into opportunities.
For example, one of the “features” beside my trail is the rusted, broken body of a 1950-vintage sedan that someone pushed off the road decades ago. I’d already decided the twisted relic was going to become a trailside “sculpture.” (It was easier to call it art than to move it.) What I didn’t know was that another part of that old wreck lay directly under the planned trail bed.
We needed to cut a set of steps right in that spot. But with metal buried in the ground, we couldn’t drive stakes to hold our 2×8 step supports. So we narrowed and turned the steps so they went around the car’s rusted old springs. And I laid concrete blocks, embedded in gravel, instead of staked wooden steps. The effect was quite artsy.
This was a lazy person’s solution. A more ambitious trail builder would have found a way to winch the old car body out of there. But now I’ve got a real conversation piece.
Being flexible and creative was definitely part of the fun of the project. In another case, a tree that was growing nearly horizontal above the trail became a leafy arbor to sit under on hot days.
Cost & fantasies
The total cost of the trail so far has been just over $400and that’s with paying my friend to open the path:
- $180 Opening the trail, cutting and bracing the steps
- $105 12 tons of gravel, including delivery
- $132 Treated decking, treated lumber for steps, deck screws
That covers all the basics. Once the trail is fully graveled and bridged, though, that’s when my fantasies kick in and things could get more expensive. In addition to creating quiet sitting areas and sculpture gardens, there are two spots that simply demand more, more, more. I plan to construct a 6 by 8-foot pagoda near the upper end of the trail for picnicking and sleep-outs. And at the very bottomwhere we discovered a dark, peaceful glade with a small, crystal rill babbling through it, a tiny screen-house/meditation chamber with a copper firepit is on my wish list.
This will all cost money. And labor. The sheer effort of getting building materials into these places will be . . . interesting. But that’s part of the pleasure of the trail. Like the man who gets warmth from his firewood twiceonce when he cuts it and once when he burns itI’ll get years of creative pleasure from building my trail, then years more as I relax and relish what I’ve created.


 Mitsu the golden retriever helped by fetching back every stick or branch we tossed off the trail. Here she sits with a pile of our step-building supplies.
 The steps leading up from the “Godzilla” footbridge. This staircase incorporates several happy accidents. First is the natural handrail on the right, courtesy of a conveniently
 The “Godzilla” footbridge just after we carried it down from the cabin. I built the framework for this bridge on my deck, figuring that would make it easier to level and square up. I’m about to nail on the decking as my helper Ken trims away a little more of the dense brush that surrounds the trail.
 One of several small footbridges. This one crosses a muddy trickle that might someday be a miniature fern-banked streamlet.
 A diagram of one type of turnpike. Essentially, a turnpike is a box made of logs, lumber, or stones. You fill it with pourous materials, top it with gravel or good soil, and rise over soggy spots.
 This area of the trail was steep and solid clay. The combination made it hard to walk on in the best of times, and really bad after a rainstorm. We graveled this area early to make it passable and built in lots of steps both for comfort and erosion control.
 Mudville. This is what the worst section of the trail looks like at the driest time of year. The mud will suck your shoes right off. Temporary boards give us passage while I wait to build a raised turnpike and drainage system.
 This is the “Godzilla” footbridgethe first and largest I built. It’s 10 feet long and 30 inches across. Although trail-building books recommend at least a 36 inch width for bridges on hiking trails, even 30 was overkill in this case.
 Ken, my helper, uses the blunt end of a ho-dad (a grubbing hoe) to hammer the stakes that anchor the stair risers. He used the sharp end of the ho-dad to scalp the vegetation from the treadway.
 A more hard-working trail builder might have found some way to get this ancient car spring out of the treadway. But I thought it made an interesting “feature.” It definitely makes a conversation piece. Because part of the old car’s steel body was also in this area, I had to go from wooden steps and stakes to concrete block steps.
 I built this 7-foot by 20-inch footbridge in place above a tiny hollow where a spring emerges from the hillside. Note the way the 4 x 4 stringer extends beyond the bridge. This was done to create a well for piling up an extra-thick load of gravel. The extra gravel made the bridge more solid and also filled hollows in some tree roots that crossed the path at that spot.




I have a fully built trail on my property in California, part of which is graveled. My question is how to keep it clear of weeds. Many times I’ve laboriously cleared it of weeds, but each year they return after the winter rains, to the point where the trail becomes so overgrown that it’s invisible. The gravel doesn’t stop the weeds; they just grow right up through it. But I see other trails nearby that seem to stay permanently clear of weeds. What are they doing differently?
Thanks for sharing your adventure. It’s a warm, inviting narrative with a lot of good information. Including all of the twists and turns of the process makes this an easier read, and for me, more valuable, than a bare-bones instruction manual. Like the previous commenter, I’m a trail newbie, and just moved to a small forested property in NW Washington state. This is a good excuse for me to get outside without being too near anyone. Thanks again!
Thank you so much for writing this. I’m about to start working on making a trail through my own patch of woods despite being out of shape and inexperienced, and was looking for detailed technical advice online for how to go about it. Something about your piece convinced me I can do this.