 |
|
| Issue #130 • July/August, 2011 |
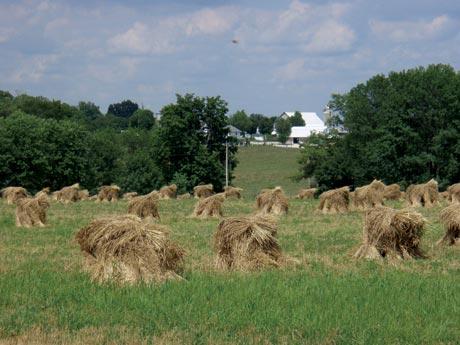
There are few foods and crops that homesteaders consider as essential as wheat. In these days of pasty loaves of over-processed “store-bought” bread, the mere phrase “whole wheat” evokes thoughts of wholesomeness, healthfulness, and quality.
It shouldn’t be too surprising to learn that wheat is the most important and widely-grown grain crop in the world. It is also the best type of grain to use for bread making and this comes from an old country boy who has eaten his share of bread! Indeed, this life-giving grain can be made into hundreds of nutritious breads and other foods. It is deserving of that number one spot on the food scale. It is equally deserving of a prominent spot in the homesteader’s larder.
Although it varies according to variety and type, a kernel of wheat contains approximately 11% protein. It also contains carbohydrates, fiber, vitamins, and minerals. Of course, those nutrients are present in the wheat in its natural state. The more it is processed, the more of those nutrients are removed. So it stands to reason that the less it is processed, the better.
Taking into consideration the quality of much of the country’s bread offerings, storing a supply of wheat and grinding one’s own flour not only is good for our health, but also for our pocketbook as well.
As for freshness, the ordinary bag of flour that is stored at room temperature in the pantry will lose practically all of its food value over the period of about a month. If you have your own buckets, cans, or jars of wheat stored, you can quickly grind a week’s worth of high quality, fresh, whole wheat flour in minutes.
For many of us, a stored supply of wheat offers yet a greater degree of self-sufficiency and independence from the increasingly fragile food supply chain. In any event, one can benefit from having the nutritional food source right at hand.
Let’s discuss some different types of wheat, their characteristics and uses for the homesteader.
Types of wheat
Here in the United States, there are seven or so main types of wheat that are grown. They have different growing characteristics and adaptations. They also offer different qualities for cooking.
One of the best is hard red winter wheat. This type of wheat is widely grown in the traditional grain belt of the United States the Plains states. It is one of the best for bakers and makes up about 40 percent of the wheat grown in the country.
Hard red spring wheat is next. It is a northern crop, grown through the northern states and Canada. It is high in protein and is another great type for baking flour. It makes up about a quarter of the wheat grown in the country.
Soft red winter wheat is mainly grown in the eastern part of the country. It is lower in protein, but offers excellent milling and baking qualities. It also makes up about a quarter of the wheat grown in the United States.
Hard white winter wheat is the newest type of wheat in the United States. It has a sweeter flavor and lighter color than the varieties of red wheat, but offers a high protein content. Growing in popularity, it currently makes up only about 1 percent of the U.S. wheat crop.
The next type of wheat is soft white spring wheat. This type of wheat is grown in some of the east and in the Pacific Northwest and California. It produces a very white flour with a sweet flavor. It makes up only about 7 percent of the nation’s wheat crop.
Durum wheat is the hardest variety of wheat. It is also the highest in protein. It is highly desirable for “high grade” food products. It makes up about 3 percent of the U.S. wheat crop.
|
How much to store?
Now that’s a good question. A lot depends upon how big your family is and how much wheat you can or will use. I am going to give you a variety of ways to use the grain, but just exactly how much wheat to store is for you to decide. Below, I have listed the guidelines given by FEMA (Federal Emergency Management Agency).
One year’s supply of wheat according to FEMA recommendations: Adult males, pregnant or nursing mothers, and active teenagers aged 14-18: 275 pounds each. Women, youths aged 7-13, and seniors: 175 pounds each. Small children age 6 and under: 60 pounds each.
As you can see, the amount of wheat needed for storage can add up pretty quickly. If you are an average couple with three children, you can expect to store anywhere from 600 to 1100 pounds of wheat. That translates to between 12 and 25 buckets of wheat. An important factor to remember when laying in your supply is simply this: Use it! A year’s supply of wheat will not do any good just growing old on the shelf. If your family is not used to the processing and using of fresh raw wheat, then phase it in over a period of time. Make a special event out of grinding, sifting, and baking with it. (This is a good time to tell your youngsters the story of the Little Red Hen).
For those who wish to obtain their wheat in bulk, in the unprocessed form, I offer the following suggestions: First, locate a good source of the grain. If you can grow your own, so much the better. You will then have total control over your wheat from seed to finished loaf. Growing, harvesting, processing, and using wheat on the home scale may be impractical for many, due to acreage, time, or desire. However, if you live in an area where wheat farming is common, you can usually work out a deal with one of the farmers to purchase a few bushels from him. If you are a stickler for using organically-grown grain, you will probably have a more difficult time locating a source, but keep looking. They’re out there, and becoming more common. Another source to consider is the local feed mill or agricultural co-op. There you can probably get the grain already dried, although you may wish to clean it a bit before storage. There are also commercial suppliers of bulk grains and foods for home use. Check a few of these out and compare their products, prices, and shipping costs. Some are listed at the end of this article.
After deciding on the type of wheat you need and obtaining the amount you need, you must turn to storing it in a manner that will keep its nutrients and quality stable until used. Remember that for most of us, dark red winter or spring wheat is probably the best choice. Those varieties also tend to store better than other varieties.
To get your wheat ready for storage, you must first determine that it is clean enough to use for baking purposes. Granted, chaff and straw can provide a lot of fiber in one’s diet, but it isn’t very palatable. If you have purchased your wheat from a commercial bulk food supplier, it has likely already been cleaned; you can ask when you purchase it.
If you have purchased raw, bulk wheat from a neighboring farmer you will need to clean or winnow the grain. The simplest way to do that is to spread it out on a large sheet of plastic and toss shovelfuls of the wheat into the air and let the wind carry the chaff and straw away. If you don’t have enough wind to do the job, a good electric fan will suffice. I have winnowed several bushels of wheat in just this manner. It works very well.
Next in importance is to store grain that is sufficiently dry to resist rotting and molding while in storage. For home storage purposes, wheat should not contain more than about 10% moisture. The low moisture will also inhibit insects from taking up residence in the grain.
As I mentioned above, you may be able to get wheat that has already been dried from your local feed mill or co-op. But unless you are drying an extremely large quantity or live in an especially humid area, you should be able to easily dry more than enough to suit your needs.
To dry grain yourself, try this simple method. Simply spread out a large piece of black plastic sheeting in a sunny spot I used the deck on the south-facing side of my house. Spread a quantity of wheat to make it not more than an inch or so deep. After spending a hot afternoon on the plastic, both the direct heat and that reflected from the side of the house had sufficiently dried down the wheat to about 11%. To measure the moisture percentage, I used an agricultural moisture-testing meter borrowed from an uncle.
If you purchased wheat from a local farmer, he might test your dried wheat for you. The local grain elevator will have the moisture meter and will probably test it for you, as well. If you are really serious about regularly laying in a home wheat supply, you might purchase your own tester, but expect to pay at least $150 for it.
If the solar-drying process takes more than a day, simply cover the grain in the evening, and then uncover it again late the next morning. Be sure to conduct this drying operation during the driest, hottest part of the season, since wheat will readily draw moisture during humid times.
Once you have your wheat crop dried down to about 10-11%, it’s time to store it. I like to use plain 5-gallon buckets as storage containers. They are durable, will seal tightly, and will hold a good, usable quantity of wheat. When stacked and stored, they allow good air circulation around them. A further advantage is that you can often get them cheaply or even free. Ask around at your local restaurants, bakeries, delis, or pizza joints. Those businesses get a lot of their ingredients in plastic buckets.
|
Do not put the wheat directly into the bucket. First line the bucket with a 13-gallon kitchen garbage bag. Fold the excess bag over the sides. Next, fill the bag in the bucket with enough wheat to come to within an inch or so of the top (The USDA does not recommend using trash bags, as chemicals can leach into the food. Food-grade Mylar bags are available. Editor).
Today, dry ice is often used to preserve the wheat. It works by releasing carbon dioxide as the material evaporates. It will kill any bugs in the storage container.
To treat your bucket of wheat with dry ice, place 2-4 ounces of the material on a piece of heavy brown paper or waxed paper on top of the wheat. The fumes created during the evaporation are heavier than air and will settle throughout the bucket. Place the lid loosely onto the bucket. Allow about 30 minutes, then secure the lid to create an airtight seal. Check the bucket to see if it is bulging. If so, crack the seal and wait another five minutes or so, then reseal.
Another practical method of wheat storage is in tin cans. I have participated in group canning sessions where dried wheat was used to fill a #10 can to within a quarter inch or so of the top. Next an oxygen absorber packet was placed on top of the wheat. A lid was put in place and the can was placed on the electrically-powered canner. The machine rolled a perfect crimp as it sealed the can lid onto the can. The cans store nicely on shelves in the basement and are conveniently-sized.
One problem with having cans, jars, or buckets of wheat stored on the shelf is: “Now that I have it, what am I going to do with it?”
Once you are staring at a bucket of wheat, wishing for a loaf of bread, you come up with an obvious quandary: How do I turn the grain into flour? The home miller has several different small mills available that will do the job. You can get simple hand-cranked steel-on-steel mills all the way up to electric-powered stone mills. You can also spend a little to a lot in purchasing your mill. I have had a Corona hand-powered mill with steel burrs for many years. It still turns out wheat flour that is very usable in any dish or bread I’ve tried. I did consider adding a pulley and some bicycle power to it at one time.
Evaluate the different mills and how much you plan to use it. Do you want stone burrs that will produce a finer grind, or will steel burrs suffice? (You can often run the flour through twice if it isn’t fine enough to suit you.)
As a food, wheat is very versatile. Its most popular use, of course, is in bread making. Countless bread recipes from all over the world exist as a testament to the usefulness of the grain and the dependence that people over the ages have placed upon it.
However, one of my personal favorite uses of wheat is actually a by-product of the flour-making process.
After grinding a batch of wheat flour, it is sifted and put aside or stored for use in baking. The coarse “leavings” are poured into a pan and either soaked overnight or started directly in the morning. Simply set the covered pan on the stove to simmer for about 35-40 minutes. Uncover and allow it to thicken. Then ladle a bowlful, add a big dollop of butter and some honey. This hot cereal will keep you going all morning.
Another good use for wheat is to use the whole kernel or berry to make bulgur. Bulgur originated in the Mediterranean region and Middle East. It is made by steaming or soaking the entire wheat berry. The resulting cooked kernel is softened and swollen and can be used in soups or crunchy snacks, in side dishes or main courses.
Try making your own batch of bulgur by placing a rack into the bottom of your cold packer. Add water up to about the level of the rack. Place a pan or pot atop the rack and add a cup of wheat, a cup of water, and a pinch of salt. Cover the cold packer and cook on high heat for about 15 minutes. Then reduce the heat and allow the steam to cook the wheat. Once the wheat kernels absorb the water in the smaller pot they will fluff up. Then simply remove them and use or store them for up to two weeks in the fridge. Note that in place of the cold packer, you may also use a saucepan and steamer combination, if you have that.
Your prepared bulgur is tasty as a breakfast cereal by adding milk, fruit, and honey. It can also be used in soups or any dish calling for barley or rice.
Another way to enjoy bulgur is to season a couple of cups of bulgur and spread it evenly over a cookie sheet. Toast it in a moderate oven until it is nicely browned and crunchy. Sprinkle the seasoned kernels over a salad. If you season the bulgur with a sweetener before drying, it becomes a healthful, crunchy snack.
The most popular use for wheat is in the baking of bread. Bread is certainly a simple, basic staple that can be baked in any homestead home. Once you have tried your hand at bread baking, it becomes a sort of quest, to fine-tune the recipe, the oven, and the loaf to try to come up with that perfect loaf. In any case, the loaves you produce will bear little resemblance to those white, pasty loaves found in the local market.
Here are a few recipes for whole-wheat bread that you should enjoy.
|
Whole wheat bread #1:
This is a good, basic whole wheat loaf to get you started. This recipe will turn out one golden, crusty loaf.
2 tsp. honey
1 Tbsp. vegetable oil
1 cup warm water
1 tsp. salt
2 Tbsp. dry milk
2 Tbsp. wheat bran (kept over from sifting the flour)
1½ tsp. dry yeast
2 cups whole wheat flour
Stir together the honey, oil, and water in a large mixing bowl. Stir in the salt, dry milk, bran, and yeast. Add the flour and mix all together. Turn the dough out onto a lightly-floured surface and knead. Add a bit of flour if needed. Knead for about 5 minutes. The dough should be slightly sticky. Put the dough in a greased medium bowl, and turn it over so that the top is lightly greased. Cover with a light cloth and set it to rise for about 45 minutes or until it is doubled in size. Turn the dough onto a breadboard and knead for about 3-4 minutes. Shape into a loaf, and place into a greased loaf pan. Cover and let rise for about 30 minutes or until it is doubled in size. Bake for about 40 minutes in a 350° F oven. Turn the finished loaf onto a rack and allow to cool.
Whole wheat bread #2:
2¼ tsp. yeast
3 Tbsp. dark brown sugar
2¾ cups whole-wheat flour
¾ cup warm water
3 Tbsp. nonfat dry milk powder
3 Tbsp. vegetable oil
1 tsp. salt
1 large egg or
2 large egg whites
Stir the yeast and sugar into the water and let it stand until foamy, about 5 minutes. Into a large mixing bowl put the rest of the ingredients and mix well. Make a depression in the center, pour in the yeast mixture, and work it into the rest. Put it out onto a floured board and knead until smooth and elastic (about 10 minutes). Transfer the dough to a large plastic bag, squeeze the air out, and seal the top of the bag. Place the dough into a bowl to rise in a warm location. Allow it to rise until doubled in size, about 1 hour. Punch the dough down and shape it into a smooth ball. Place the smooth side up on an oiled baking sheet and cover it loosely with oiled plastic. Let it rise in a warm spot until doubled in size, about 45-50 minutes. Preheat your oven to 375° F. About fifteen minutes before baking, put the rack in the center of the oven. Lightly dust the top of the loaf with flour. Place the loaf in the oven and bake until the bread is well-browned and sounds hollow when rapped on the bottom. This should take about 30-35 minutes. Remove the loaf from the oven and pan. Place it on a cooling rack. Makes 1 loaf.
Whole wheat bread #3:
8 cups scalded milk
6¾ tsp. yeast
2/3 cup water
1 Tbsp. sugar
12 cups whole wheat
¾ cup shortening, melted
½ cup molasses
1 cup sugar
2 Tbsp. salt
Scald the milk. Dissolve the yeast in 2/3 cup water while the milk is cooling. Dissolve 1 cup sugar in the hot milk. Stir all the ingredients in a large bowl, turn out onto a floured board and knead for about 5 minutes, adding flour a little at a time, if necessary. Knead the dough for about 5 minutes. Let the dough rise until doubled in bulk (about 1½ to 2 hours). Knead the dough down and shape it into 6 loaves. Put in greased loaf pans. Let it rise again until doubled in the pans. Bake in a preheated 375° F oven for about 40 minutes. Turn the loaves onto a wire rack and let them cool.
There are many more recipes and uses for wheat. Your own experimentation will yield great results in cooking with this great cereal grain.
If you are interested in trying your hand at growing your own wheat patch, then I recommend locating a copy of Small-Scale Grain Raising, by Gene Logsdon. This standby text has all the information you’ll need to raise your own grain crop. The book has been published in a Second Edition and is available from Backwoods Home Magazine.
If you want to purchase wheat, either in bulk or ready to store, but cannot find a source for buying wheat locally, check out these mail-order suppliers:
• Walton Feed, 800-847-0465, www.waltonfeed.com
• Emergency Essentials, 1-800-999-1863, www.emergencyessentials.com
• Wheat Montana, 800-535-2798, www.wheatmontana.com


