| Issue #152 • March/April, 2015 |

Ingredients
Making cheese is one of the easiest and most satisfying tasks that you can accomplish in the homestead kitchen. While there are many wonderful cheeses out there to try, I recommend a simple farmer’s cheese to get your feet wet and familiarize yourself with the basic process. The great thing about this recipe is that it doesn’t require specialty ingredients; it can be made with either store-bought or farm-fresh milk, and it is ready to eat within a few hours. I also love the fact that it can be flavored with any number of herbs and spices to suit your personal taste.
You will need:
1 quart whole milk (cow or goat milk will work)
juice of 2-4 large lemons
1 Tbsp. butter
salt and pepper
herbs and spices to taste

1. Heat milk over low heat to almost boiling. 2. Pour in lemon juice. 3. Strain the curds. 4. Twist the straining cloth to remove as much whey as possible. The curds should stay together in a ball. 5. Add the butter while the curds are still hot. 6. Add salt and other seasonings.
In a heavy stainless steel saucepan, heat milk over low heat to almost boiling. I never use a thermometer; I know it’s ready when the milk forms a skin over the top and little bubbles begin to form around the edges.
Once the milk is ready, remove from heat and skim the skin from the top with a spoon. Then, pour in half of your lemon juice. You should see the milk begin to separate into firm white curds and thin yellow whey. If it doesn’t seem to be separating, add the rest of the lemon juice and continue to stir. The whey will be clear to slightly milky and the curds may be very fine or clumpy, depending on the type of milk that you use and its exact temperature.
Strain the curds through a cloth-lined strainer or colander. I use a heavy flour sack dish towel so that I don’t lose any of the finer curds. If you want, save your whey for baking, as a starter culture for fermented foods, or give it to your chickens … it is full of nutrition! Gather the curds up in the cloth and twist it to remove as much whey as possible (be careful, it’s hot). The curds should look fairly dry and hold together in a soft ball.
Transfer to a bowl and add the butter. Take a spoon and mash the butter into the curds. You want to make sure that you do this while the curds are hot. At this point, they may feel rubbery and stiff, but if you continue to mash, they will eventually become soft and relatively smooth. The smoother they are, the better the texture of your final product will be. This can take up to 10 minutes. You can speed the process by using a small food processor, but I like to do it by hand so that I can “feel” the texture of the curds. Cheese making is part science, part art.
When you feel that your curds are as smooth as they can get, add a pinch of salt, a dash of pepper, and whatever other seasonings you want. I love a combination of oregano and garlic. Dill, rosemary, and cayenne are also tasty. Mix well.
With your hands, form your cheese into a small, firm log. At this point, if you want, you can roll the log in additional herbs, finely chopped nuts, or seeds. Wrap it in plastic wrap and chill for several hours.

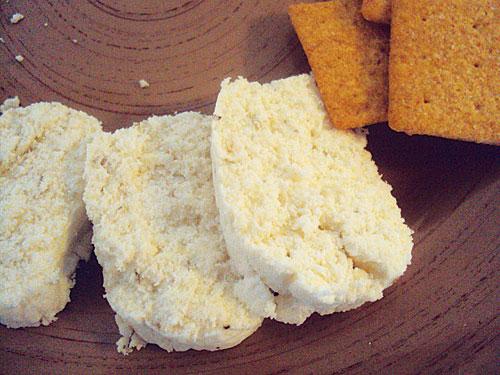
Finished cheese
The finished product should be soft, but firm enough to slice. Bear in mind that cheese can be temperamental, so it may not turn out exactly the same every time. I have never had a batch that was inedible. I’ve had a few “whoops” batches that were crumbly, or too soft to slice, but they still had a terrific flavor and we enjoyed them on salads or as a spread. If you have a batch that turns out exceptionally well, make notes on exactly what you did so that you can repeat it the next time.
You can make larger batches of this recipe, using up to a gallon of milk. The cheese will keep for a week or so in the fridge.


