| Issue #151 • January/February, 2015 |
Those of us who live as self-sufficiently as possible love to forage. From wild greens to wild meat, foraged foods make their way onto our tables as often as possible. But most people don’t think about the fact that a homestead staple is available under our very noses and ready to forage every minute of the day. It is, you might say, as common as the air we breathe, since it is in the air we breathe: Yeast.
Dry yeast wasn’t always readily available in years gone by and sourdough bread was a common food in many pioneer homes. With just a little flour and water, we too can catch the yeast that floats in the air and make a delicious not to mention nutritiously superior bread for our families. I started making sourdough several years ago and through trial and error have come up with a method and a recipe that works well for me with minimal effort.
Making the starter
To make sourdough, you first must have a starter culture. There are three ways to get your starter: Order it from a supplier such as Cultures for Health (www.culturesforhealth.com), get one from a friend who has extra, or start your own. I wanted to experience the process from start to finish, so I opted to start my own. If you do an online search, there are as many methods for making your own starter as there are people making bread. Many call for potato water or active dry yeast and while I’m sure that these produce great results, I wanted basic. I wanted something that I could make if I was stranded in a cabin with just a little flour and water. So flour and water is what I used.
There are a few things that you need to know before making your starter. First of all, use glass bowls and wooden spoons. Stainless steel or aluminum can react to the culture and affect your results. I do use stainless steel measuring cups to measure my flour and water, but only because the ingredients come into contact with them so briefly. Secondly, do not run your bowls or utensils through the dishwasher as the detergent can leave a residue that will interfere with the starter. A good washing with a mild dish detergent works fine. Finally, you will get the most consistent results if you use unbleached white flour. People do successfully use whole wheat, but it can be a little trickier to work with. If you want to convert your starter to whole wheat once it is established, you can do that by feeding it later with wheat flour.
In a large glass bowl, mix together 2 cups of flour and 1½ cups of filtered water. Do not use straight tap water the chemicals will affect your starter. We have an under-the-sink filtration system and that water works fine. Cover with a light cloth (I use a flour sack dish towel) and set in a warm place. I just keep mine on my kitchen counter.
Every day for seven days, stir in ¼ cup flour and ¼ cup water. After about three days, your starter will look bubbly and expand in the bowl, and by the end of the week it should have a nice yeasty, fermented smell. If it turns grey or develops mold on top, then it hasn’t caught a good yeast and you will need to throw it out and start over. You also need to watch out for fruit flies since they love anything fermented. If necessary, put a big rubber band around the cloth and bowl to keep the flies from crawling inside. Fruit fly traps around your bowl of starter work well to keep them at bay.

After about three days, your starter will look bubbly and expand in the bowl.
Making the bread
After seven days, your starter should be ready to use. My recipe has a long rise time, so I mix up my bread the night before I want to bake it. A long fermentation/rise time breaks down the gluten in the dough and makes nutrients like zinc, magnesium, and iron more absorbable, so I like to let the dough rise for a full 12 hours the first time.
2 cups starter
4 cups filtered water
4 tsp. salt
6-8 cups flour
olive/coconut oil, for greasing
Take out 2 cups of starter and place in a large glass bowl. Cover the remainder and set it aside. I will cover ongoing care of your starter at the end of this article.
To the starter, add the filtered water and salt. Stir in flour to make a soft dough. Just about any flour can be used, but I find that whole white wheat yields great results and is readily available. Turn onto a floured board and knead for ten minutes, adding flour as necessary, until the dough is firm, smooth, and elastic. Wash your big bowl and grease well. Place the dough inside, turning to grease the top. Cover with a damp cloth and let sit in a warm place overnight. Again, I just use my counter. Our house is usually fairly warm.
The next morning, the dough should have risen and be at least doubled in size. It may have a thin crust on top where it has dried out. I turn the dough onto a lightly-floured surface and knead that crust in. Divide the dough into four equal pieces and form each piece into a round loaf about 6 inches in diameter. Place loaves on greased baking sheets or cast iron griddles. Cover with a damp cloth and let rise for 1½ to 2 hours. The loaves may not be completely doubled in size, but they should be noticeably larger. At this point, heat your oven to 500° F. With a sharp knife (I use a serrated one), carefully cut several slashes or an “X” shape in the top of the loaves. This allows the loaves to expand in the oven without cracking.
If you like a really crusty loaf, place a baking pan full of water on a bottom rack of your oven. This creates steam, which produces a hard crust. My family prefers a softer crust, so I skip this step.
Bake the loaves for 15 minutes. Reduce heat to 450° F and bake for an additional 5-7 minutes, until the loaves are browned on the bottom and sound hollow when you tap them. Remove from the oven and place on wire racks to cool.

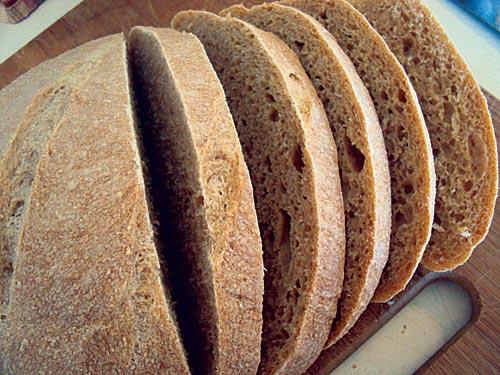
The morning after the dough has risen, divide it into four equal pieces and shape each piece into a round loaf.
Caring for your starter
Your starter, once it is established, is somewhat like a family pet, with its own personality. You will need to learn just how to care for it so that it stays as healthy as possible. After you have baked a batch of bread, you should have at least 1 cup of starter left. You have a couple of options on what to do with this. If you plan to bake bread again fairly soon, you can transfer it to a clean bowl and feed it often (at least every 2-3 days, or as often as twice a day) until you are ready to bake again. If you don’t need it right away, you can transfer it to a clean glass jar with a lid and store it in the fridge until ready to use. Most people say that it will keep in the fridge unattended for several weeks. I have actually had it last for months in there. It may develop a dark liquid on top. When you are ready to use it again, bring it to room temperature and pour off the dark liquid. Then put it in a bowl and feed it every 4-12 hours until it is active and bubbly and you have enough to make bread. If you are trying to increase the volume of your starter, you can feed it larger amounts at one time. The rule of thumb is that you don’t feed it more than the existing amount of starter for example, if you have a cup of starter, you can feed it up to ½ cup flour and ½ cup water (1 cup total). After about 4 hours, you will have two cups of starter and you could feed it up to 1 cup flour and 1 cup water.
Always bake bread with starter that has been fed in the last 8 hours and that is active and bubbly. I usually feed my starter at noon on the day that I will be mixing my bread up in the evening.
If your starter seems sluggish and doesn’t bubble as much as you would like it to, try feeding it a little more often. I have also had success feeding a sluggish starter a larger amount than usual and that seems to perk it up.
Baking with sourdough is an art, and it takes practice. I went through several batches of mediocre bread before I began to get consistently good results, so don’t give up if it doesn’t turn out perfect the first time. There is a lot of information out there but it can be overwhelming. The most helpful and practical resources that I have found are at www.gnowfglins.com (I left several comments/questions on the blog and received great advice and encouragement there) and Sandor Katz’s book Wild Fermentation.
Above all, have fun. I never cease to feel a thrill when I pull a loaf of bread from the oven and know that it is created by the very air around me.


