| Issue #136 • July/August, 2012 |
We built our chicken house for around $200. We could have done it for less if we were dedicated scroungers. Three of us put up the 7×18-foot structure in about four hours. For four years it has withstood heat, rain, snow, hail, and high winds, and at various times has sheltered chickens, springtime vegetable starts, and even kept bales of hay dry and cozy … all in our suburban backyard.
The main materials flexible 16-foot welded-wire cattle panels and plastic sheeting are available at any farm supply.
I got the idea when I was exploring ferro-concrete construction. Ferro-concrete, in essence, is multiple layers of wire fencing (such as chicken wire), covered with a thick layer of concrete. Because of the flexible materials at its core, it can be formed into durable, sturdy structures of various types.
Back then I wondered if I could make a chicken house using the basic structural protocols. The framing could be made using 16-foot-long and about 52-inch-tall cattle panels, then covered with chicken wire (1-inch openings) and finished with concrete for a super-durable weather-resistant structure.
The idea percolated for about a year until our need for a chicken house became pressing we had 25 fully-feathered young hens and husky meat chicks in a small cage fragrancing our kitchen. The time had come for them to meet the great outdoors. Unfortunately, it was early fall and nights were getting too chilly for concrete to set up properly.

Supplies and beginnings
This is what we had to work with:
- Five 16×4-foot cattle panels
- 20 pieces of rebar (24-inch lengths)
- A 20-foot-wide roll of 6 mil “transparent” plastic (actually translucent white)
- A couple partial rolls of 1-inch chicken wire, 36-inches tall
- Some pine 2x4s of various lengths
- Scrap of ½-inch plywood
- A dozen or so wire clothes hangers
- Construction stapler and staples
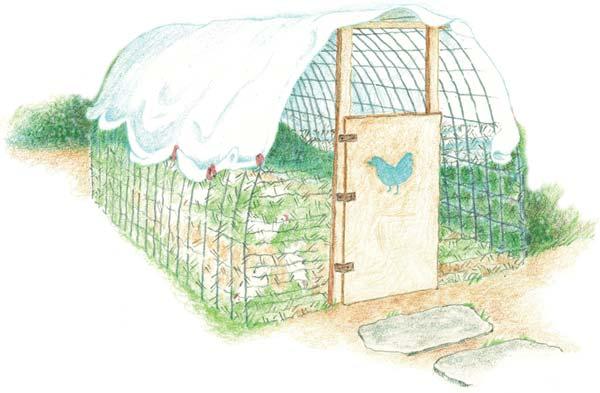
The plan evolved differently than my original ferro-concrete thoughts, but the structure turned out to be easier to build, and was both flexible and stable. We decided to use the cattle panels in an arch, bending the 16-foot lengths over to form a “tunnel,” and cover that with plastic sheeting. We wanted the interior to be high enough that even the tallest among us (6-foot 2-inches) wouldn’t have to fear scalping when tending the birds.
We get severe enough winds that we wanted this potential kite to be secure. We would need to anchor the short edges of the panels firmly to the ground. Then, once the full-length arch was constructed, we could finish the ends with wood framing and stick in a door before covering the whole thing in plastic.
We picked out a spot in the yard that receives some shade in the summer but is unshaded during the winter. We didn’t want the chickens to be too hot when the sun was beating down in July or too cold when the sun was weaker in January. Since the plastic cover was thick enough to retain warmth from the chickens’ body heat, we expected the interior would be warm enough to prevent their drinking water from freezing. We live in an area with four distinct seasons, but they are rarely extreme. Cluckers are able to tolerate moderate temperature variance without too much discomfort or loss of productivity.
We hit a few snags, but by and large, it worked the way we expected.
The process
The first step was to define one side of the chicken-house-to-be. This was where the rebar pieces came into the picture. We would use them as stakes to hold the ends of each cattle panel in place. First we pounded two guideline stakes into the ground, about 20 feet apart, and ran a string taut between them. This was the edge line for the rebar. I figured that if we put a rebar stake about six inches from the edge of each panel it would allow us to overlap edges and secure the panels. The natural spring of the panels would help hold them upright and in place.

Once we had the first two edge-stakes in place along the taut line, we set the narrow end of a cattle panel into those rebar anchors, then bent a panel by “walking” the other end of it back toward the staked edge. These things have a lot of spring in them, so it took two of us to steady and bend the panel at the same time. We found that if we put the second side edge about seven feet from the first, that gave us a nice six-foot-plus arch and plenty of floor space. So, we marked the second edge-to-be, pulled the cattle panel out temporarily, and ran another taut line. Now we had two clearly marked edges, where the “feet” of the arches (that is, the narrow ends of the panels) would sit. We pounded in rebar stakes along both edge lines, allowing for panel overlap.
Now it was time to form the long tunnel arch. One helper steadied a panel against the first rebar edge while the second one “walked” the opposite end down, bending the arch into place. We placed the second panel slightly overlapping the first on the outside. We tried to fit the third panel inside the second panel because we thought that might provide better stability. But we simply couldn’t jockey it into place properly, so it ended up on the outside, too. We were careful to overlap the panels with their wires aligned so we could later fasten them together. We continued until all five panels were in position producing a lovely metal arch, still open on both ends.
Next, we clipped the old wire clothes hangers into 6-inch pieces (more or less) using wire cutters. The wires served as twist ties, attaching the panels to the rebar and to each other. After twisting each wire tight, we bent the ends inward to avoid future scrapes.
When it was wired together, we were surprised that the arch was still quite flexible and had a bit of spring in it. We could push the peak of the arch one foot laterally. It would spring back to center position on its own. Some give might be beneficial in high winds, but this looked a little too flexible to me. We decided to put 2×4 braces at the open ends to make it more rigid. We also thought that wrapping the cattle panel arch with chicken wire would help stabilize it even more.
We cut 2×4 sections to fit across at doorway height, and wired those in place. At the front door area, we placed a treated 2×4 on the ground as a threshold, then nailed two 2x4s upright at the corners of top and bottom braces to act as a doorframe. Putting the doorframe in the front end of the tunnel and a single crosspiece at the far end braced the arch enough that the extreme lateral wobble was gone. It still had more flexibility than a standard building, but given the arch structure, we were pretty confident it would withstand both winds and heavy snowfalls.
At this point we attached chicken wire near the left side of the door frame. Then we unrolled the wire along the base of the tunnel, attaching it every foot or so with wire ties. We continued unrolling until we arrived at the right side of the door frame and wired it tight. The chicken wire acted as another form of bracing for the structure.
Happy with that development, we went ahead and ran another round of chicken wire above the first level, and a third round above that creating a chicken wire barrier around the whole structure almost to the top of the arch. Now, it was more solid still, though pushing against it showed that it remained forgiving enough to “float” against pressure. Only a hurricane-force wind would push it out of alignment, and it would take more weight than seasonal snow could provide to crush the arch. It still had a bit of a wobble but we hoped it was going to be solid enough to withstand regional weather conditions. (Two ice storms later, we were sure.)
Next, we placed a door. We planned to build a more solid one later (and after four years, we are finally getting around to it), so we set up a temporary entry. It was nothing more than a piece of ½-inch exterior plywood, cut to fit the lower half of the opening (it hung over a bit on the right hand side, but we were “going to fix it later”).

After searching for hinges we went with the makeshift option pieces of heavy leather, nailed to doorframe and door. We put one near the top of the door, the other near the bottom. Then we put a simple hook-and-eye latch on the door to hold it closed. Now the door opened and closed easily and could be latched to keep the birds in and predators out.
Attaching the plastic
Now we were ready to attach the plastic layer. This turned out to be simpler than we expected. The roll was 20 feet wide. We unfurled enough to cover the entire arch, plus an extra 16 feet for the end sections (a total of about 35 feet). That was a pretty big piece of plastic. Even the slightest breeze caught it and made it flutter.
This part took all three of us. One stayed at the tail end of the chicken-house-to-be, and fed out the plastic, the other two grabbed a corner each and proceeded to “walk” the plastic down opposite sides to the front end of the structure. Then we adjusted the drape until it was centered. We then put a piece of cut firewood onto the ground-level “skirt” of plastic on each side to hold it in place while we attached the cover.
Using a staple gun, we fastened the sheeting to the wooden door frame, then cut the excess plastic away so we had an actual doorway. We had to fold pieces of the plastic to conform to the arch shape around both ends of the structure, but then we “pinned” the plastic to the frame using more pieces of the cut clothes hangers.
We ran out of clothes hanger wire and ended up using bungee cords to hold the lower edges to the base all the way around. That turned out to be serendipitous, because when the weather warmed up we were able to roll up the bottom edges of the plastic to permit good air flow through the structure. The presence of chicken wire at the base kept the birds inside and the predators outside.
At this point, we decided to try out the building. Even though it was chilly outdoors and a breeze was blowing, the inside was warm and dry. Quite warm, in fact! So warm that we realized it could become uncomfortably hot if all the day’s heat was trapped inside. We did the easiest adjustment possible just cut two V-shaped flaps through the plastic at the top of the arch on each end, and one on each side. That allowed the flap to lay down during wet weather, but to puff out if hot air needed to expand outward. There was enough ventilation from that simple adjustment that the structure never became too warm or too cold for the birds.
The chickens move in
The chickens seemed happy to have more space to move around and lots of grass and weeds to pick through. Later, we added hay to the flooring to keep it clean and give the chickens something to kick around during their daily scratch-fests. We placed their waterer on an old tire so it wouldn’t get too much debris scratched into it and put their feeder at the far end so they would have to get some exercise walking from food to water. An old rabbit nesting box became their egg-laying spot. We also placed a 2×4 inside across the width of the structure so that the birds would have a roost at night. This seemed to work just fine.
Problems and solutions
Over time, a few problems emerged. We found that mice liked the mid-winter warmth and ready food supply as much as the chickens did. We didn’t realize how much the mice liked the structure until we were cleaning the chickens’ waterer and found the comfy mouse nest filled with peanut-sized babies inside the old tire on which the water tank rested. In the spring we found that mice had built a little city around the edge of the structure, with a complex of tunnels running everywhere. We ended up removing most of the mouse-encouraging supplies and eliminating the tunnel-making aids, but the chickens still have a ready supply of mouse-snacks available to them. I’m not certain we could completely eliminate mice, in any case, without making the whole structure much tighter which would defeat the purpose of keeping it airy, too. This may be one problem we all have to live with.

Another problem was the degradation of the plastic over time. The weather made the plastic dry and rather crispy. We replaced it at the start of the fourth year. Surprisingly, to us anyway, the plastic didn’t rip through in places where it was tacked down, or attached by wires or bungee cords. I suspect that if we shielded the plastic a little better in the summer so it wasn’t quite as exposed to high heat, it might last an extra year or so.
City predators opossums, mostly turned out to enjoy chicken and eggs as much as we did. One particularly enterprising possum found a way to crawl underneath the plastic, up along the chicken wire, and through the chicken-wire gap on the peak of the arch. He cost us four hens over several weeks before we found the few tufts of possum fur he left behind to mark his entrance and exit routes. We closed up his pathway with bungee cords, and made sure to check whenever the backyard dogs started barking vigorously.
On one or two occasions, we’ve forgotten to latch the door and chickens got out or our pug dogs got in. The final solution to that problem will be a new door, properly hinged, with a draw-bolt that locks when it is fully closed.
Four years later…
The arch structure has stood up better and longer than I expected and is now housing another batch of chickens who are just getting ready to lay. One of my early concerns that the plastic would billow and be torn loose to fly all over the neighborhood never happened, and never even came close to happening. During high winds, the plastic may bulge a bit, making the structure look puffy, but it hasn’t loosened probably because the V-shaped vents allow just enough excess air pressure to escape. During two difficult ice storms, the chickens remained warm and dry, and the arch held its shape nicely. Between batches of chickens, it has provided a warm environment to get spring garden plant starts going and protect them from birds and insects.
It turned out to be a better investment than we expected good enough that we might go ahead and build another one to house the rabbits we’re planning to get.


