| Issue #152 • March/April, 2015 |
One of the hazards of living on the side of a mountain in northern New Mexico is that I live on a rock. And I don’t mean the ground has a lot of pebbles and stones in it it is solid rock with just a dash of topsoil to keep you guessing. After an interesting experience with the yard and a sledge hammer, I am pretty sure that my rock goes straight to China, which means that nothing grows in it except well-established trees, scrub oak, and the occasional cactus. Any gardening that I do has to be above the ground and it has to conserve water as well.
After a number of years of different kinds of container gardens failing in one way or another due to our climate, summer water concerns, or my sporadic travel schedule, I got serious about finding a way to garden on top of my rock to help our family be more self-sufficient.
What is keyhole gardening?
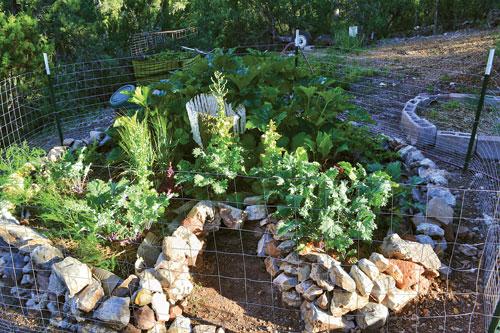
The answer for us turned out to be a “keyhole garden.” A keyhole garden is basically an aboveground circle garden with a notch in it resembling a keyhole (hence the name) and a composter directly in the center to continuously feed the entire garden. The purpose of the notch is so you can reach the composter easily without having to step into the garden. A keyhole garden should be no larger than about six feet in diameter. Any bigger than that, and the water and nutrients will have a hard time reaching the edges of the garden.
The keyhole garden was invented and used by missionaries in areas of frequent drought or natural desert conditions, mainly places such as Africa, where this style of garden is still being used today. These gardens give people a way to feed their families healthy, sustainable food even in the middle of a drought or economic trouble. A keyhole garden has the ability to use very little water (only a gallon a day in slightly cooler weather), especially if you make a cover for your composter. This prevents the water from evaporating as quickly.
Keyhole gardens also provide a significant amount of food for such a small footprint. I experimented with my garden this year; half of it I planted with the “correct” amount of space between plants and on the other half I crowded them purposefully. The side that I crowded did significantly better due to the fact that the crowding allowed a natural shade and mulch environment which aided in water conservation for the plants.

Materials list
To build a keyhole garden you will need:
- A relatively level piece of ground
- Something to build the sides of your garden (such as logs, stout sticks, cinderblock, bricks, hay bales, wine bottles held in place with mortar, rocks, or whatever you have on hand)
- A composter that will allow water and nutrients to pass through it to the garden (wattle slim sticks to make a basket, or use leftover chicken wire)
- Cardboard, newspapers, and phone books
- Small stones, ash, bark, small sticks, rusty nails, bones
- Leaves, or some other source of green manure
- Compost
- Soil
- A three-foot length of string (or a tape measure if you’d rather)
Preparing the ground
To start this project, you will need to ensure that the ground is relatively level and as free from weeds and baby scrub oaks as you can get it.
If you have someone giving you a helping hand, have them stand where you want the center of your garden to be, holding one end of your three-foot length of string. Take the other end and, holding the string taut, walk in a circle marking the ground as you go. If you are working alone, just stick a short stick in the ground with the string tied to it, then walk in a circle. This will be your keyhole garden’s main footprint. Now, decide where you want your garden’s “keyhole” and mark a space that is roughly 3x2x1 feet (see photographs). You can make it larger or smaller depending on your own comfort and needs.
Building the walls
Next, start building your garden’s walls. I used rocks from around my yard, putting the largest ones on the bottom and smallest rocks on top. You can make the walls as short as 10 inches and they will work just fine, but do keep in mind that the taller you go, the easier it is on your back. A taller garden bed means less bending. Another thing to consider when determining how tall you want to go is that because the composter is integrated into the garden itself, your soil level will rise a little every year until you have to either add more height to the walls or remove some of the soil.
Because I have only used rock as a building medium for a keyhole garden, it is the only method that I can speak with authority on. If you choose to use rock, please use gloves when moving them around I didn’t and my hands looked like they had gone through a meat grinder. Don’t forget to always lift with the legs. Butt out, chest up that’s the way to pick stuff up and may we never forget it.
With the walls of your garden up, you now get to turn your attention to all that cardboard and newspaper that you have had stashed in the garage. Layer the cardboard all along the bottom and up the sides of your garden, this is when your building techniques will begin to resemble “Lasagna Gardening” at its finest! You will need a lot of newspapers/phone books, so don’t skimp. Wet down your papers in a large trash can filled with water, get them good and soaked, layer them on top of the cardboard, and then layer some more. Reserve about ? of your paper for a future step.
Making the composter
This composter is a nifty little device that will really set this garden apart from all the other gardens that you’ve ever had. Your composter needs to be about two feet in diameter and be able to stand one to two feet above the top of your garden wall. Since chicken wire is what I had, I simply made a cylinder out of the wire with the “finished” edges facing up or down and wired the rough edges together. The openings were larger than I wanted, so I took some all-cotton yarn, cut into lengths that were five strands thick and wove it through the wire that way I didn’t end up with a composter full of dirt. If you have a large supply of long straight sticks that are slightly flexible, then a wattle composter would be a great alternative. To make a wattle composter, you basically weave sticks (over under, next stick alternate, under over) together until you have a cylinder. Your composter doesn’t have to be round as long as it’s not too big or too small; I personally wouldn’t go smaller in diameter than 18 inches or larger in diameter than three feet.
Place your composter in the center of your garden and put some already-done compost into the bottom. You don’t need a ton of it, as this compost is there to give the composter a boost once you start putting your kitchen scraps into it (which you can start doing immediately). This is what will feed and eventually water your garden.

Filling the garden
Your next layer will be the “debris,” the small stones, ash, etc., followed by the rest of your wet paper around the composter. As your garden matures over time, the “debris” will add a slow release of vital minerals not readily available from compost. Add your first layer of green manure, then a layer of compost. You can use compost exclusively and not add any topsoil, but I didn’t have enough compost to do that. Follow this with a second layer of green manure and then finish it all off with compost/soil. With your last layer of compost/soil, you want to make sure that you slope the dirt, the ground level should be higher up against the composter and slope gradually downwards to meet the wall.
Planting
Give your new garden a good soak and start planting when you’re ready. When your seeds are just starting out, make sure to keep the soil well-moistened. However, once they start to grow big enough, water exclusively through the composter as much as possible (if things are excessively dry and your plants look a bit “wilty” then by all means give the actual earth a good soak now and then). The goal is to train the roots to grow deep in order to get their water, which in turn makes them less vulnerable to heat and wind.
I have been so blessed and pleased with this garden. For the first time since living on the rock, I actually pulled in a harvest from my garden plus it survived my necessary two-week trip to Oregon this summer. If you are looking for a drought-resistant garden, then the keyhole garden is definitely something to look into.


