 |
|
| Issue #132 • November/December, 2011 |
Dave Duffy, the publisher of Backwoods Home Magazine, asked me to review some of my early recipes and see if any needed updating. After rereading a few, I selected several that have undergone changes since BHM first published them. Most of these changes have been the result of comments and suggestions made by friends, family, and Backwoods Home readers. Over the years I’ve made a habit of recording these comments and criticisms. So, recently, I decided to review these notes and select the recipes that have generated the most comments.
To my surprise dessert recipes, especially pies, seemed to garner the most attention. The apple pie recipe I included in my article on great American foods in Issue #30 (Nov/Dec 1994) received at least 60 suggestions and other comments. Several came from my wife’s mother, Gertrude. On one occasion, after eating a piece of my pie at a family Christmas dinner, she offered a few suggestions she said would make my pie almost as good as hers, if I followed her instructions. After reading that comment, I decided that my immediate goal would be to get beyond “almost as good.” What follows is my latest attempt to reach this goal.
Since Thanksgiving and Christmas, two great occasions for making pies, are almost upon us, and apple season is currently at its peak, this is a great time to update this favorite and frequently-prepared dessert.
|
Over the years I have often relied on my mother’s old recipe file for guidance, especially when preparing dessert recipes. Once she found a recipe she liked, she would copy it on an index card and place it in an old mahogany cigar humidor. From that day on, the selected recipe became a standard in her kitchen. She very seldom made changes to these recipes unless she had to make a substitution for an unavailable ingredient. My mother was one of those rare individuals with a never-fail long-term memory. She never recorded any of these changes on the card. Unlike my mom, I have a terrible memory, but I am constantly revising recipes as I discover ways to improve them and when I make any changes to a recipe, I record that change on the recipe card. The changes to this apple pie recipe were so extensive I decided to share them with everyone in a new article.
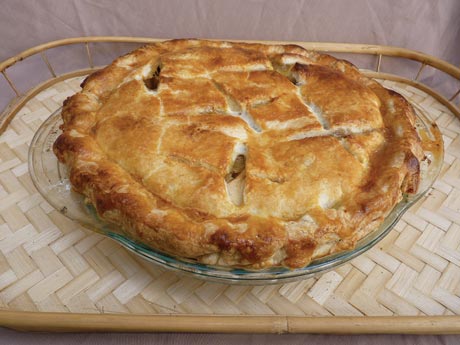
This revised recipe produces a pie with mounds of tender, juicy apples surrounded by a rich and flaky pastry crust. However, handing folks a new recipe that includes only changed ingredients and an updated assembly procedure is not going to be enough. I want to make you a better cook, too, and understanding why these changes are necessary is also important. This updated pie does not replace my mom’s original. I grew up loving all of her pies, and will continue to use her original recipe from time to time.
My mother would make her first apple pie around the first of October, when the new crop of New England apples appeared in the local markets. She was very selective when choosing the apples for her pies. Her favorite was a tart, grayish-green apple called the Roxbury Russet, believed to be the oldest apple bred in this country. We also lived in the Boston neighborhood where this apple was first planted, Roxbury, Massachusetts, and across the street from a church that had two of these trees in back. Unfortunately, this apple is not widely available on the market today, probably because it isn’t a very attractive apple, and it only produces fruit in alternate years. Her second choice was one of the sweet varieties, usually Golden Delicious or Braeburn. These three apples are excellent choices for a pie because they hold their shape during baking.
Her pie crust is basic. It is made with vegetable shortening, flour, salt, and ice water and is easy to prepare and produces reliable results. The apple filling contains about two pounds of apples, sugar, cinnamon, salt, butter, and flour, and is easy to assemble and tastes great. My updated version doesn’t stray far from the original, but it produces a better pie that solves most of the perceived shortcomings in the original.
I live in New England and apple picking in the fall is an established tradition in my family. There is one orchard in my area that grows Roxbury Russet apples and my first apple picking adventure includes a trip to this orchard to see if these apples are available. I hold to mother’s standard of using only fresh, crisp apples in my pie, so the Blunt family looks forward to our first fall apple picking adventure.
Last weekend, my wife Tricia, my daughter Sarah, and I went apple picking. My sons, Jason and Michael, are away pounding the books at their respective universities and missed this annual event. As usual, after we finished picking and handing our bag of apples to the owner for weighing, we discover that we had picked enough apples for 10 pies. Of course everyone was looking at me with that, “What are going to make with all of these apples” look on their faces. Before Sarah could voice her post-apple picking plea, I offered my suggestion for an apple pie as a starter.
“Daddy,” she said, “you’re supposed to wait for me to ask that question.”
This first apple picking adventure has been a family ritual for 22 years. Almost every aspect of it has become a tradition etched in stone, including suggestions about what to do with the apples. Speak out of turn and you will be put in your place. I apologized for speaking out of turn and we paid for our apples and headed for home.
|
Immediately after unloading our apple cargo, I took both my mother’s original apple pie recipe and my revised version out of the working file, and began separating and peeling enough apples to make both pies. From October through early spring all types of pies are favorite desserts in my house, with apple pie at the top of the list. So, determining which version of this pie would be the standard had to be decided.
Once again, the final decision would be made by the recipe review committee: my wife and my three children. Over the years they have tastefully yet methodically deconstructed the old standard for this favorite dessert. The most recent observations came from Michael and Sarah last fall. We had finished dinner and I announced that I made apple pie for dessert. I cut everyone a piece, and, as usual, we all cleaned our plates.
After dinner, Michael wanted to know why there was a huge air space between the top crust and the apple filling.
I told him that the apples lose moisture as the pie bakes, causing them to shrink.
“Oh,” he said, “so that is why there is so much juice on the bottom of the pie.” He also pointed out that this juice made the bottom crust a little soggy.
Since I had always believed that a somewhat soggy bottom crust is an unavoidable consequence of making an apple pie with fresh apples, I didn’t consider this a real problem.
A few weeks later I made another apple pie and Sarah came to me with another observation.
“Dad,” she said, “the crust on this pie is not the same as the last one. It isn’t as crispy; it also seems to be a little tough and pale.”
This pie usually receives blanket approval, so these constructive criticisms caught me a little off guard. In spite of my surprise, I promised Sarah and Michael I would consider their observations and see if there was a solution.
A couple of days after my conversation with Sarah I posed these questions to a professional baker who has a solid knowledge of baking science. He gave me several suggestions he thought would help me improve the crust and filling. The combination of his advice and some interesting facts I learned while researching whole grain breads led me to a complete revision of my mother’s apple pie recipe. The basic food science applied here is really simple, but the effect on the finished pie is dramatic. The most radical changes are in the crust recipe, so let’s start there.
New never-fail pie crust
The original version of this crust formula is simple and results in an easy-to-assemble pie crust and yields predictable results. This new formula uses almost the same amount of flour, salt, and shortening as the original recipe. I replaced half of the vegetable shortening with unsalted butter, which adds flavor. Also, I have added one common pastry ingredient, sugar, and one not so common ingredient, 80 proof vodka. Yes, VODKA! Okay, let’s talk about the vodka first.
All workable formulas for pie crust contain some brand of all-purpose flour. Depending on the brand you use, this type of flour has a protein content of about 11 percent. Protein is essential to the formation of gluten. When making bread, the formation of a strong gluten network is a definite plus. However, when making a pastry, like pie crust, limiting gluten formation can yield better results. As I explained in my last two bread articles, gluten is formed when two partial proteins (gliadin and glutenin), present in all wheat flours, link together when water is added to the flour. When making pie crust gluten can, if not kept in check, make for a tough pie crust. I first tried to solve this problem by incorporating a portion of cake flour, which contains about half of the protein of all-purpose flour, into my crust formula. The result was a crust that was somewhat dry and had a sandy texture.
My baker friend told me that professional bakers have long understood the need to limit gluten formation when making a pastry crust. The most efficient way to accomplish this is to carefully control the amount of water in the formula. Too much water will yield a tough crust. However, without proper hydration the crust will be dry and difficult to roll. With the amount of flour in my formula he calculated that I would need 9 tablespoons of cold liquid, and suggested that four tablespoons of that liquid be some type of alcohol. His preference was 80 proof vodka. He explained that since 80 proof vodka contains only 60 percent water, the remaining 40 percent is ethanol. Gluten will not form in the presence of alcohol as it does with water. So four tablespoons of vodka added only about 2½ tablespoons of water to the dough, while the total liquid volume remained the same. This small, but significant, reduction in water volume will result in pie dough that is both easy to roll and tender when baked. If you are worried about the alcohol, it vaporizes in the oven during baking.
He told me, “Adding sugar and salt to most baked items is essential to the development of flavor. Also, adding a little lemon zest will add brightness to the finished crust. Sugar also insures proper browning of the crust during baking.” He went on to say, “Mixing the fat with the flour should be done in two stages. The first mix should include all of the fat, and nearly half of the flour blended with the sugar and salt. The remaining flour can be added after the first batch is fully incorporated, and mixed just enough for it to become evenly distributed. Combining the ingredients in this manner creates small pockets of fat that are only coated with flour. These pockets of unincorporated fat melt when the crust is baked, resulting in crisp, flaky layers.”
While working my way through the recipes in my previous bread articles, I discovered that scooping with a measuring cup was an unreliable method for measuring flour. Professional bakers use a balance scale to accurately weigh the principal ingredients of a recipe, including liquids. By applying this wisdom of weighing the flour that I use in my bread recipes, I solved all of my consistency problems with my pie crust.
I usually use my 11-cup food processor to mix pie dough. But, after talking to several neighbors and family members, I realize that some folks prefer a standing mixer fitted with a paddle to perform this task. Still others, like my mom, use a dough cutter to blend the fat with the flour mixture. I made this crust using all three methods with good results. The food processor and standing mixer both produced excellent dough with about the same effort. If you have plenty of time and don’t mind a little hard labor, the dough cutter produces dough very close to one mixed by machine.
When using a food processor or manual dough cutter, the fat must be refrigerator-cold. With the standing mixer the fat should be allowed to come to a cool room temperature. This will prevent the paddle from throwing flour all over your counter. Like any other carefully-crafted recipe, this one requires a little more work and attention to detail than other pie crust formulas. But once you have mastered the technique, I am sure that you will find the extra effort rewarding when your pie comes out of the oven.
New never-fail pie crust
Ingredients:
11½ oz. unbleached all-purpose flour (Note: I use King Arthur all-purpose flour in all of my baking formulas, because I believe it produces the most consistent results.)
1 tsp. table salt
2 Tbsp. light brown sugar
6 oz. chilled vegetable shortening, cut into ½-inch pieces
3 oz. chilled unsalted butter, cut into ¼-inch pieces
½ tsp. grated lemon zest
4 Tbsp. chilled vodka
5 Tbsp. ice water
Method:
1. Combine the flour with the salt and sugar in a large bowl and blend.
2. Transfer 6 ounces of this mixture to a food processor or standing mixer with the paddle attached.
3. Add the chilled shortening and unsalted butter. Process until the dough starts to develop uneven clumps about 15 seconds. The dough will look like large curd cottage cheese and all of the fat will be coated with flour.
4. Scrape the bowl and evenly distribute the dough around the blade or paddle.
5. Add the remaining flour and pulse in short bursts until the ingredients are evenly distributed. This should take only five or six pulses or 15 to 20 seconds at medium speed with the standing mixer.
6. Empty the mixture into a medium bowl. Add the grated lemon zest to chilled vodka and ice water. Sprinkle this mixture over the dough.
7. Using a rubber spatula begin folding the dough and pressing down on the mixture after each fold. Continue folding until the dough sticks together and forms a tacky ball. You will have about 25 ounces of dough.
8. Divide the dough into two balls of equal weight, and flatten each ball into a 4-inch disk. Wrap these disks in plastic wrap and refrigerate them for at least one hour.
The Blunt family’s new favorite apple pie filling
As I said earlier, there are no wonder ingredients in this updated pie filling. I have doubled the amount of apples, added a little lemon zest and one tablespoon of instant tapioca. The only other flavor in this filling is ground cinnamon and white and brown sugar. Sugar performs several tasks in this filling. It works in cooperation with the salt to extract moisture from the apples, boosts the sweetness of the apples, and acts as a binding agent to hold the filling together.
Let’s begin with the problems I discovered in the original formula. The most noticeable problem, with the original pie, was the huge empty space between the crust and the filling after the pie was baked. This was caused by heat extracting water from the apples during baking. The volume of this extracted water is one reason why most two-crusted apple pies only contain about two pounds of apples. In a vain attempt to prevent this liquid from soaking the bottom crust, some form of starch thickener is traditionally added to the filling. I have tried several concoctions like plain gelatin, cornstarch mixed with lemon juice, and a butter/flour roux with limited success. On a couple of occasions I overdid it with these starches and ruined the pie. This approach to thicken the extracted liquid gave the filling a texture that made it taste like it came from a can. It really didn’t do much to solve the soggy bottom crust problem.
I wasn’t sure if there were any satisfactory answers to these problems, so I went back to the baker for advice. His answer to what I thought was a complex problem was simple and to the point. “Double the amount of apples in the pie,” he said. “Then cook the apples over low heat to extract most of the water. The water will be flavored with the brown sugar, lemon zest, and cinnamon. This flavored apple juice can then be drained from the tenderized apples, thickened to the desired consistency and folded back into the cooled apples. You will only need about one cup of this flavored juice to properly stabilize the filling.”
“Why low heat?” I asked.
“Apples naturally contain a generous amount of pectin, a complex carbohydrate that gives them structure. When the apples are cooked at the right temperature, the pectin is converted to a heat-stable form, which will continue to add structure to the apples. If you cook the apples at high temperature this natural pectin loses much of its binding ability, resulting in mushy and overly soft apples. Drain the cooked apples in a large colander and save the juice. If you want a pie with a concentrated apple flavor, discard this juice, cool the apples to room temperature and make your pie.
“Personally,” he added, “I like the subtle flavor boost the added liquid provides, so I put it into the pie.
“Finally, when you preheat the oven, place a large rimmed-cookie sheet on the rack to heat up. When you are ready to bake, set the pie on the hot baking sheet. This simple step quickly liquefies the solid fat in the bottom crust and distributes it evenly between the particles of flour, creating a tight seal that prevents the juice from the apples from seeping and making the bottom crust soggy.”
Since that conversation, I have made at least six versions of this pie, starting with the seasoned, precooked apples and no fortified sauce, followed by three pies using various amounts of tapioca-thickened liquid. Deciding on which one of these pies would become the standard was not easy. You see, I only had two members of the recipe review committee as tasters: my wife Tricia and my daughter Sarah. They are two of the toughest pie critics I know. We were unable to make a final decision until I made two of these versions a second time.
The notes that I make on recipe cards are usually just a few sentences long. Because there are so many comments about this recipe, the notes filled eight index cards. I am confident the procedures I outline here will produce the same results for you as they did for me. Besides the extra time needed to cut the additional two pounds of apples, this pie requires no more effort than the original recipe. Please give it a try. I am sure that you will be satisfied with the results of your efforts. I still love the original version of this pie, but I will admit that this updated version is better.
|
New-age deep-dish apple pie
Ingredients:
2½ lbs. Golden Delicious apples
2 lbs. Cortland or Granny Smith apples
5½ oz. granulated sugar
2 oz. light brown sugar
1 tsp. ground cinnamon
½ tsp. lemon zest
½ tsp. table salt
1 tsp. lemon juice
1 cup extracted apple juice (This is the juice you’ll be creating when you’re cooking the apples.)
1 Tbsp. instant tapioca, ground to a powder in a spice grinder or coffee mill
1 large egg, lightly beaten with 2 tsp. of cold water (which will be used when assembling the pie)
Method:
1. Peel and core the apples, then cut them into ¼-inch slices.
2. In a large bowl combine the apples, granulated sugar, brown sugar, cinnamon, lemon zest, and table salt. Gently toss this mixture with the apples.
3. Place the apples in a large Dutch oven, cover and cook the apples over medium heat, stirring frequently, until the apples are just tender and still hold their shape. This will take about 15 to 20 minutes. The juice being extracted from the apples should be maintained at a gentle simmer. Adjust the heat up or down as necessary.
4. Transfer the apples and juice to a large rimmed cookie sheet and cool to room temperature. This will take about 30 minutes.
5. While the apples are cooling, heat the oven to 425º F and place an aluminum foil-covered rimmed cookie sheet on the middle rack.
6. Drain the juice from the apples through a large colander set over a large bowl. Gently shake the colander to extract as much juice as possible. (This will be your “extracted apple juice” listed in the ingredients.)
7. If you haven’t done it already, grind the instant tapioca to a fine powder in a spice grinder or coffee grinder used for this purpose.
8. Combine one cup of the extracted apple juice and the lemon juice with the instant tapioca in a small sauce pan and mix well. Bring this mixture to a simmer while stirring constantly until the mixture thickens, about two to three minutes after it starts to simmer.
9. Cool this mixture for about five minutes and gently mix with the cooled apples.
Assembling and baking the pie
Let’s put this pie together and bake it to find out if all this new-age science works.
1. Reduce the oven heat to 400º F.
2. Remove one of the chilled dough disks from the refrigerator, place it on a generously-floured work surface, and roll it into a 12-inch circle.
3. Gently drape the rolled dough on the rolling pin and transfer it to a nine-inch pie plate. Position the dough so that there is a one-inch overhang around the edge.
4. Working around the circumference of the dough, gently press the dough into the bottom contour of the plate. Then put the dough-lined pie plate in the refrigerator for at least 20 minutes.
5. After 20 minutes, remove the pie plate from the refrigerator and transfer the cooled apple mixture to the pie plate. Return the filled pie to the refrigerator to keep cool.
6. Remove the second disk of dough from the refrigerator and roll into a 10-inch circle on a floured work surface. Remove the filled pie from the refrigerator and transfer the rolled dough disk to the pie, leaving an even one-inch overhang around the plate. Pinch the edges of the top and bottom crusts firmly together to seal the pie. Trim away excess dough with a sharp knife. Cut four or five two-inch slits in the top of the pie with the same knife for vents.
7. Brush the entire surface of the pie with the beaten egg/water mixture.
8. Set the pie on the preheated cookie sheet and bake until the crust starts to brown about 30 minutes.
9. Reduce the oven temperature to 375º F and continue baking until the pie is golden brown and the filling is bubbling about 25 to 30 minutes.
10. Remove the baked pie from the oven, place it on a wire rack, and cool it for at least two hours.
Please give this apple pie a try, but don’t abandon your old standard recipe, if you have one. As my son, Jason, says, “Apple pie is the best and it is almost impossible to make a bad one.”







Outstanding article.
I just sprinkle flour over the bottom crust before adding sliced apples. It thickens any apple juice that seeps out with baking.
I made the apple pie. Took me all day but it was so worth it! the crust was excellent. The inside just perfect. Being sugar conscious i added only the cooked down apple juice. It was sweet and syrupy. To replace the brown sugar flavor added tbsp of black strap mollases. Yum pie was sweet enough . Thank you for doing all of the research. The vodka replacing some water really made it flaky. Can’t wait to do another!!