 |
|
| Issue #62 • March/April, 2000 |
If you are prudish, narrow-minded or puritanical, read no further as this article may offend you. If, however, you enjoy a good laugh and can tolerate some earthy humor straight from the garden, read on.
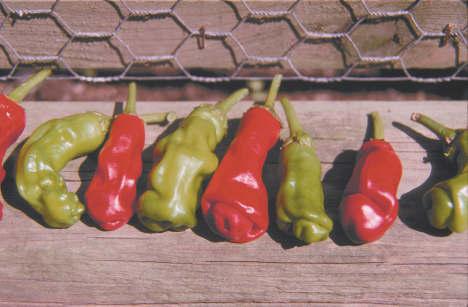
For many years some of us have been cultivating a pepper known simply as the Peter Pepper. No fancy title. No one ever calls it anything else. Its appearance says it all. Like many heirloom plants, Peter Peppers seem to have survived by their seeds being passed around among gardeners. If Nature dealt you a bad hand and your crop failed, you had to start from scratch and inquire as to who might have seeds to share. You had to be discreet in your quest, as some gardeners, particularly those of excessively high moral standards and without much sense of humor, took a dim view of someone hunting Peter Pepper seeds. Now the seeds are available from the company listed at the end of this story and customers may place orders without having to upset any prissy people. (I hope the company is ready for the onslaught of orders that are bound to come in.)

When you can get past the guffaws, titters, and remarks from visitors viewing your Peter Pepper patch, you can explain that the Peter Pepper is one of the best hot peppers to have around. It is not so hot that it is like consuming fire and it is not so mild that you wish it had more zip. It is just right to add flavor to anything in which you’d ordinarily use some hot pepper. Finely chop one of these peppers in a pot of beans, peas, gumbo, chili, etc., and watch the diners liven up.
Peter Peppers are not hard to grow. If you can raise hot peppers of any kind, you can raise these. The best growing conditions involve a sunny spot in the garden, moderately rich soil and the same amount of water you’d give any other pepper plant when drought threatens.
Plants may be started indoors during February and transferred to the garden after the soil warms up. Using a sterilized potting soil, start the seeds in a seed starter with controlled temperature of about 70°F. The sterilized soil will prevent small seedlings from falling prey to damping-off. This is the condition wherein seedlings wilt just after emerging from the soil and is caused by fungi living in the soil. If you do not have a seed starter, plant your seeds in a plastic or clay pot in a sunny window making sure that the container is kept reasonably moist.
Canned, sliced Peter Peppers
There are a lot of recipes around calling for Jalapeno pepper rings. Try substituting Peter Pepper rings from your own pantry.
1. Gather fresh Peter Peppers, rinse with cold water and slice crosswise into 1/8 to ¼-inch rings. (It is not necessary to remove seeds.)
2. Mix enough lime water solution to cover amount of peppers you have. Solution is mixture of ¼ cup powdered lime to 1 quart cold water. (Always use stainless steel or porcelain vesselsnever aluminum.) Stir occasionally as lime does not completely dissolve and has a tendency to settle. Soak for 3 hours.
3. Rinse thoroughly to remove lime. Soak in clear water for 30 minutes. Drain in colander to remove as much water as possible.
4. Put peppers in a stainless steel or porcelain pot and cover with apple cider vinegar and a sprinkle of salt. Bring to a boil long enough to thoroughly heat peppers. Pack pepper rings into sterilized half pint or pint jars, cover with hot vinegar solution, and seal. Let jars sit covered with a kitchen towel in a place free from drafts until you can no longer hear seals pop in place. Check to be sure all jars have sealed before storing in pantry. Any unsealed jars may be refrigerated or returned to stove to re-heat and given another try.
When seedlings have developed 3-4 small leaves and are about 1-2 inches tall, transfer them to peat pots still using the sterilized potting soil. Water them with a good organic plant food and wait until weather conditions are suitable before transferring them to their permanent spot in the garden. These are warm weather plants. Don’t plant early in the season.
Peat pots are becoming increasingly costly, but they do have the advantage of being biodegradable so that plantspots and allmay be put in the ground. Cheaper pots, however, may be often found on sale in the form of packets of 6.4-oz., styrofoam cups (coffee cups). Just punch a small hole in the bottom for drainage and proceed as with the peat pots. Plants will have to be removed from the cups as carefully as possible to avoid root damage, but any gardener worth his keep can do it. A fringe benefit to the cups is the fact that, unless you crush them, you can rinse them out thoroughly and stack them back to use again.
It’s important to avoid sunscald when exposing young plants of any kind to the garden environment. This is the condition that occurs when transplants leave the protection of indoors and move directly to the garden. Leaves actually look like they have been scalded and often the plants don’t recover. The best way to avoid problems is to set trays of plants outside daily for a couple of hours in a sunny spot protected from wind. Over a period of several days gradually increase the exposure time and, chances are, you won’t have one sunscald victim when the plants move to their permanent places.
Peter Peppers thrive in a sandy loam soil with pH factor of 6.0-6.5. It’s best if soil is not extremely rich, as rich soil tends to produce more foliage than peppers. Peppers need moisture, but will not do well under boggy conditions. When summer’s drought threatens, it’s well to apply a good organic mulch of grass clippings, leaves, etc., to help conserve moisture. (Avoid using anything with seeds, as you’ll be doing yourself no favors.)
If you want beautiful plants loaded down with peppers, space these plants about 15 inches apart in rows about 3 feet apart. (Two rows are sufficient in 4 x 8 foot raised beds.) This spacing makes it easy to move among mature plants without fear of breaking limbs, as pepper plants of any kind have brittle limbs. Plants should be set deep enough to allow at least an inch of soil above peat pots as the pots will “wick off” moisture if left exposed above ground. Also, proper planting will help the plants to develop good root anchorage and they’re not likely to topple over after heavy showers.
Peter Peppers-dehydrated
Use only clean, fresh peppers for dehydrating. Cut peppers crosswise into thin 1/8-inch rings, placing them side by side on drying trays of dehydrator. We use an electric dehydrator as it maintains a constant temperature, but we hear some folks have good luck with a low temperature oven. Set temperature at 130° F. and leave peppers to dehydrate for several hours.
When pepper rings have reached a crisp stage, they may be pulverized in an electric blender, seeds and all. Store pepper powder in small clean jars. Be sure the jars are tightly sealed and labeled. If the dehydrated Peter Peppers were mainly red ones, the resulting powder will look like paprika. Unlabeled jars can lead to a hot time in the old town tonight.
After transplanting be sure to water plants well to settle the earth and remove any air pockets.
I like to use tomato cages around all pepper plants to help support limbs when they are heavy with peppers, and I prefer putting these out at the same time that I transplant. Plants grow up into the cages eliminating the need for stakes and tying. Mature Peter Pepper plants are usually about 2 feet tall with peppers 4-5 inches long.
Hot peppers seem to be less vulnerable to diseases than bell peppers. I have never lost a Peter Pepper or any other hot pepper to a virus, whereas various viruses and wilts will sometimes play havoc with sweet peppers.
When harvesting, it’s best to cut the pepper stems with a sharp knife or clippers, as pulling them loose will often cause limbs or blossoms to break off. In the kitchen it is a good idea to protect one’s hands in some way while cutting or chopping peppers. Hot peppers contain a concentrated irritant called capsaicin which has brought misery into the lives of many pepper handlers. Plastic gloves are helpful, and if those aren’t available try protecting your “holding” hand with a pint size plastic freezer bag. Whatever you do, try
to avoid touching the cut part of
the pepper.
Peter Peppers may be used in the same ways as other hot peppers. Try canning them to use on nachos. Use them in casseroles, soups, gravies, etc. (see recipes). They have a high concentration of Vitamin C. If you are plagued with sinus trouble, try eating some chopped fresh Peter Peppers in your beans, rice, etc. If they don’t cure the trouble, they’ll certainly take your mind off of it! A seed source is Totally Tomatoes, P.O. Box 1626, Augusta, GA 30903-1626.


