 |
|
| Issue #63 • May/June, 2000 |
Drying of food as a means of preservation has been around for a long time. Populations in suitably dry climates all around the globe have dried meat, fish, fruit, and vegetables in times of plenty as a way to provide for the leaner months of the year. My grandmother used to tell us of when she was a child, helping to spread apple slices on the top of a tin-shed roof for drying. An aunt once described stringing fresh young bean pods on a long heavy thread and hanging them to dry, coming up with what they called leather-britches beans. Obviously, these were simple and imperfect food drying systems, but they do show ways in which food can be dried at home.
Essentially, dehydration of food removes the moisture that provides the environment conducive to the growth of bacteria. Removal of the moisture results in a product that can be stored for months or even years. Fortunately, for those of us in the less arid climates, methods exist which enable us to dry suitable quantities of foods at home without having to spread the food out on our rooftops. In fact, a really good food dehydrator can be made easily.
For the past few years, some round plastic food dehydrators have been available at retail outlets, by mail order, and from “infomercials” on TV. These units introduced many people to food drying. The ones I examined, however, were too lightly constructed to stand up to many years of regular and heavy use. They also lacked the capacity to do much in the way of drying a large quantity of food.
Other commercially available dehydrators that I have seen used were large, high quality units. These models were mounted on rollers and resembled a portable dishwasher in size. These units could dry a considerable quantity of food at a time and were being put to heavy use by the family who owned the two of them. They were also way too expensive for me.
When I decided to begin food drying, I did so after visiting with the folks using the floor model dehydrators described above. These friends showed me containers of dried, diced carrots, onion slices, apples, and other fruits and vegetables. What impressed me the most about this method of preservation was the amount of space that was saved by drying the foods. For example, a five-gallon bucketful of carrots could be sliced, steamed, and dried and made to take up the space of a shoebox. Half of a five-gallon bucket of apples, when sliced and dried, fit nicely in a gallon-sized freezer bag.
Since building our own dehydrator, we have dried jerky, apples, strawberries, carrots, onions, green beans, bananas, fruit leathers, and several other fruits and vegetables. Some of these were experiments, but we use the dryer each year to put up several bushels of sliced apples. These treats make a healthful and tasty alternative to junk snack food for the whole family, much better to munch on than potato chips.
Below are instructions for building a food dryer similar to ours. Use your imagination, intuition, and abilities when building your own. Use what you have or what you can obtain easily and cheaply in the way of materials. Make your food dryer to suit your own circumstances. It might be nearly identical to the one described or a vastly improved version.

The dryer cabinet and the polycarbonate trays
For our dehydrator, I began by purchasing the light polycarbonate trays. I then designed and built the dryer cabinet around them. After considering various materials for constructing the trays from scratch, and after studying the effects of these materials on some foods, I decided the trays were what were needed. The acids in some foods may react unfavorably with certain metals such as aluminum screen. Wood, as used in dowel rod-type trays may absorb food tastes and odors. Fiberglass screen can leave minute fiberglass splinters sticking to the dried food. Galvanized screen is out, due to its zinc-based coating reacting with foods. One material which I have not tried, and which may warrant experimentation, is nylon screening. If stretched tightly on light wooden frames, this material might be durable enough to withstand repeated use. I do not know of any health problems posed by the use of the material on dryer trays. The trays that we used were simply better than any alternative that I could come up with at the time.
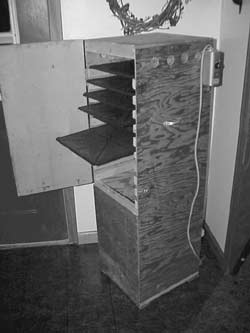
Whatever the size or material of your trays, design the cabinet size around them allowing for sufficient room below for the heat element and room to easily fit the trays within. I am providing the measurements below to serve only as a guide for your own construction process, because the type and size of trays that you come up with may vary from that which I devised. Our dryer measures 48″ tall by 14¾” wide by 16″ deep. The trays themselves measure 13¾” square. A slightly different size tray is available from Excalibur Dehydrators, listed at the end of this article.
In the accompanying photographs and drawing you can see some of the construction details of our dryer. I made the base of heavy one-inch particle board because that is what I had. Quarter-inch plywood made up the sides and top of the cabinet. I ripped 1 x 2s for the framing in the cabinet and for the rails which support the drying trays.
Ordinary screen wire covers the six x six-inch fan opening. Holes cut near the top of each side are covered on the inside with strips of screen and allow moisture and air to escape.
If you do not have one, a wide variety of suitable fan and motor assemblies are available from: W.W. Grainger Distribution Group, 1901 Plantside Drive, Louisville, KY 40299. Request one of their catalogs. This is an electrical supply wholesaler. You may have to have a retailer order this unit for you. Order fan-motor assembly #7C7-27. The cost was under $20. Just remember to use a relatively small fan (about four inches in diameter) to move the air rather slowly through the dryer. You want the fan to ventilate the box and move the heated air throughout, but not to cool the food on the trays.
![The 600-watt ceramic heat coil [Top] screws into an ordinary porcelain lamp base. [Bottom]](/articles/../articles/images/sanders63-3.jpg)
The 600-watt ceramic heat coil [Top] screws into an ordinary porcelain lamp base. [Bottom]
The heat source is a ceramic heat coil screwed into a regular porcelain lamp base. The lamp fixture is secured to the base and either wired directly to a three-prong plug or through a thermostat. The coil was purchased from a local hardware store and is rated at 600 watts. The cost was less than $5. The lamp base cost about a dollar.
Although it isn’t absolutely necessary, I added a thermostat assembly that I had scrounged up. This addition helped to cut down on tending and tray rotation. The thermostat easily handles the appropriate 100°-150°F temperature range. If you purchase a thermostat, specify a fairly narrow temperature spread for the on-off cycle.
Old unmatched hinges for the door and hooks and eyes for the closures were scrounged from the workshop.
Dried apples
Since dried apples are so popular at our house, I will give you the simple directions for drying them as an example of how simple it is to dry foods. First, I use one of the clamp-on slicers that core, slice, and peel the apples in one operation. It takes about three to five seconds to do one apple with one of these peelers. I have looked over several models and prefer the one I purchased from Back To Basics Products, listed at the end of the article. With this peeler, a simple knife cut is all that is needed to produce a handful of neatly prepared apple rings. By the way, you can save the peelings and cores and make a nice batch of apple jelly from them later.
As I peel the fruit, I place the rings in a bowl containing a solution made from about a half-cup or so of lemon juice and about two to four cups water. This acid bath prevents the apples from turning brown as they dry. I have also heard of some folks dipping the apple rings in plain 7-Up or Sprite for the same purpose.
After dipping the apples, I drain them in a plastic colander and arrange them on the dryer trays. Let them dry to a chewy leathery consistency and they are ready to store. We have found that the 10 trays full of freshly dried apples fills up a one-gallon zip-top plastic bag. After bagging, they are stored in the freezer. They make great snacks for work, camping, hiking, or TV-munching. They make a really good apple pie as well.
Vegetables are similarly easy to dry, usually requiring a simple steaming prior to going into the dryer. My wife has also used the dryer to dry sprays of flowers such as baby’s breath, statice, and globe amaranth for use in dried bouquets and wreaths. It worked quite well for that, too, as she prepared those items for sale. Herbs can also be dried in the dehydrator.
For more information
- Making the Best of Basics by James Stevens. Great section devoted to food drying. Available from BHM.
- W. W. Grainger, Inc. Visit their website at www.grainger.com to browse their online catalog. Or write them at 100 Grainger Pkwy., Lake Forest, IL 60045.
- Excalibur Food Dryers, 6083 Power Inn Rd., Sacramento, CA 95824. Tel.: 916-381-4254. They make high quality food dehydrators and trays.
- Back To Basics Products, 11660 S. State St., Draper, UT 84020. Website: www.backtobasicsproducts.com.


Have you made any Jerky with this unit?
Great article!
Where did you find your favorite polycarbonate trays?
i’ve looked for 3 hours and finally found your very helpful article
. i plan to raise moringa tea and would need to dehydrate the leaves, how big would it be feasible to build one that would still work without problems of the humidity. and circulation?